
Is Your Parking Lot Drowning? Here’s Why You Need to Install French Drains in Your Lot
The best time to install French drains in your lot was before the water damage started. The second best time is right now.
Quick answer — how to install a French drain in a parking lot:
- Plan your route — identify where water pools and map a path to a safe outlet
- Call 811 — have underground utilities marked before any digging
- Dig the trench — 18 to 24 inches deep with a minimum 1% slope (1 inch drop per 8 feet)
- Line with geotextile fabric — non-woven fabric keeps soil out of the gravel
- Add a gravel base — use clean washed stone, roughly 3 inches deep
- Lay perforated pipe — holes facing down, connected to a solid outlet pipe
- Backfill with gravel — cover the pipe, then fold the fabric over in a “burrito” wrap
- Compact and finish — restore the surface and verify water flows to the outlet
If you manage a commercial property in the DFW Metroplex, you already know what standing water costs you. It softens asphalt. It erodes the subgrade beneath your pavement. It creates liability hazards for anyone crossing your lot.
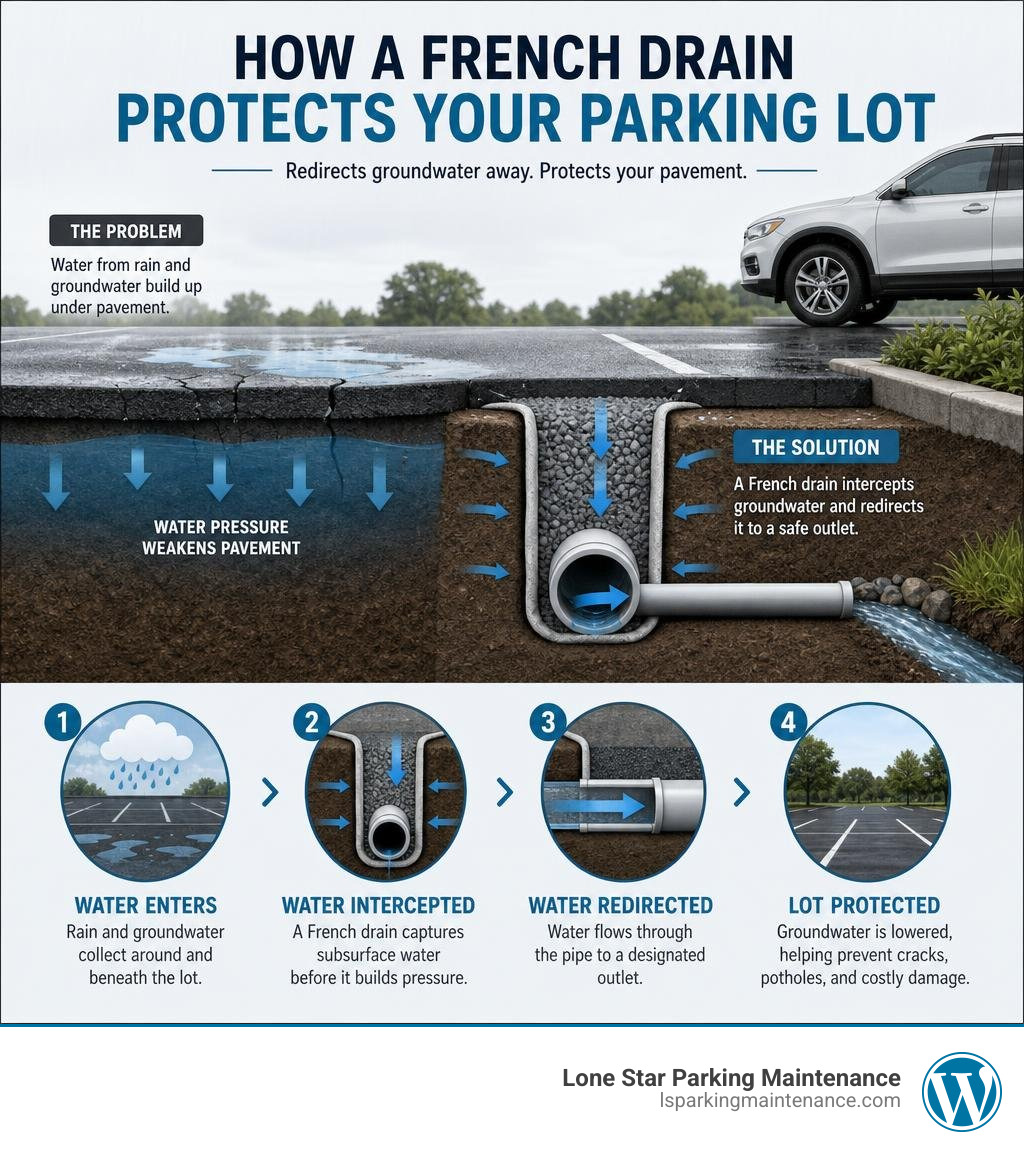
And unlike a simple surface drainage fix, the water you can’t see is often the most destructive. Groundwater and subsurface moisture build up hydrostatic pressure under your pavement — silently weakening it from below until cracks, heaving, and potholes appear.
A properly installed French drain intercepts that water before it causes damage — redirecting it away from your pavement through a simple but highly effective system of pipe, gravel, and filter fabric.
Done right, a French drain lasts 20 to 30 years or more. Done wrong, it fails within three to five years — and you’re back to square one.
This guide walks you through everything you need to know to get it right.
Important install French drains lot terms:
Why and When You Should Install French Drains Lot Systems
When water pools on top of your asphalt, it is highly visible. However, the water hiding just beneath the surface is often the real culprit behind premature pavement failure. In the DFW Metroplex, our infamous “black gumbo” clay soils act like a giant sponge. They expand aggressively when wet and shrink when dry. This constant movement wreaks havoc on parking lot subgrades.
If groundwater is allowed to saturate the soil beneath your asphalt, it destroys the load-bearing capacity of the subgrade. When heavy vehicles drive over these soft, saturated spots, the asphalt flexes beyond its limits. This leads to alligator cracking, deep potholes, and sunken pavement sections.
To prevent this costly cycle of damage, you must mitigate subsurface water. A French drain acts as an underground interceptor. It relieves hydrostatic pressure by giving groundwater an easy path of least resistance. Instead of pushing upward against your pavement or foundation, the rising water seeps into the gravel trench, enters the perforated pipe, and flows safely away.
If you notice persistent soggy turf adjacent to your parking lot, water seeping up through asphalt cracks days after a storm, or recurring pavement failure along the edges of your lot, it is time to look into professional parking lot drainage solutions.
French Drains vs. Catch Basins
A common source of confusion for property managers is choosing between a French drain and a standard catch basin. While both are essential tools for commercial water management, they serve entirely different purposes.
- Catch Basins: These systems are designed to capture high volumes of surface runoff quickly. They feature a grated top that sits flush with the pavement surface, collecting rainwater from storms and routing it directly into a solid storm sewer pipe.
- French Drains: These are subsurface systems designed to manage groundwater. Instead of catching surface water before it hits the ground, a French drain collects water that has already soaked into the earth, preventing it from saturating the pavement’s subgrade.
To help you choose the right system for your property, here is a quick comparison:
| Feature | French Drain | Catch Basin |
|---|---|---|
| Primary Target | Subsurface groundwater and saturated soil | Surface runoff and rapid stormwater |
| How It Collects Water | Perforated pipe surrounded by open gravel | Open metal grate at a low point in the pavement |
| Best For | Soggy lot borders, foundation protection, subgrade preservation | Low spots in asphalt, heavy downpour management |
| Visual Footprint | Often hidden under gravel, turf, or permeable stone | Highly visible metal grates embedded in concrete or asphalt |
In many commercial lots, the ideal setup involves a combination of both. For instance, you might use catch basins to clear the main drive lanes while utilizing a French drain along the perimeter to intercept runoff from neighboring sloped properties. Understanding how these systems work together is key to maintaining your parking lot storm drain infrastructure.
Essential Materials and Tools for Commercial Drainage
When you prepare to install French drains in your lot, using residential-grade materials is a recipe for quick failure. Commercial lots experience heavy loads from delivery trucks, garbage haulers, and high-volume traffic. The materials you bury must be engineered to withstand this continuous stress.

- The Pipe: Avoid cheap, thin-walled corrugated HDPE black piping. While easy to bend, corrugated pipe is highly susceptible to crushing under heavy loads and is incredibly difficult to clean out with a mechanical snake or hydro-jetter later. Instead, opt for rigid PVC pipe (SDR 35 or Schedule 40). Ensure you use perforated PVC with pre-drilled holes designed for drainage.
- The Gravel: Do not use crushed concrete or stone that contains “fines” (dust and small particles). Over time, these fine particles wash down and clog the system. Instead, use 1/2-inch to 1-inch washed round gravel or clear crushed stone. This type of stone naturally maintains a 40% to 45% void space, allowing water to flow freely.
- The Fabric: Never use standard woven landscape fabric. It clogs quickly when exposed to fine clay soils, rendering your drain useless. You must use a high-quality, non-woven geotextile filter fabric. This fabric acts as a high-performance filter, allowing water to pass through while keeping fine silt and clay out of your gravel envelope.
For a comprehensive look at how these materials function together in a trench, you can review this classic DIY French Drain Guide.
How to Plan and Design to Install French Drains Lot Routes
A successful drainage project starts long before the first shovel touches the dirt. In commercial settings, a poorly routed drain can cause structural damage or lead to legal issues with neighboring properties.
- Calculate the Slope: Gravity is the engine of a French drain. Your trench must have a continuous downward slope toward the discharge point. The industry standard is a minimum 1% slope, which translates to a 1-inch drop for every 8 feet of run (or roughly 6 inches of fall for a 50-foot run). Skipping this calculation or “eyeballing” the slope is the number one reason French drains fail.
- Call 811 (Texas 811): This is not optional. In the DFW Metroplex, commercial properties are packed with underground utilities, including gas lines, high-voltage electrical conduits, fiber-optic cables, and irrigation lines. Always call 811 at least 48 business hours before digging to have all utility lines clearly marked.
- Establish a Safe Outlet: Where will the water go? You cannot simply dump water onto a public sidewalk or a neighbor’s property. Safe discharge options include:
- Daylighting the pipe on a natural slope away from structures.
- Connecting directly to an approved municipal storm sewer system (requires local permits).
- Routing the drain into a commercial dry well or retention basin where the water can safely percolate back into the deeper soil layers.
For advanced engineering calculations and sizing guidelines based on your specific lot size, check out this comprehensive French Drain Installation Guide.
Step-by-Step Installation Process
Once the planning is complete, the physical installation begins. Because commercial properties require deep, wide trenches to handle large volumes of water, renting heavy machinery like a walk-behind or ride-on trencher or a mini-excavator is highly recommended to save time and manual labor.
Step-by-Step Guide to Install French Drains Lot Projects
To ensure your drainage system stands the test of time, follow these precise construction steps:
- Mark the Route: Use bright landscape spray paint to outline the exact path of the trench. Double-check that the route runs parallel to your pavement edges and stays at least 3 feet away from building foundations or retaining walls.
- Excavate the Trench: Dig the trench to a minimum depth of 18 to 24 inches. For commercial applications, the trench should be at least 12 inches wide to accommodate a 4-inch rigid PVC pipe and plenty of surrounding gravel.
- Verify the Grade: Use a laser level or a tight string line with a line level to verify that your trench maintains a consistent 1% slope from the highest point (the water source) to the lowest point (the outlet).
- Line with Geotextile Fabric: Lay your non-woven geotextile fabric inside the trench. Ensure the fabric is wide enough to line the bottom and sides of the trench, leaving at least 10 to 12 inches of excess fabric draping over the sides. This excess will be used to wrap the top of the system later.
- Add the Gravel Bedding: Pour a 3-inch layer of washed round gravel along the bottom of the fabric-lined trench. This bedding layer supports the pipe and allows water to flow underneath it.
- Place the Perforated Pipe: Lay your rigid PVC pipe onto the gravel bed. CRITICAL STEP: Ensure the perforations (holes) in the pipe face downward (typically at the 4 o’clock and 8 o’clock positions). Placing the holes facing up is a common mistake; water must rise from the bottom of the trench into the pipe to be carried away efficiently.
- Backfill with Gravel: Pour additional washed gravel into the trench, covering the pipe completely. Fill the trench until the gravel is within 4 to 6 inches of the ground surface.
- The “Burrito” Fold: Grab the excess geotextile fabric draped over the trench sides and fold it over the top of the gravel, overlapping the edges by at least 4 to 6 inches. This creates a fully sealed gravel envelope that prevents surrounding soil from ever entering your clean drainage stone.
- Final Backfill and Compaction: Cover the wrapped fabric with topsoil, sand, or permeable decorative stone. If the drain is located along a turf border, add topsoil and sod. Use a plate compactor to lightly settle the backfill, mounding it slightly above grade to account for natural settling over the first few rains.
For a highly detailed breakdown of this structural process, you can refer to this professional engineering guide on How to Install a French Drain.
Frequently Asked Questions about Lot Drainage
Maintaining a healthy parking lot requires ongoing vigilance. To help you protect your investment, we have compiled some of the most common questions property owners ask us about commercial drainage systems.
For more insights on keeping your pavement dry and structurally sound, explore our guide on how to stop the soak in your parking lot.
How long does a commercial French drain last?
When designed and installed correctly, a commercial French drain can easily last 20 to 30 years or more.
The lifespan of the system depends heavily on the quality of the materials used. Using high-quality, non-woven geotextile fabric to wrap the gravel envelope prevents clay and silt from clogging the system. Using rigid, heavy-duty PVC instead of cheap corrugated piping ensures the pipe will not crush under the weight of commercial vehicles or lawn maintenance equipment over time.
How much does it cost to install a French drain on a lot?
For commercial properties, French drain installation typically costs between $25 and $70 per linear foot.
The total cost of your project will depend on several variables:
- Depth and Width: Deeper trenches require more excavation and more gravel backfill.
- Surface Material: Cutting through existing asphalt or concrete to lay a drain is more labor-intensive and expensive than digging through a grassy perimeter.
- Equipment Needs: Large-scale commercial lots often require heavy excavators and trenchers, which increases mobilization costs.
While a professional installation is a significant upfront investment, it is highly cost-effective compared to the tens of thousands of dollars required to reconstruct a parking lot subgrade that has failed due to water saturation.
What are the most common French drain installation mistakes?
Over our years of maintaining parking facilities in the DFW area, we have seen many DIY and low-bid drainage projects fail prematurely. The most common mistakes include:
- Insufficient Slope: If the trench is flat or slopes uphill, water will pool in the pipe, leading to stagnant water, soil saturation, and system failure.
- Using the Wrong Fabric: Using cheap, woven weed-barrier landscape fabric instead of industrial non-woven geotextile fabric. Woven fabric quickly clogs with fine clay, stopping water from entering the drain.
- Routing Downspouts Directly into the Drain: Commercial roof downspouts carry massive volumes of water and debris (like leaf litter and shingle grit). Routing them directly into a perforated French drain will quickly overwhelm the system and clog the gravel envelope. Downspouts should always be routed through separate, solid PVC pipes.
- Placing Pipe Holes Facing Up: Installing the perforated pipe with the holes facing upward prevents the system from capturing groundwater until the entire trench is already completely flooded.
Conclusion
Water is the single greatest threat to the lifespan of your asphalt. Leaving subsurface water issues unaddressed guarantees costly structural damage, shifting subgrades, and premature pavement failure.
By taking the time to install French drains in your lot, you are directly protecting your pavement subgrade, reducing liability risks, and extending the life of your asphalt by decades.
At Lone Star Parking Maintenance, we help property managers throughout the DFW Metroplex protect their properties from water damage. From professional pavement sealing and crack repair to comprehensive facility maintenance, we use top-quality materials and industry-best practices to keep your lot safe, clean, and dry.
Ready to protect your pavement investment? Get a professional drainage consultation with Lone Star Parking Maintenance today!