
Why Proper Wheel Stop Installation Protects Your Parking Lot and Your Bottom Line
Wheel stop installation is the process of anchoring parking blocks to asphalt, concrete, or gravel surfaces to prevent vehicles from rolling too far forward into walls, pedestrian walkways, landscaping, or accessible routes.
Here is a quick overview of how it works:
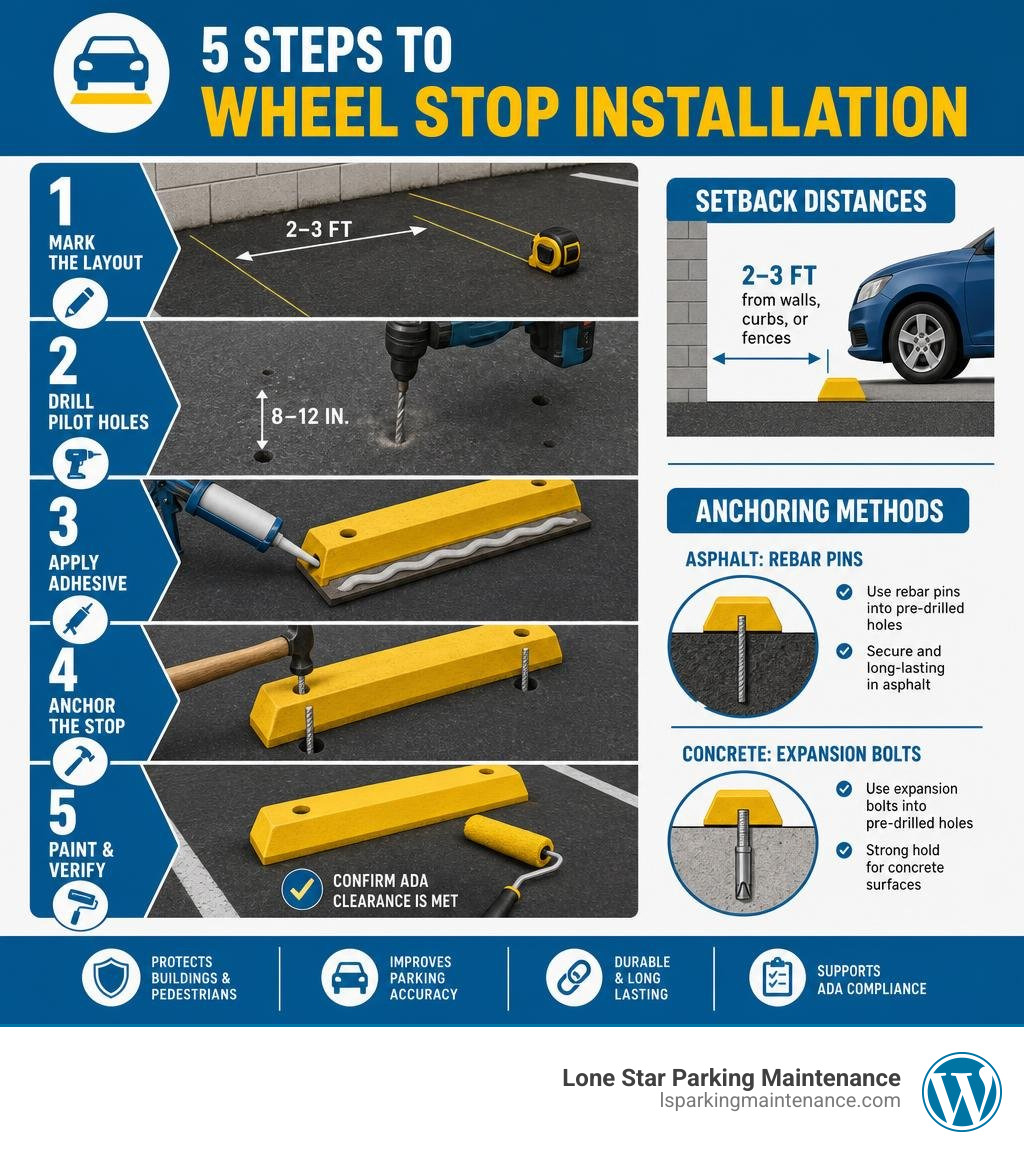
- Mark the layout — position each stop 2 to 3 feet back from walls, curbs, or fences
- Drill pilot holes — 8 to 12 inches deep for asphalt, shallower for concrete
- Apply adhesive — spread epoxy or construction adhesive along the base of the stop
- Anchor the stop — drive rebar pins or expansion bolts through the pre-drilled holes
- Paint and verify — apply reflective yellow paint and confirm ADA clearance is met
If you manage a parking lot in the DFW Metroplex, wheel stops do more than just guide drivers into their spots. They protect your building, your landscaping, and — critically — your pedestrians. One misplaced stop near an accessible aisle can trigger a $4,000 minimum civil penalty under the Unruh Civil Rights Act in California, and similar ADA liability risks apply across the country.
The good news? Installation is straightforward when you follow the right steps and use the correct anchoring method for your surface type.
Understanding Wheel Stops: Materials, Dimensions, and Lifespans
Choosing the right material for your parking lot is the first crucial step in any wheel stop installation project. The three most common materials are precast concrete, recycled rubber, and plastic. Each material has distinct characteristics, weights, and lifespans that make it suitable for different applications.
| Material | Average Weight | Standard Lifespan | Best Surface Applications | Key Advantage |
|---|---|---|---|---|
| Precast Concrete | 220 – 500 lbs | 20 – 30 Years | Asphalt, Concrete | Maximum durability, heavy-duty resistance |
| Recycled Rubber | 35 lbs | 5 – 10 Years | Asphalt, Concrete, Gravel | Flexible, easy single-person install, won’t chip |
| Recycled Plastic | 22 lbs (10 kg) | 5 – 10 Years | Concrete, Asphalt | Lightweight, chemical resistant, vibrant colors |
When selecting a material, you must also consider the vehicle track width. Standard passenger vehicles require a wheel stop that spans at least 6 feet (approximately 1650mm to 1800mm) to ensure both front wheels make contact simultaneously. Selecting the wrong size can cause vehicles to misalign or bypass the barrier entirely.
To explore how these heavy-duty barriers keep traffic in check, read our detailed guide on Precast Concrete Wheel Stoppers.
Concrete Wheel Stops
For commercial properties experiencing heavy, continuous traffic, concrete remains the industry gold standard. High-quality concrete wheel stops are manufactured with a compressive strength of 5,500 to 8,000 PSI. To prevent cracking under intense impact, they are reinforced internally with a double-spine of #3 rebar and advanced FiberLock synthetic reinforcement.
Concrete stops generally come in two sizes:
- Passenger Vehicle Stops: These are typically 6 feet long, 5.5 inches tall, and weigh between 220 and 233 lbs.
- Tractor-Trailer Stops: Designed for industrial hubs, these massive blocks are 8 feet long, 9 to 12 inches high, and weigh up to 500 lbs.
In the hot, dry climate of the DFW Metroplex, concrete stops are incredibly resilient, lasting 20 to 30 years with minimal maintenance. For more tips on keeping your paved surfaces in peak condition, check out our resources on More about concrete and asphalt maintenance.
Rubber and Recycled Plastic Wheel Stops
If you are looking for a lightweight, highly visible alternative, rubber or plastic may be your best bet. Made from 100% recycled tire rubber, rubber wheel stops weigh a manageable 35 lbs. Because rubber is naturally flexible, these stops can mold to uneven pavement surfaces, making them highly effective on older asphalt or slightly warped concrete. They also feature molded, embedded reflective tape (usually in safety yellow or white) to ensure high visibility at night.
Recycled plastic wheel stops are even lighter, weighing in at just 10kg (around 22 lbs). This ultra-lightweight design allows for a seamless, single-person installation without any specialized lifting equipment or slings. While rubber and plastic stops are incredibly easy to install, they do have a shorter lifespan of 5 to 10 years, as thermal expansion and UV exposure will eventually degrade the polymers.
Placement Standards and Regulatory Compliance
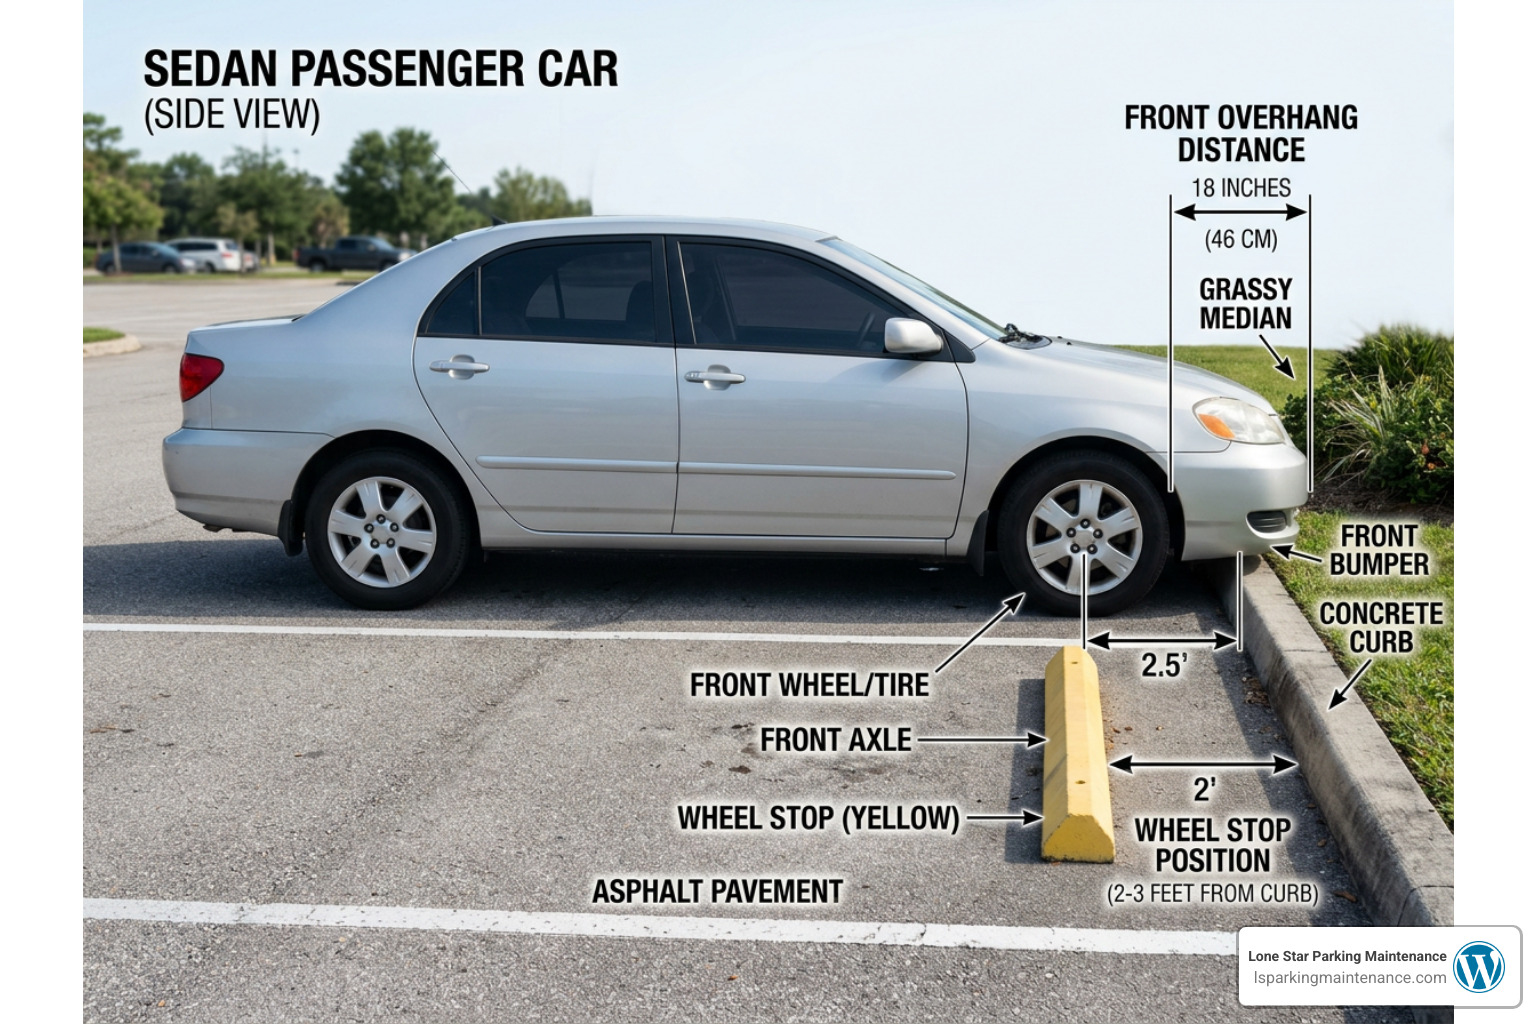
Proper placement is just as important as choosing the right material. If you place a wheel stop too close to a curb or wall, a vehicle’s front bumper overhang will collide with the obstacle, defeating the purpose of the stop. If you place it too far back, the vehicle will stick out into the driving lane, creating a collision hazard.
Standard passenger vehicles have an average front overhang of 2 to 3 feet, while larger SUVs, vans, and pickup trucks can overhang by 3 to 4 feet. Because of this, standard placement guidelines require wheel stops to be anchored exactly 2 to 3 feet from the adjacent wall, fence, or curb. If your facility serves a high volume of heavy trucks or SUVs, increasing this setback to 3 or 4 feet is highly recommended.
Ensuring your layout respects these clearances keeps your walkways safe and accessible. Learn the ins and outs of commercial accessibility by reading How to master ADA compliance.
California Building Code and ADA Standards for Wheel Stop Installation
Even though we operate locally in Texas, federal ADA guidelines apply nationwide, and California’s strict standards often serve as a benchmark for risk mitigation. Under California Building Code (CBC) Section 11B-502.7.2, wheel stops must be installed to prevent any vehicle from encroaching on the required clear width of adjacent accessible routes.
If a parked vehicle’s bumper overhangs onto a sidewalk and reduces the pedestrian path to less than 36 inches (or 48 inches in certain jurisdictions), it constitutes an immediate ADA violation. Under California’s Unruh Civil Rights Act, such violations carry a minimum civil penalty of $4,000 per occurrence, plus potential plaintiff attorney fees.
To avoid these costly legal pitfalls, wheel stops must never encroach into accessible parking access aisles. Even a tiny 1-to-2-inch misalignment can render an access aisle non-compliant. To ensure your striping and barrier layouts are fully aligned with federal standards, see The essential guide to ADA compliant parking lot striping.
Australian Standards for Wheel Stop Placement
For international projects or multi-national developers looking for highly structured guidelines, the Australian Standard AS/NZS 2890.1:2004 provides an excellent mathematical framework. This code dictates that wheel stops must be between 90mm and 100mm in height and exactly 1650mm (plus or minus 50mm) in width.
The standard layout distances under AS/NZS 2890.1:2004 are calculated based on the height of the curb:
- Standard Curb (under 150mm): Front-in parking requires a setback of 620mm from the curb; rear-in parking requires 900mm.
- High Curb or Wall (over 150mm): Front-in parking requires a setback of 820mm; rear-in parking requires 1100mm.
To view these precise diagrams and layout formulas, check out the AS2890.1 positioning guidelines.
Essential Tools and Materials for Wheel Stop Installation
Before starting your installation, gather all necessary tools and safety gear. Having the correct hardware on hand ensures a permanent hold that won’t loosen under repeated tire impacts.
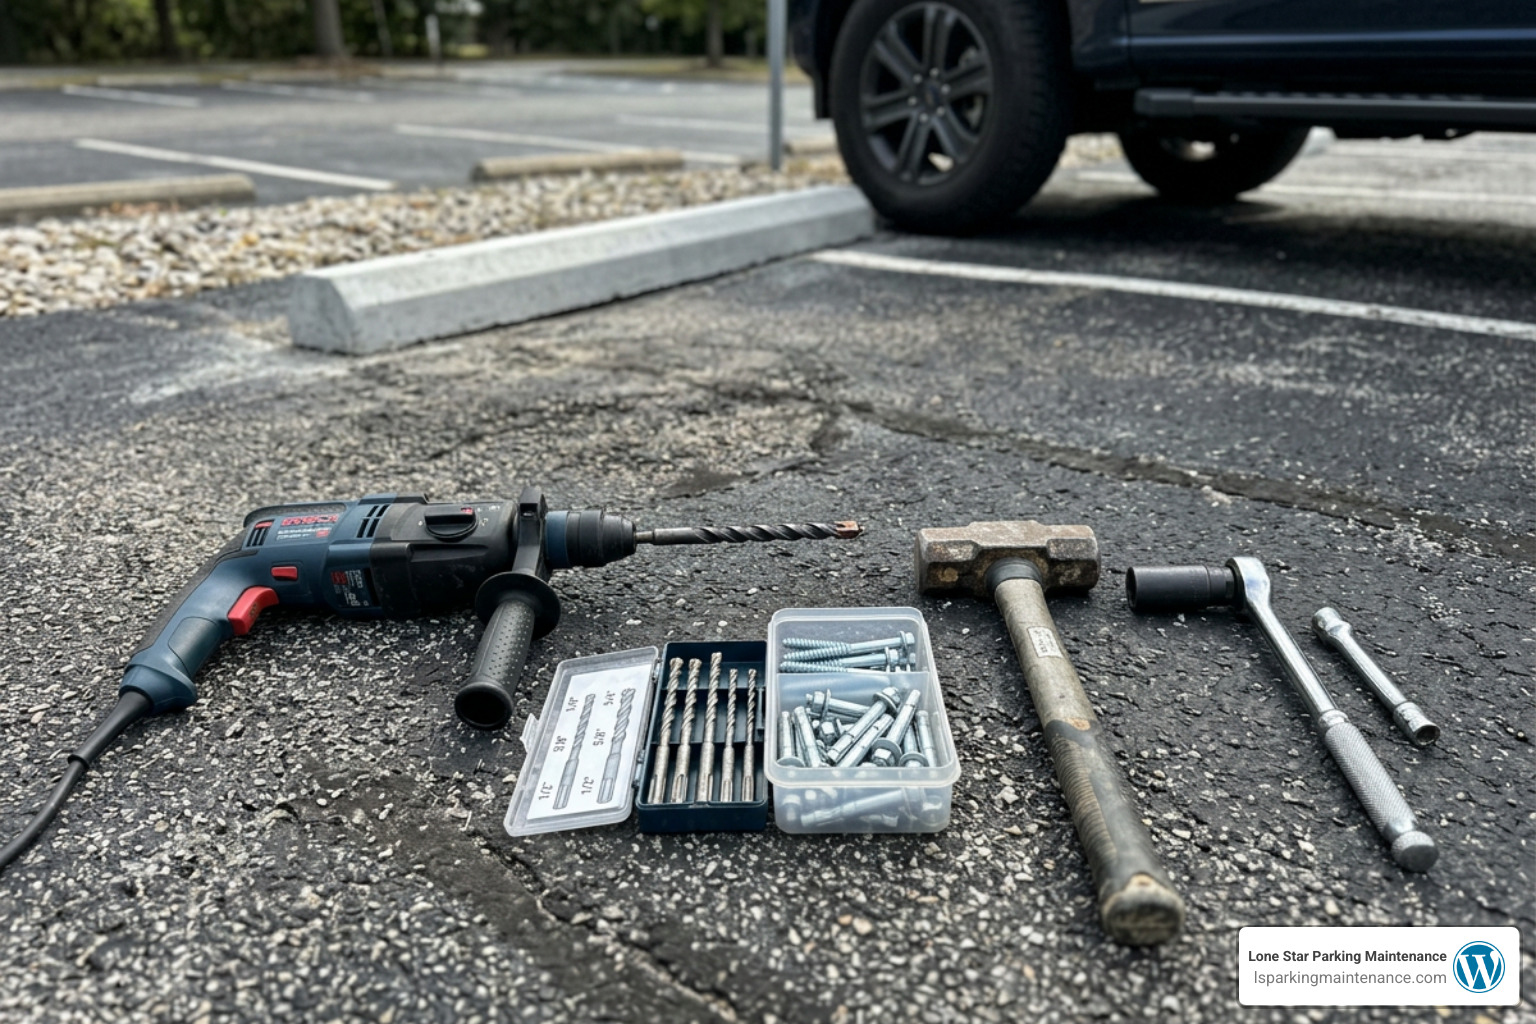
- High-Speed Hammer Drill: Essential for boring clean holes into asphalt or concrete.
- Masonry Drill Bits: Use a 1/2-inch or 3/4-inch bit depending on your anchor size. (Keep a 10mm or 12mm bit handy for smaller concrete screw bolts).
- Heavy Sledgehammer: Used to drive heavy steel rebar spikes into asphalt or gravel surfaces.
- Socket Wrench or Impact Driver: Required for tightening lag bolts, wedge anchors, or hex-head screw bolts.
- Anchoring Hardware:
- For Asphalt: 12mm x 300mm (or 18-inch for older asphalt) galvanized steel rebar pins.
- For Concrete: M12 x 150mm concrete screw bolts, lag bolts with expansion shields, or wedge bolts.
- Epoxy Resin or Construction Adhesive: Heavy-duty structural adhesive to prevent lateral movement.
- Safety Gear: Heavy-duty work gloves, safety glasses, and high-visibility vests.
How to Install Wheel Stops in 5 Simple Steps
Ready to get to work? Whether you are installing lightweight rubber blocks or heavy precast concrete barriers, following this systematic process will guarantee a secure, compliant installation.
Before positioning your blocks, ensure your parking lot lines are freshly painted and clearly marked. For professional layout tips, read The complete guide to lot line painting.
Step 1: Layout and Alignment
First, sweep the parking space clean of dirt, gravel, and standing water. Using your measuring tape, measure 2 to 3 feet back from the curb or wall and snap a bright chalk line across the stalls to ensure perfect linear alignment. Center the wheel stop within the stall lines, leaving roughly 3 to 6 inches of clearance on either side of the stall boundaries to prevent pedestrian tripping hazards.
For a detailed visual guide on aligning different styles of stops, check out these instructions on How to install wheel stops.
Step 2: Drilling Pilot Holes
With the wheel stop perfectly positioned, use the molded holes in the stop as a template. Insert your hammer drill vertically into the holes.
- On Asphalt: Drill a pilot hole 8 to 12 inches deep. Drilling the hole slightly undersized (by about 1/16 of an inch) creates a tight interference fit when the rebar pin is driven home.
- On Concrete: Drill a hole about 1/4 inch deeper than the length of your anchor bolt (usually 4 to 6 inches deep). Mark your drill bit with tape so you don’t over-drill.
Step 3: Preparing the Surface and Applying Adhesive
Move the wheel stop slightly to the side. Use a blow bulb or wire brush to thoroughly clear all concrete dust and debris out of the drilled holes.
For the ultimate permanent hold, we highly recommend the combination method. Apply a generous bead of heavy-duty construction adhesive or structural epoxy resin to the flat bottom edges of the wheel stop. This adhesive layer prevents the stop from pivoting or shifting during thermal expansion cycles in the intense Texas heat.
Step 4: Anchoring the Wheel Stop
Reposition the wheel stop back over the clean holes.
- For Asphalt: Insert your galvanized steel rebar pins through the holes. Use your heavy sledgehammer to drive the pins straight down into the asphalt until the heads sit completely flush or slightly countersunk below the top surface of the wheel stop.
- For Concrete: Insert your expansion anchors or concrete screw bolts. Use a socket wrench or impact driver to wind the bolts down. Tighten until snug—aim for a firmness similar to a strong handshake. Do not over-tighten, or you risk cracking the concrete block or stripping the threads.
Step 5: Painting and Final Compliance Check for Wheel Stop Installation
To prevent pedestrian trip-and-fall accidents, apply a coat of highly visible, reflective safety paint (such as AQMD Rule 1113-compliant low-VOC traffic paint) in safety yellow or bright white.
Once dry, perform a manual pull test on each stop to ensure there is zero lateral wiggle. Finally, double-check that no part of the wheel stop or the parked vehicle’s bumper encroaches into any designated ADA access aisles or pedestrian walkways.
Professional Installation Costs and Lifespan Expectations in 2026
While DIY installation is possible for small projects, hiring a professional team saves time, prevents structural damage to your pavement, and ensures absolute compliance with local building codes.
In June 2026, professional installation pricing generally ranges as follows:
- Concrete Wheel Stops: $65 to $125 per stop (includes supply, rebar anchoring, and reflective painting).
- Rubber Wheel Stops: $85 to $150 per stop (includes supply, heavy-duty hardware, and precision alignment).
- Removal of Old Stops: $20 to $45 per stop.
- Repainting Existing Stops: $15 to $30 per stop.
For a typical 50-space parking lot in the DFW Metroplex, a complete wheel stop installation project averages $3,250 to $6,250 fully installed. Property owners can easily save 15% to 20% on these rates by bundling wheel stop installation with other parking lot maintenance services, such as crack sealing, sealcoating, or line striping.
Frequently Asked Questions about Parking Blocks
How far should a wheel stop be placed from a wall or curb?
A wheel stop should be placed exactly 2 to 3 feet from a wall, fence, or curb. This setback accommodates the standard front bumper overhang of most passenger cars. For parking lots that accommodate larger trucks or SUVs, increase this setback to 3 to 4 feet to prevent bumper damage.
Can wheel stops be installed on asphalt without drilling?
While adhesive-only installation is sometimes used for temporary parking lots or indoor garages, it is not recommended for permanent commercial outdoor lots. Over time, vehicle impacts, heavy rain, and extreme thermal expansion will break the adhesive bond, causing the wheel stop to slide and create a major liability hazard. For a secure hold, always use steel rebar anchors driven 8 to 12 inches deep.
What are the penalties for non-compliant wheel stops under the ADA?
Non-compliant wheel stops that encroach upon accessible routes or block access aisles violate the Americans with Disabilities Act (ADA). In addition to federal civil lawsuits, property owners can face severe local penalties, such as California’s Unruh Civil Rights Act fines of $4,000 per violation, plus legal fees and civil liability for any pedestrian trip-and-fall injuries.
Conclusion
Proper wheel stop installation is one of the easiest, most cost-effective ways to protect your building, organize your traffic flow, and shield your property from expensive liability claims. Whether you choose heavy-duty concrete blocks or flexible recycled rubber, taking the time to anchor them correctly ensures your parking lot remains safe and functional for decades.
At Lone Star Parking Maintenance, we bring top-quality materials, industry-standard precision, and a deep commitment to safety to every project across the DFW Metroplex. Ready to upgrade your property? Schedule professional curb stop installation with our expert team today!