
Understanding Causes and Identifying Types of Concrete Cracks
Before opening a bottle of filler, it is essential to understand why concrete cracks in the first place. Concrete possesses immense compressive strength, but its tensile strength (its ability to handle being pulled apart) is relatively low. When internal or external stresses exceed that tensile limit, the concrete splits.
The primary causes of slab cracking include:
- Drying Shrinkage: As fresh concrete cures, excess water evaporates. This volume reduction creates internal tension, causing micro-cracks.
- Thermal Expansion and Contraction: Hot Texas summers expand concrete slabs, while cold snaps contract them. Without adequate space to shift, cracks emerge.
- Ground Settling and Soil Erosion: Shrink-swell clay soils (common across North Texas) expand when wet and contract during dry spells, leaving voids beneath slabs.
- Improper Control Joint Spacing: Control joints are planned cuts placed in slabs to dictate where concrete should crack as it shrinks. If joints are cut too shallow or spaced too far apart, random cracking occurs.
To identify what type of crack you are dealing with, refer to standard diagnostic criteria like those outlined in the Guide to Concrete Repair.
DIY Assessment vs. When to Call a Structural Professional
Not every crack is a simple DIY project. Distinguishing between cosmetic surface defects and active structural problems keeps your facility safe and prevents wasted money on temporary patches.
Use this rule of thumb: non-moving horizontal cracks under 1/4-inch wide without vertical displacement can usually be fixed by property owners or site managers. However, you should consult a licensed structural engineer or specialist if you notice any of the following red flags:
- Vertical Displacement (Lipping): One side of the crack is higher than the other, indicating subgrade failure or slab settlement.
- Active Movement: The crack continues to widen or lengthen over several weeks or months.
- Widespread Cracking with Sinking: Multiple cracks paired with visible slab drop or soil washouts.
- Structural Shear Stress: Deep cracks running through structural load-bearing walls, garage columns, or heavy traffic lanes.
For broader diagnostic strategies on slab issues, consult the Concrete Crack Repair Guide.
Essential Surface Preparation Before Fixing Cracks in Concrete
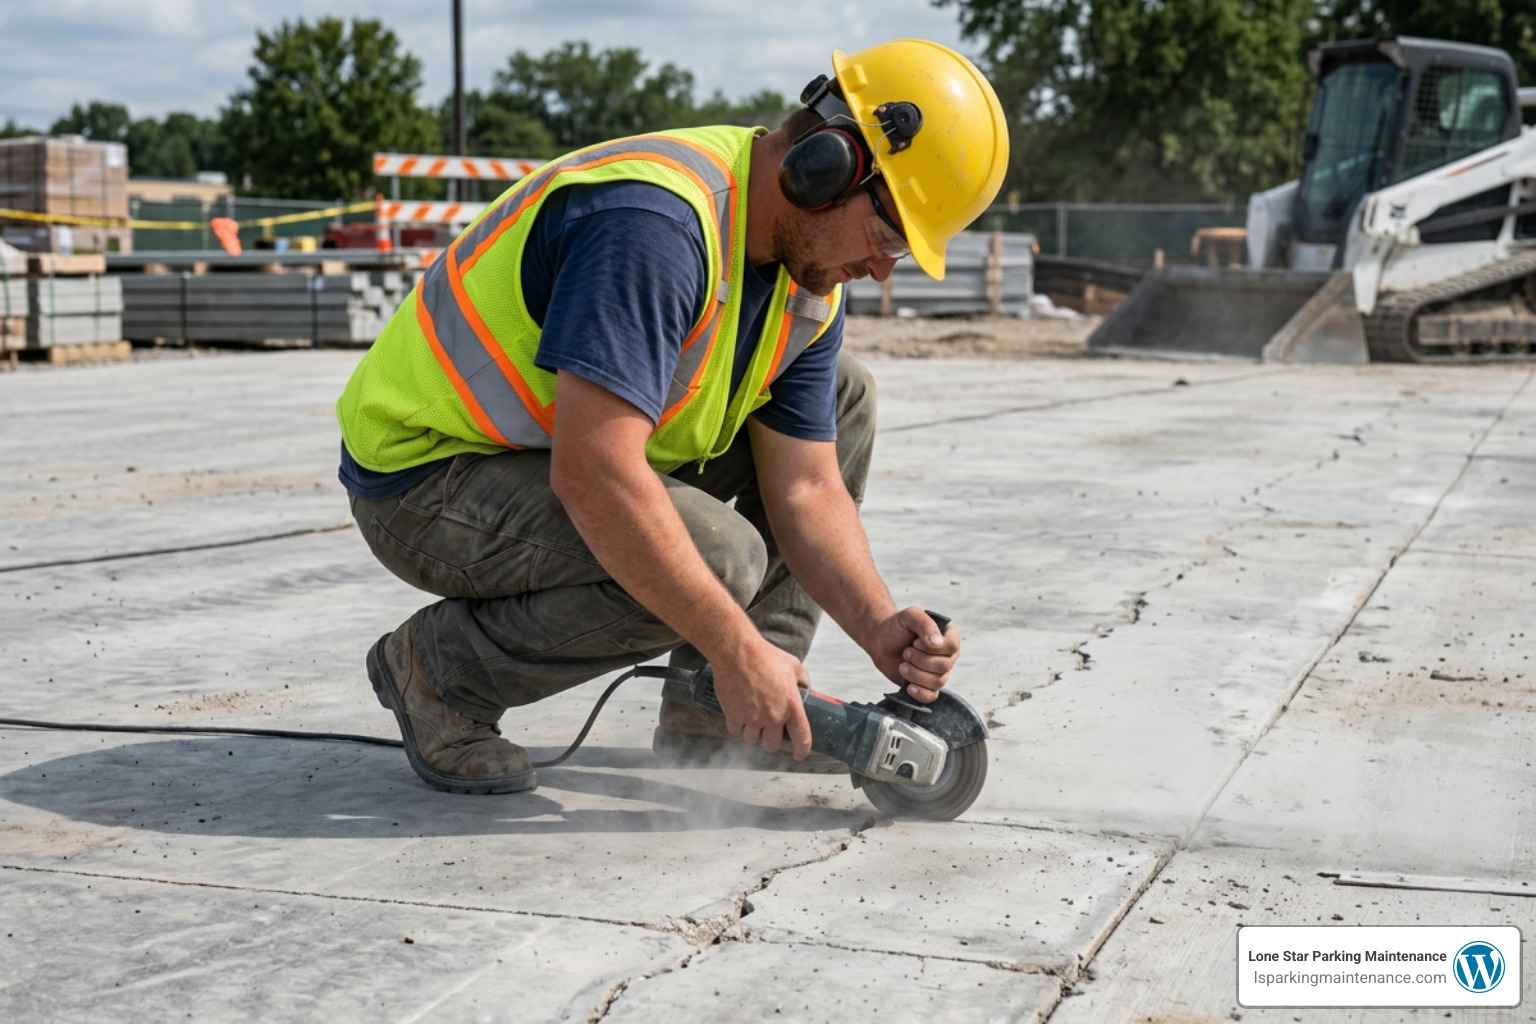
If there is one absolute rule in concrete repair, it is this: surface preparation determines bond success. Applying sealant over dirt, oil, or loose concrete dust will cause the repair product to peel away within months.
Follow these critical surface prep steps:
- Mechanical Crack Chasing: For narrow or hairline cracks, use an angle grinder equipped with a diamond crack-chasing blade to widen the opening slightly. Opening the crack exposes clean, sound aggregate and creates a defined channel for the repair material.
- Undercut Edge Beveling: For wider cracks, use a hammer and cold chisel to create an inverted “V” profile (wider at the bottom than at the top). This mechanical keying locks the patching compound firmly under the existing concrete edges.
- Debris Cleanout: Brush out all fractured concrete chips and dirt using a stiff wire brush.
- Vacuum Dust Extraction: Avoid using high-pressure air to blow out narrow cracks, as compressed air can pack fine dust tight into the bottom of the void. Instead, use a heavy-duty shop vacuum to pull out all fine particles.
- Degreasing & Drying: Treat oil spills with a dedicated concrete degreaser and rinse thoroughly. Allow the concrete surface to dry for at least 24 hours prior to applying non-moisture-tolerant resins or urethanes.
Selecting the Best Repair Materials by Crack Size
Choosing the right repair compound depends entirely on crack width, depth, expected slab movement, and exposure to vehicle traffic.
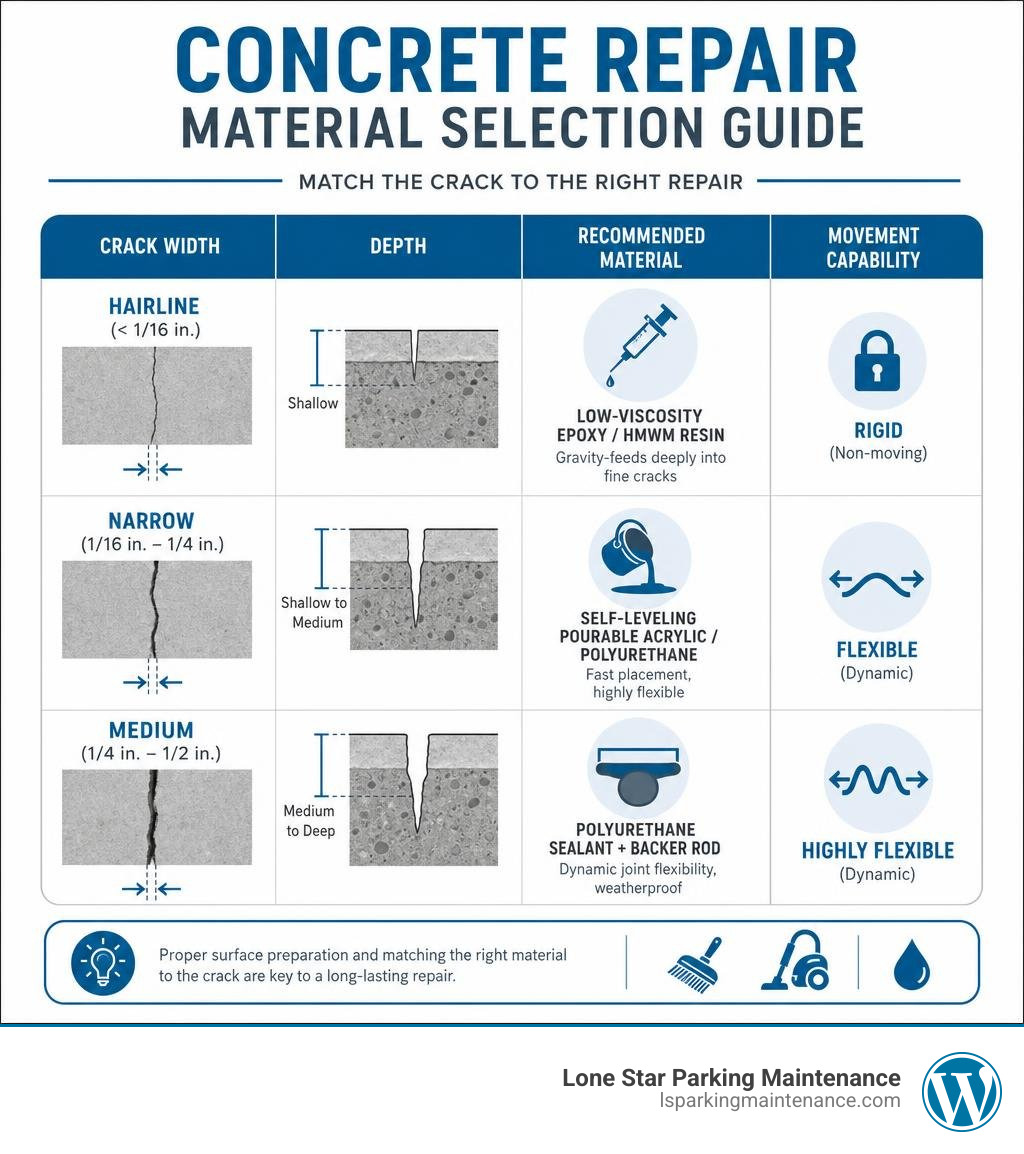
| Crack Width | Recommended Material | Primary Advantage | Movement Capability |
|---|---|---|---|
| Hairline (<1/16 in.) | Low-Viscosity Epoxy / HMWM Resin | Gravity-feeds deeply into fine cracks | Rigid (Non-moving) |
| Narrow (1/16 in. – 1/4 in.) | Self-Leveling Pourable Acrylic / Polyurethane | Fast placement, highly flexible | Flexible (Dynamic) |
| Medium (1/4 in. – 1/2 in.) | Polyurethane Sealant + Backer Rod | Dynamic joint flexibility, weatherproof | Highly Flexible |
| Wide (≥1/2 in.) | Polymer-Modified Mortar / 5000 PSI Mix | High structural strength, low shrinkage | Rigid / Semi-Rigid |
Choosing Elastomeric Sealants and Epoxies for Fixing Cracks in Concrete
When structural bonding is required for non-moving horizontal slabs, high-molecular-weight methacrylates (HMWM) and ultra-low viscosity epoxies conforming to ASTM C881 are the industry standard. As documented in technical research on Crack Repair by Gravity Feed with Resin, low-viscosity resins (under 200 cps) can penetrate cracks as narrow as 0.006 inches (0.15 mm) purely via gravity, restoring integrity to the slab.
Conversely, for driveways, parking surfaces, and outdoor slabs exposed to Texas sun and thermal swings, elastomeric polyurethane or acrylic sealants are preferred. Elastomeric compounds stretch and compress alongside concrete movement without tearing loose from the crack walls.
Step-by-Step Instructions for Repairing Concrete Slabs

Step-by-Step Guide for Narrow Crack Repair (≤1/4 Inch)
Narrow, non-structural cracks are straightforward to fix. Check out our detailed guide on The Ultimate Guide to Filling Every Crack in Your Driveway for more tips on outdoor surfaces.
- Clean Thoroughly: Scrub the crack with a wire brush and vacuum all loose dust out completely.
- Apply Sealant: Insert a bottle or tube of self-leveling acrylic or polyurethane sealant (such as Sikacryl® or equivalent elastomeric caulk) into the crack. Squeeze steadily, letting gravity pull the liquid down into the void.
- Strike Flush: Tool the surface lightly with a flexible putty knife or margin trowel to ensure the filler sits flush with or slightly below the surrounding surface.
- Cure: Protect the area from foot traffic for at least 1 hour and moisture for 24 hours.
Step-by-Step Process for Fixing Cracks in Concrete Greater Than 1/2 Inch
Wider cracks require structural backing to prevent liquid sealants from sinking indefinitely into the subgrade. If you need to complete repairs fast, explore our resource on How to Fill Cracks Quickly Even If Youve Never Tried It Before.
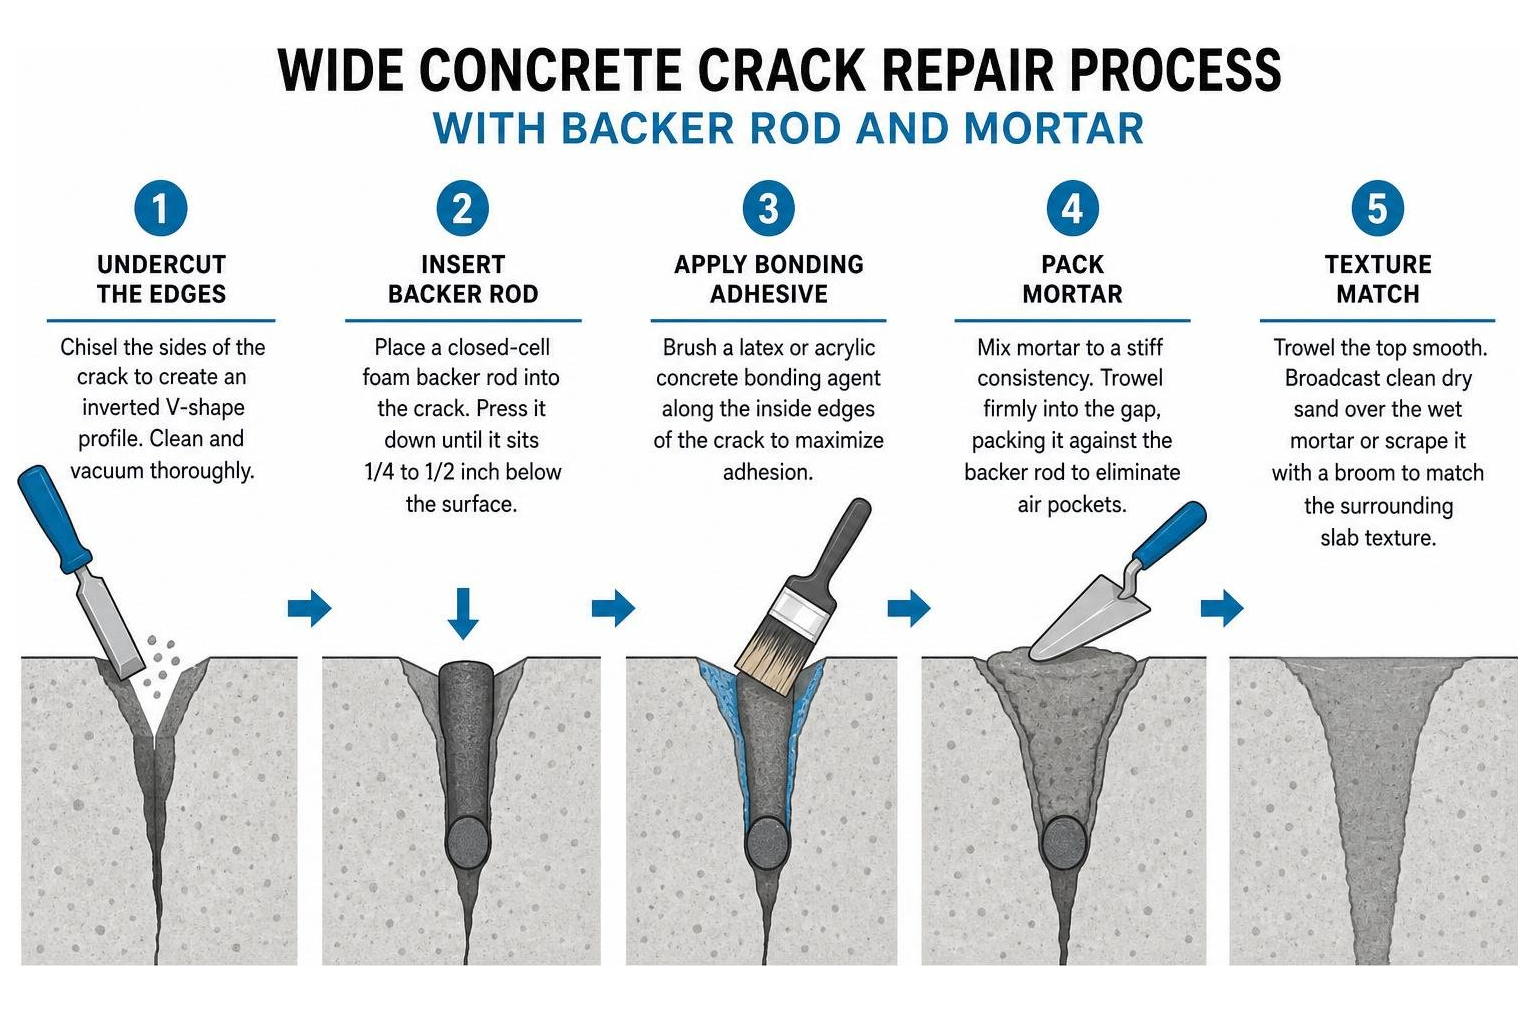
- Undercut the Edges: Chisel the sides of the crack to create an inverted V-shape profile. Clean away debris and vacuum thoroughly.
- Insert Backer Rod: Place a closed-cell flexible foam backer rod into the crack. Ensure the backer rod is sized 25% to 50% larger than the crack width so it fits snugly. Press it down until it sits approximately 1/4 to 1/2 inch below the concrete surface.
- Apply Bonding Adhesive: Brush a latex or acrylic concrete bonding agent along the inside edges of the crack to maximize adhesion.
- Pack Mortar: Mix a polymer-modified patching mortar or high-strength 5000 PSI concrete mix to a stiff consistency. Trowel the mortar firmly into the gap, packing it against the backer rod to eliminate air pockets.
- Texture Match: Trowel the top smooth. Broadcast clean dry sand over the wet mortar or scrape it with a broom to match the surrounding slab texture.
Finishing, Sealing, and Preventing Future Surface Damage
Once your repairs have fully cured, applying a high-quality protective sealer acts as a shield against water, oil, de-icing salts, and UV degradation.
Penetrating breathable sealers (such as silane-siloxane blends) absorb deep into the concrete matrix without altering surface traction. These sealers develop initial water repellency within 24 hours, with chemical protection continuing to strengthen over 7 days. Because penetrating sealers remain vapor-permeable, moisture trapped inside the slab can escape safely without pushing off the surface seal.
For broader protection strategies across asphalt and concrete pavements, check out The Essential Guide to Asphalt Repair and Protection.
Frequently Asked Questions About Concrete Crack Repair
How much does DIY concrete crack repair usually cost?
For standard minor slab cracks, basic DIY repair materials—including a wire brush, backer rod, self-leveling sealant, and margin trowel—typically cost under $100. A 32 fl. oz bottle of pourable sealant provides around 38 linear feet of coverage for cracks measuring 1/2 inch wide by 1/4 inch deep.
How long should concrete crack fillers cure before accepting traffic?
Most modern pourable acrylic and polyurethane sealants reach a tack-free state in about 50 minutes and accept light foot traffic within 1 hour. However, full vehicular traffic and water exposure require a full 24-hour cure window, depending on ambient air temperatures and relative humidity.
Why do repaired concrete cracks sometimes reopen?
Repaired concrete cracks usually reopen for two reasons: skipping proper surface cleaning (which ruins the bond) or applying a rigid repair material (like plain sand-cement mortar) over a dynamic crack subject to ongoing ground movement or thermal expansion. If the subgrade continues to shift, rigid patches will crack again.
Conclusion
Taking care of minor concrete cracks today prevents major structural headaches tomorrow. Whether you are managing a commercial facility or maintaining a residential driveway in the DFW Metroplex, staying ahead of water intrusion preserves your concrete investments for years to come.
When structural settlement, deep slab displacement, or commercial garage repairs exceed basic DIY steps, work with experienced pavement professionals. Contact Lone Star Parking Maintenance for expert support with your commercial parking surfaces, or explore our Professional Parking Lot Sealing and Crack Filling Services to keep your property safe, smooth, and looking its best.