
Choose a Driveway Trench Drain That Matches Water Flow and Vehicle Loads
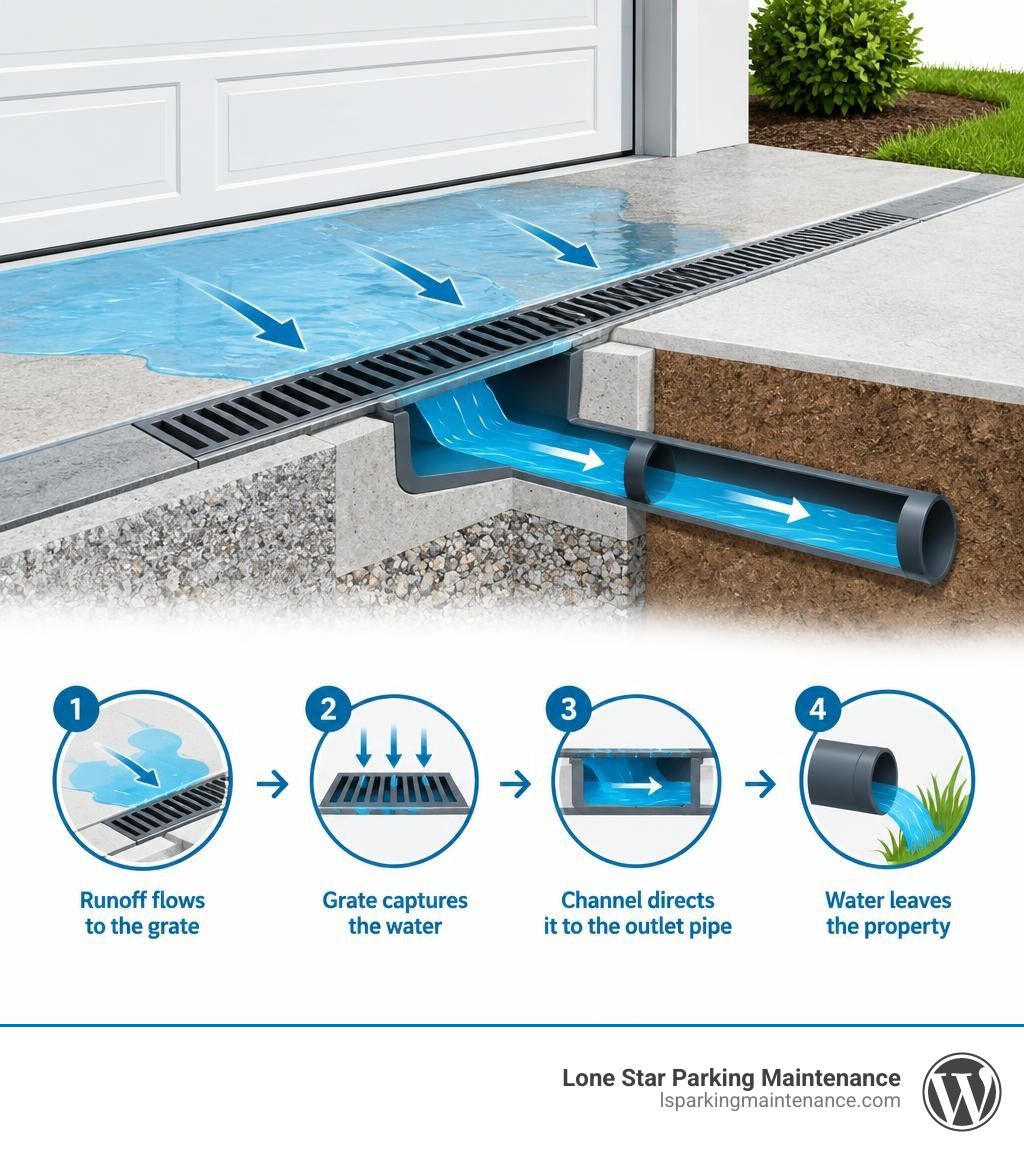
A trench drain for driveway use is a narrow, grated channel installed across the path of runoff, often at a garage door, driveway apron, or low spot. It captures surface water before it pools, then carries it through an outlet pipe to an approved discharge point.
For a reliable choice before the next major storm:
- Choose a pre-sloped channel when you need the drain itself to move water toward an outlet.
- Use a neutral-invert, or flat-base, channel only when the driveway concrete already has a consistent slope.
- Match the grate’s load rating to the heaviest vehicle that will cross it.
- Size the channel and outlet for the driveway width, local rainfall, and water coming from nearby roofs or paved areas.
The right system helps protect concrete, reduce slippery standing water, and keep runoff from reaching garage thresholds. For most vehicle driveways, the key is not simply buying the widest drain. It is choosing a properly sloped channel, durable grate, solid concrete embedment, and a clear path for water to leave the property.
I’m Cason, and this guide will help you compare driveway trench drain options and plan a system that fits your site.
Trench drain for driveway terminology:
- Parking lot drainage
- Trench drain installation
- Traffic rated catch basin
Understanding Driveway Trench Drains: Types and Core Mechanics
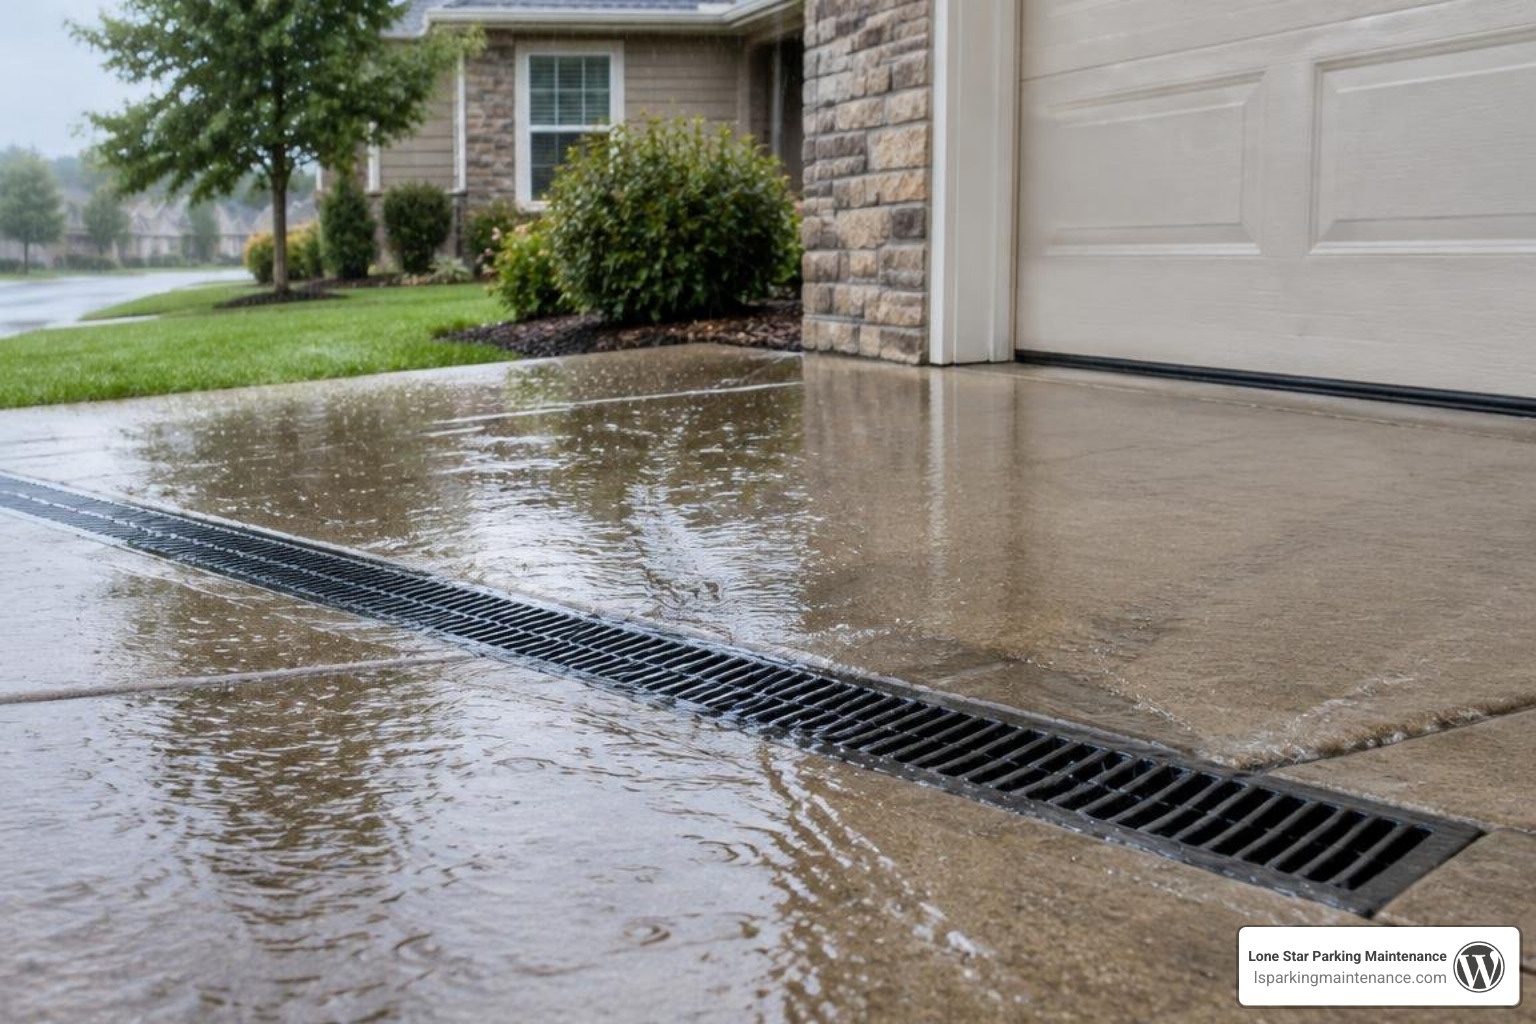
Driveways take a beating from heavy vehicles, shifting weather, and relentless stormwater. When severe downpours hit, large flat surfaces quickly turn into rushing sheets of water. If your driveway slopes toward your foundation or garage, that water creates massive hydrostatic pressure against walls, seeps under foundation slabs, and erodes adjacent landscaping.
A linear trench drain intercepts that sheet flow across the entire width of your pavement, transforming widespread surface runoff into a controlled, high-velocity stream that gets directed safely off your property.
To select the right system, you first need to understand the fundamental mechanics behind how these channels operate. Managing surface runoff requires a tailored approach, much like the foundational principles found in parking lot drainage basics, where stopping standing water prevents long-term structural decay.
Neutral-Invert vs. Pre-Sloped Systems
When choosing channel sections, you will encounter two core designs: neutral-invert channels and pre-sloped channels.
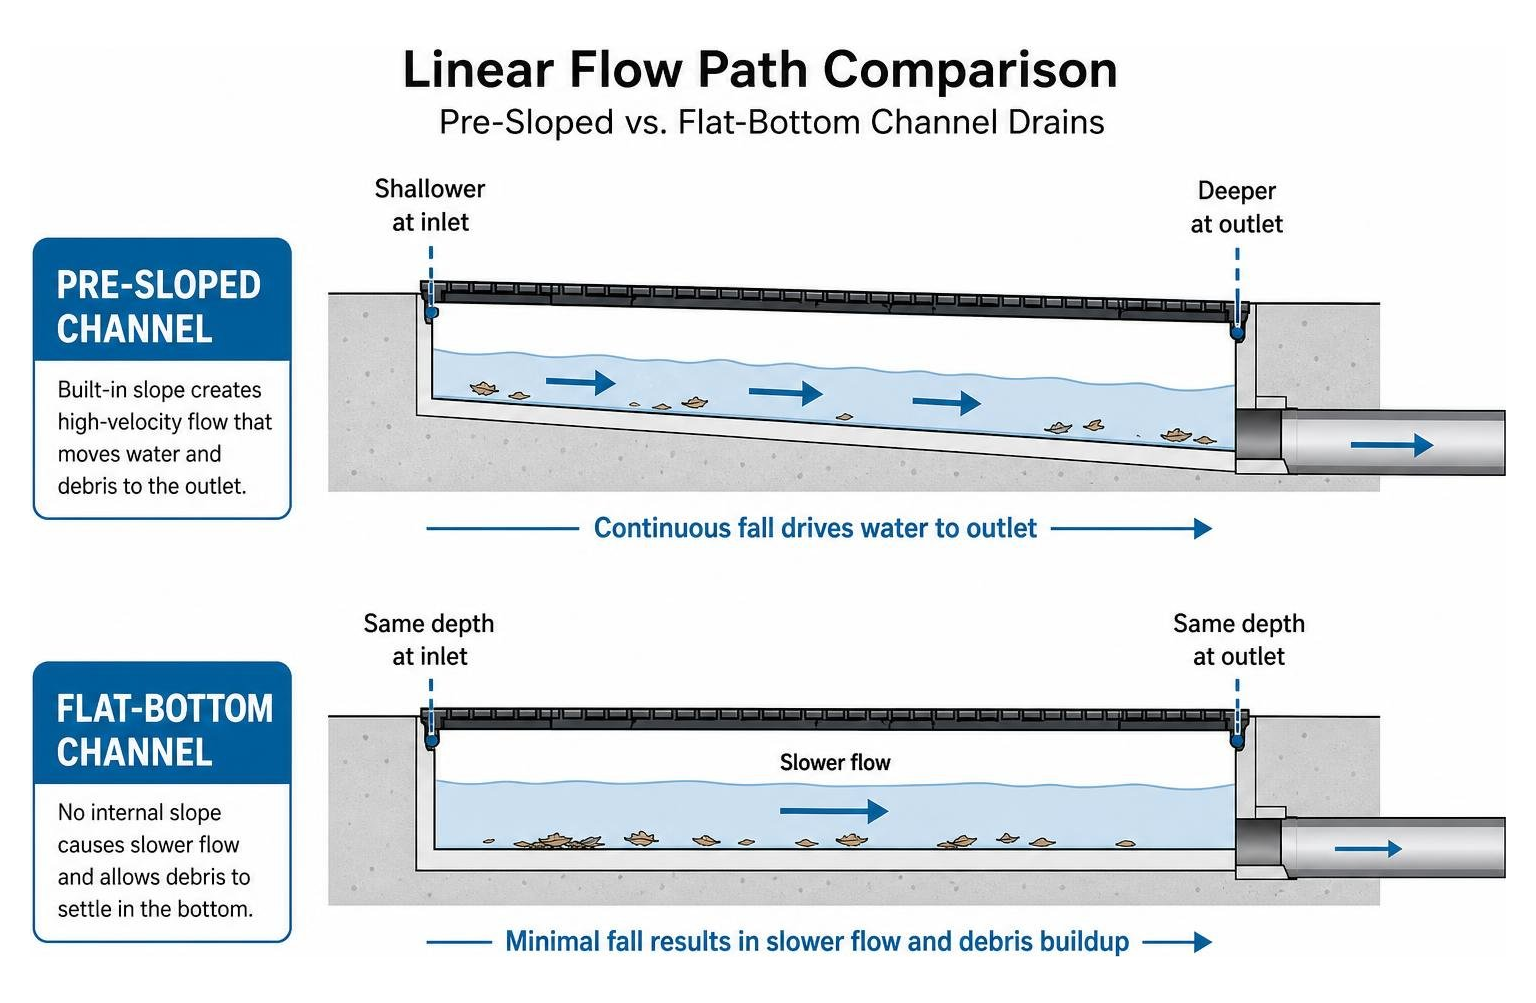
- Neutral-Invert (Flat-Base) Systems: In a neutral-invert channel, the internal bottom of the channel runs completely flat with a uniform depth from one end to the other. These channels rely strictly on the external slope of your concrete driveway to move water. If your driveway apron has a natural, steep grade sloping from the center toward the outer edges, a neutral channel can follow that grade. However, if your driveway is relatively flat—such as right along a garage door threshold—water in a flat-bottom channel will move sluggishly, causing silt, dirt, and leaves to settle at the bottom.
- Pre-Sloped Systems: Pre-sloped channels are engineered with a built-in fall directly inside the invert, typically varying between a 0.5% and 1% built-in slope. As individual channel sections are joined sequentially, the channel floor gradually deepens while the top edge remains perfectly flush with your level pavement. This slope generates high hydraulic velocity, keeping debris suspended in the water column and moving it quickly toward the discharge pipe. In fact, pre-sloped channels can move 2 to 3 times more water than traditional non-sloping drains of the same width.
Catch Basins and Discharge Outlets
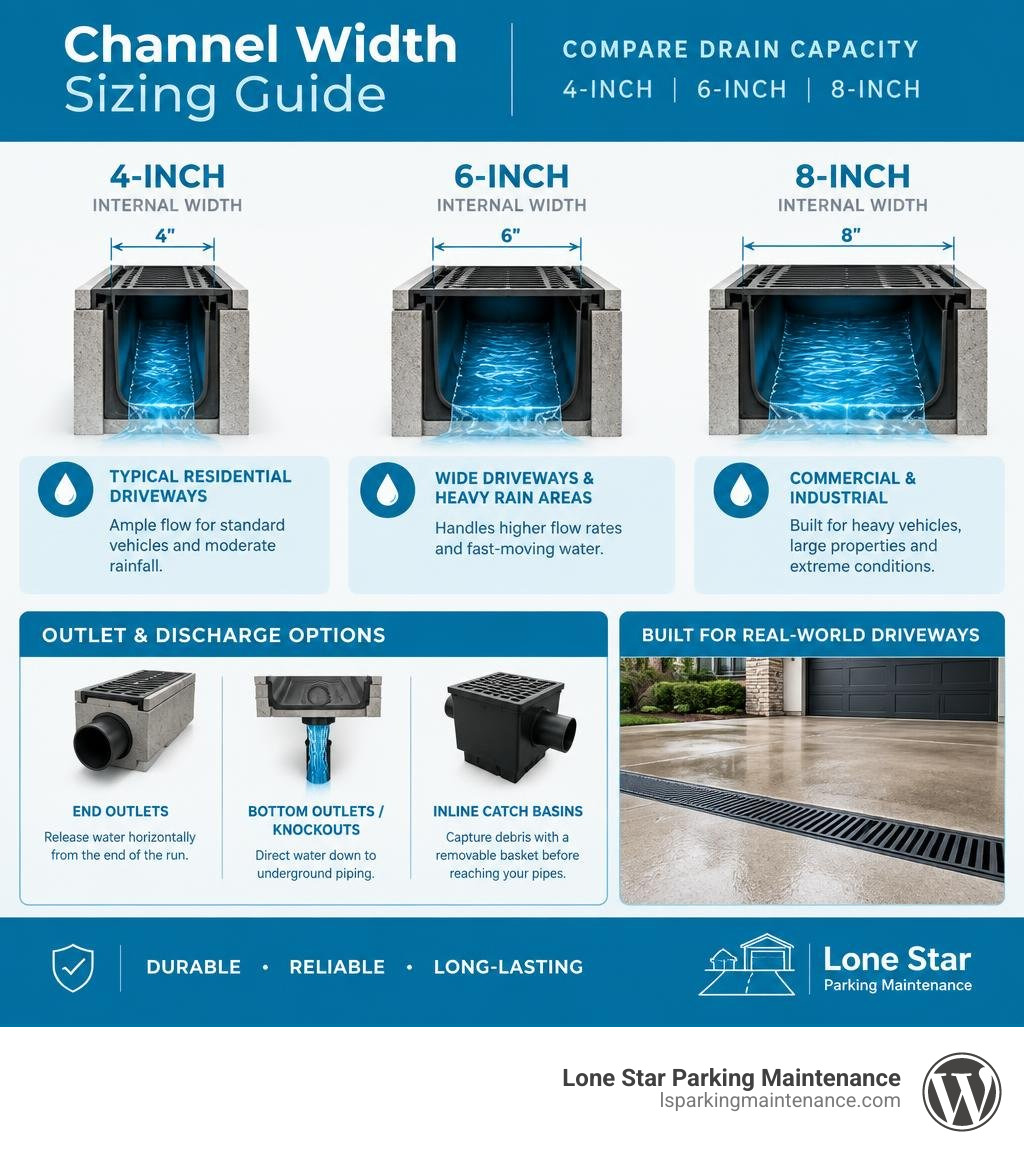
Collecting the water is only half the battle; routing it away from your foundation is what keeps your property safe. Trench drains utilize multiple discharge outlet configurations:
- End Outlets: Solid end plates fitted with standard pipe connectors (typically 4-inch, 6-inch, or 8-inch adapters) that release water horizontally from the end of the channel run.
- Bottom Outlets / Knockouts: Pre-formed circular outlets molded into the underside of the channel that dump water straight down into subterranean piping. A bottom drain outlet is recommended after every four to five connected modular sections to prevent channel overflow during cloudbursts.
- Inline Catch Basins: Installing traffic-rated catch basins at the end of a trench drain run provides an essential collection point. Catch basins feature removable sediment baskets that capture heavy gravel, leaves, and debris before they reach your underground pipes.
From the catch basin or outlet, the discharge pipe should route into a municipal storm system, a dry well, a retention area, or tie into subsurface french drains designed to disperse excess runoff safely into the subsoil.
Sizing and Selecting the Right Trench Drain for Driveway Applications
Undersizing a trench drain leads to water bypassing the grate during peak storm surges, completely defeating the purpose of your investment. To size your system accurately, calculate your catchment area (the total square footage of the driveway, plus any un-guttered roof area that drains onto it) and multiply it by local rainfall intensity figures.
For projects requiring commercial-grade durability, choosing heavy-duty trench drain kits provides the peace of mind that your drainage infrastructure won’t fail under heavy rainfall or continuous vehicle crossing.
Sizing Channel Width: 4-Inch vs. 6-Inch vs. 8-Inch Trench Drain for Driveway Runoff
Internal channel width directly dictates maximum hydraulic capacity and flow rates:
- 4-Inch Internal Width: The standard choice for typical residential driveways handling standard passenger vehicle traffic and moderate rainfall. Compact 4-inch systems provide ample flow when paired with a built-in slope and connect seamlessly to standard 4-inch schedule 40 or corrugated PVC pipes.
- 6-Inch Internal Width: Highly recommended for wide driveways (three-car garages or multi-vehicle aprons), steep downward-sloping driveways that accumulate fast-moving water, or properties in regions subject to intense cloudbursts. High-capacity modular systems like the Model 600 feature a 4.5-inch internal and 6-inch outer dimension, handling extreme flow rates up to 396 gallons per minute (GPM) per foot with runs extending up to 835 feet.
- 8-Inch Internal Width: Engineered for heavy commercial entrances, industrial facilities, or massive residential properties where large delivery trucks, fire apparatus, or heavy machinery regularly traverse. High-capacity options like the Model 200 Series support drainage lengths up to 196 feet and easily integrate with heavy-duty 4-inch, 6-inch, 8-inch, and 12-inch discharge pipes.
Residential vs. Commercial Pre-Sloped Trench Drain for Driveway Performance
Light-duty plastic channels sold at standard retail stores often warp under high ambient summer temperatures and crack under wheel torque. A professional-grade trench drain utilizes fiber-reinforced polymer, heavy-gauge polymer concrete, or integrated structural steel frames that distribute vehicle weight directly to the surrounding concrete slab.
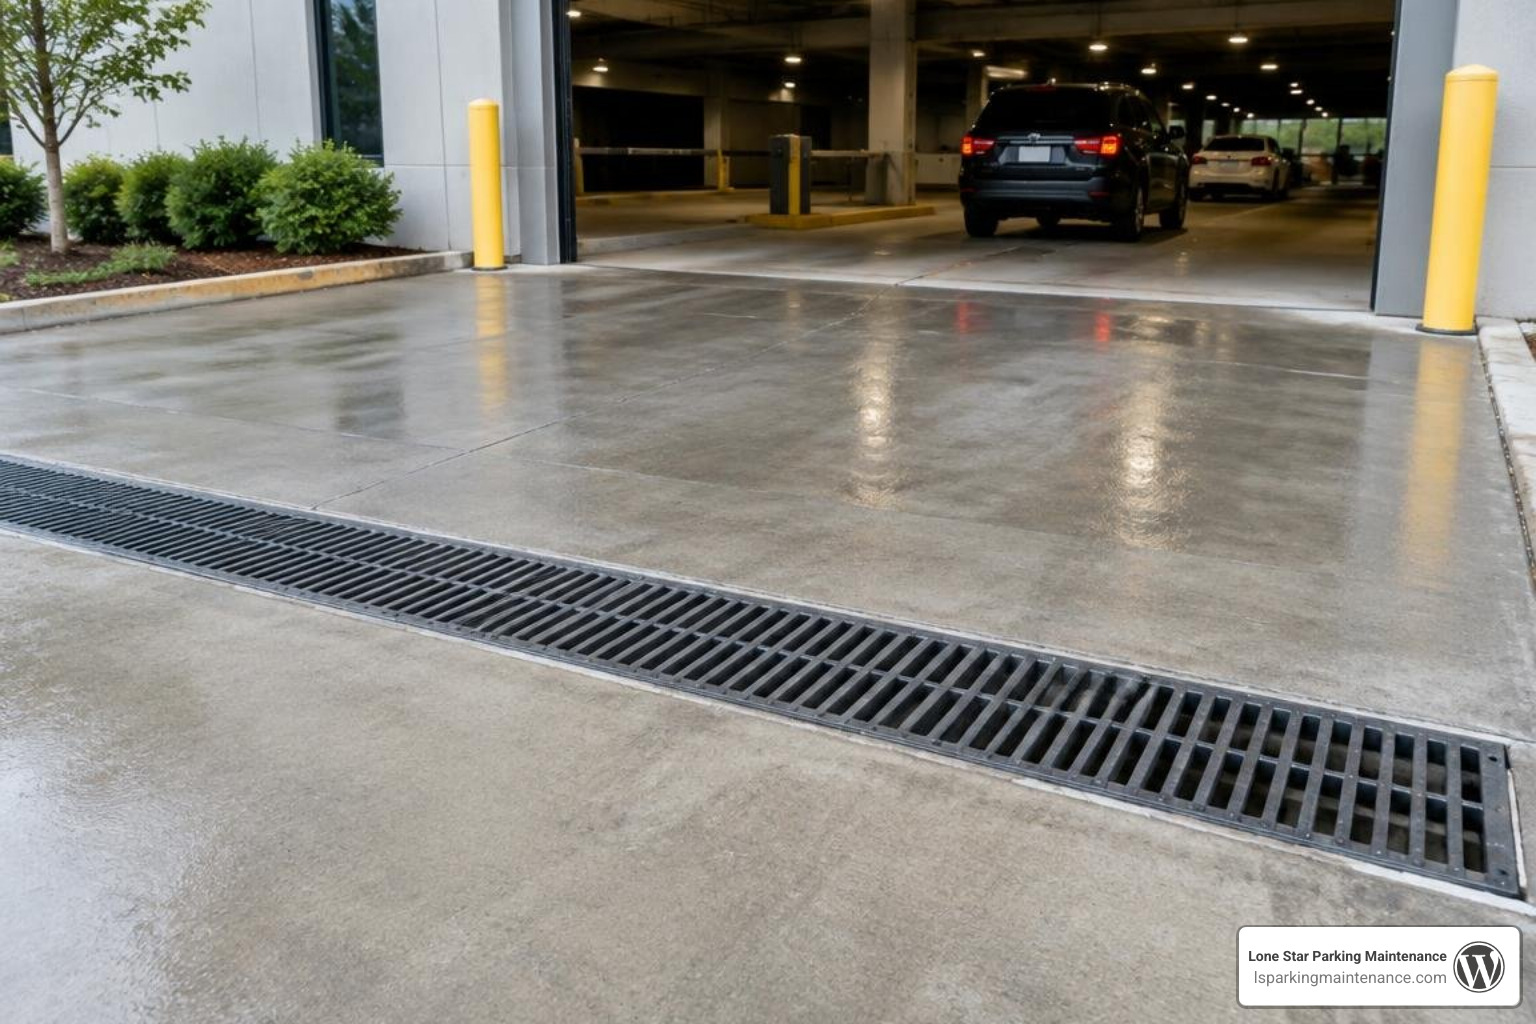
When evaluating overall flow capacity across residential versus commercial installations, consider these key performance factors:
- Internal Hydraulic Radius: Smooth, radius-bottom (U-shaped or V-shaped) channels create less friction than square boxes, allowing water to maintain peak velocity.
- Grate Open Area: The physical percentage of open space in the grate surface determines intake rate. A grate must accept incoming sheet flow without creating a hydraulic dam.
- Discharge Pipe Sizing: Channel depth and width mean little if the outlet pipe cannot evacuate water as fast as the trench collects it.
- Run Length and Fall: Longer runs require progressively deeper channels when using pre-sloped designs to maintain a continuous, uninterrupted 0.5%–1% gradient.
Material and Load Rating Specifications: Channels and Grates
Trench drains are subjected to extreme vertical dynamic loads (downward vehicle weight) and horizontal shear forces (turning tires and hard braking). Installing components that fail to meet recognized load ratings will lead to broken grates, crushed channels, and dangerous surface voids.
Load standards are primarily defined by two testing benchmarks:
- AASHTO H-20 / HS-20: An American standard requiring a drain to support a 32,000-pound axle load (16,000 pounds per wheel load), representing typical heavy highway traffic.
- DIN EN 1433: The European standard classifying drainage channels into specific load classes from Class A (pedestrian) up to Class F (heavy industrial).
For extreme applications requiring massive vehicle resistance, specialized options like the traffic-rated S100K system provide EN 1433 Class F load ratings, capable of withstanding proof loads of up to 200,000 pounds.
Channel Materials: HDPE, Fiber-Reinforced Concrete, and Polymer Concrete
The structural channel body serves as the permanent formwork embedded within the concrete slab:
- High-Density Polyethylene (HDPE): Lightweight, exceptionally resistant to road chemicals and salts, and easy to handle on site. High-grade HDPE channels feature external anchoring ribs that mechanically lock into surrounding concrete to prevent uplift.
- Polymer Concrete: Made from mineral aggregates bonded with synthetic resin, polymer concrete offers significantly higher compressive strength than standard Portland cement concrete. It resists freeze-thaw cycles, is completely impervious to water penetration, and does not degrade when exposed to de-icing salts.
- Fiber-Reinforced Concrete: Blends traditional cementitious mixes with structural fiberglass or synthetic fibers. This material provides exceptional dimensional stability and thermal expansion properties that closely match the surrounding concrete pour, eliminating separation gaps over time.
Grate Selection: Ductile Iron vs. Galvanized Steel vs. Polymer
Choosing the right grate requires balancing load class, corrosion resistance, aesthetics, and pedestrian safety. Selecting the correct vehicular drain covers and grates ensures your installation withstands daily traffic without bending or rattling loose.
| Grate Material | Typical Load Class | Expected Lifespan | Best Applications | Key Pros & Cons |
|---|---|---|---|---|
| Ductile Iron | Class C to Class F (H-20 & Heavy Commercial) | 30+ Years | Heavy vehicle traffic, driveways, fire truck aprons | Unmatched impact strength; natural surface oxidation (patina) occurs unless epoxy coated. |
| Galvanized Steel | Class B to Class C (Medium Vehicular) | 15–20 Years | Standard passenger vehicle driveways, carports | Sleek modern appearance; zinc coating protects against rust but can wear over decades. |
| Polymer / HDPE | Class A to Class B (Light Duty / Pedestrian) | 10–15 Years | Sidewalks, pool decks, patio thresholds | 100% rustproof and UV-stabilized; not suitable for commercial trucks or heavy turning loads. |
When finalizing your grate specification, look for these vital design features:
- Lockdown Bolts and ClipLocks™: Grates must be mechanically fastened to the channel frame. Unbolted grates will rattle, shift under vehicle braking, and can dislodge during flash floods.
- Anti-Shunt Lugs: Molded or cast lugs on the underside of grates prevent linear sliding within the frame when cars drive over them at an angle.
- ADA Compliance and Heel-Proof Spacing: Grate openings should measure no wider than 1/4 to 1/2 inch if the driveway is used by pedestrians, preventing high heels, canes, or bicycle tires from catching.
Step-by-Step Installation and Avoiding Costly Mistakes
A trench drain is only as strong as its concrete encasement. Even an H-20 rated ductile iron channel will buckle if it is placed directly on soft dirt and backfilled with gravel. Proper encasement in a solid concrete collar ensures that wheel loads are transferred away from the drain body and distributed safely into the surrounding ground.
Understanding proper trench drain installation methods helps prevent costly mistakes that could ruin an otherwise solid driveway.
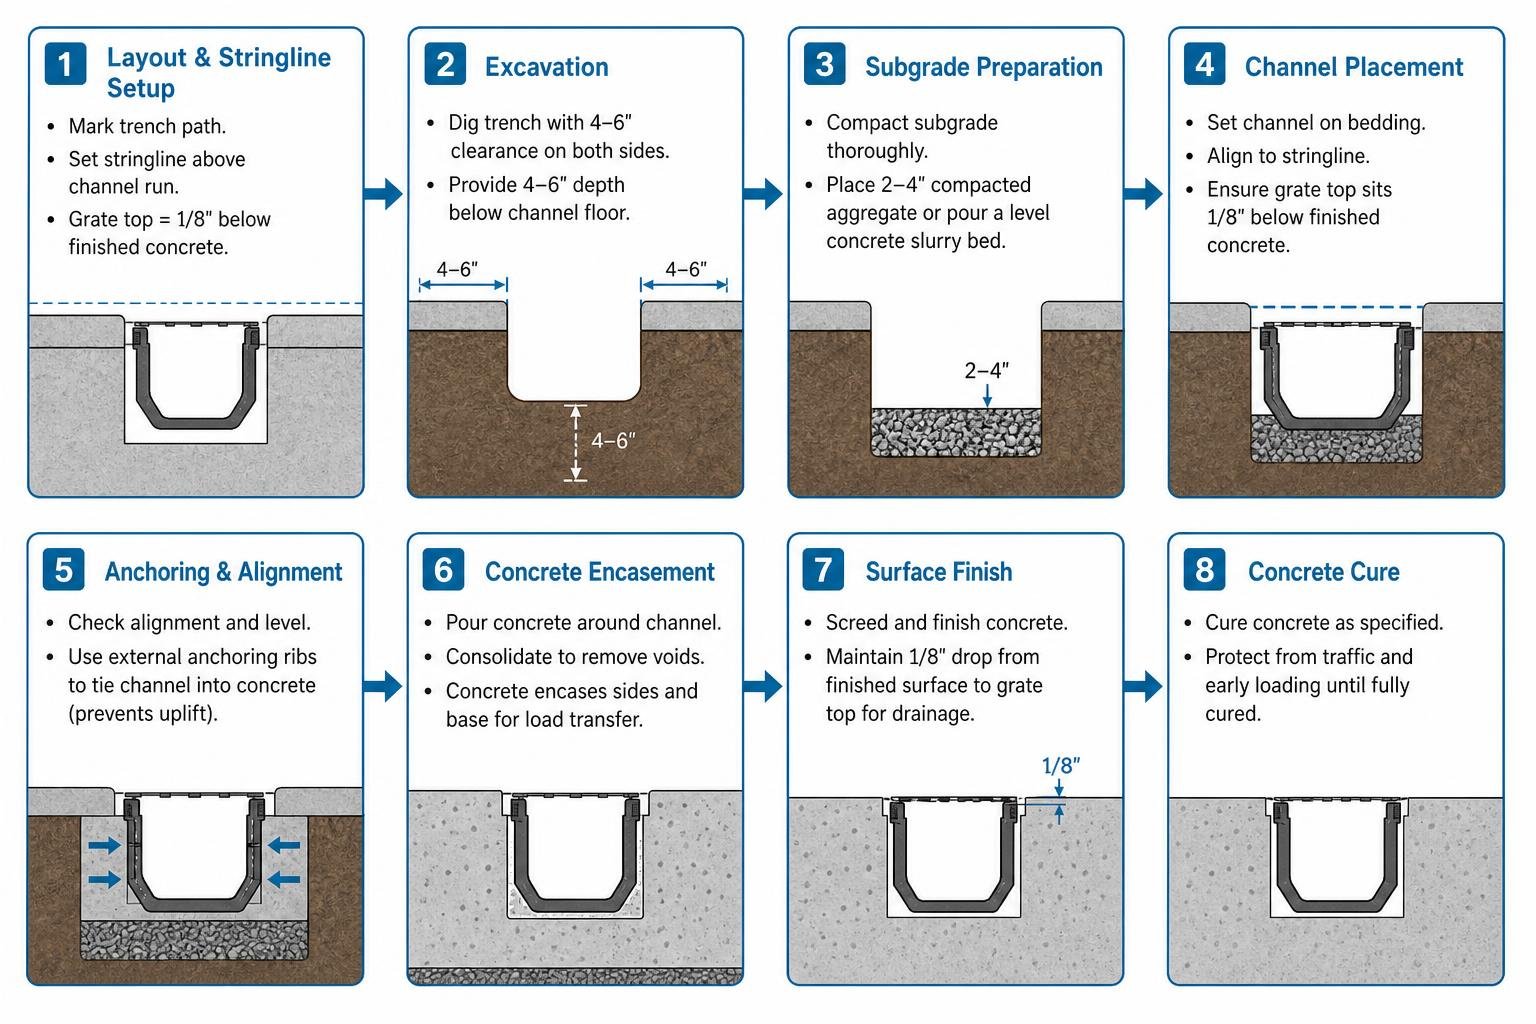
Excavation, Bedding, and Elevation Setting
- Layout and Stringline Setup: Mark your trench path using chalk or spray paint. Set a taut stringline directly above the planned channel run. The finished top of the drain grates must sit exactly 1/8 inch below the finished concrete surface to ensure water flows into the grate rather than damming against the edge.
- Excavation: Dig a trench that provides at least 4 to 6 inches of clearance on both sides of the channel and 4 to 6 inches beneath the channel floor for the concrete bedding foundation.
- Subgrade Preparation: Thoroughly compact the trench subgrade. Lay 2 to 4 inches of compacted aggregate or pour a level concrete slurry bed.
- Channel Alignment and Stabilization: Assemble the modular channel sections, clicking tongue-and-groove joints together and applying manufacturer-approved polyurethane joint sealant. Secure the channels against shifting or floating by driving rebar stakes into the ground through integrated channel staking brackets, or suspend the channel from leveling boards spanning the excavation.
Pouring Concrete Embedment and Anchoring
- Protect Grates and Channels: Keep factory-supplied protective plywood covers or heavy plastic tape over the channel grates during the pour. This prevents wet concrete from splashing into the interior channel, clogging bolt holes, or sealing grates shut permanently.
- Placing the Concrete: Pour a high-strength concrete mix (minimum 3,500 to 4,000 PSI) evenly along both sides of the channel. Placing concrete on only one side will push the channel out of alignment.
- Vibrate and Consolidate: Use a mechanical concrete vibrator or spade tool to eliminate air pockets and voids directly beneath the channel haunches.
- Troweling the Edge: Trowel the finished concrete with a slight 1/8-inch slope down toward the drain rim, creating a smooth transition that guides runoff straight into the grate.
- Curing: Allow the concrete encasement to cure fully (typically 7 to 28 days depending on the mix design) before allowing vehicle traffic over the drain.
Maintenance Schedules and Common Installation Pitfalls
To keep your driveway drainage functioning smoothly for 20 to 30 years, avoid these common installation mistakes:
- Setting the Drain Level with or Above the Concrete: Surface water will pool directly against the frame instead of dropping through the grate. Always maintain that 1/8-inch recess.
- Failing to Prevent Floating: Lightweight plastic and HDPE channels are buoyant. When wet concrete fills the trench, unspecced channels will float upward, ruining your elevation. Always use rebar anchoring clips or pour the concrete collar in two distinct lifts.
- Omitting Joint Sealant: Unsealed modular channel joints let water leak out under the driveway, leading to subgrade washouts and sinkholes.
- Neglecting Catch Basin Maintenance: A catch basin full of silt stops draining. Perform seasonal inspections: lift the grates, remove debris from inline baskets, flush the channel with a garden hose or pressure washer, and inspect perimeter concrete expansion joints for cracking.
Frequently Asked Questions About Driveway Drainage
How does a pre-sloped channel outperform a flat base drain?
A pre-sloped channel has a built-in fall, typically 0.5% to 1%, inside the channel floor. This slope creates a continuous hydraulic gradient that moves water even across level pavement. The increased velocity helps keep sediment suspended and flowing toward the outlet, reducing buildup that can cause clogs in a flat-bottom channel.
What load rating is required for heavy passenger vehicles?
For standard residential driveways carrying passenger vehicles, a system rated to AASHTO H-20 or EN 1433 Class C is usually sufficient when the channel is fully encased in concrete. If your driveway will see heavier service vehicles, delivery trucks, or RVs, choose a system rated for Class D or higher and confirm that the grate and channel frame both meet that rating.
How do you clean and prevent clogs in driveway channel drains?
Cleaning a driveway trench drain is straightforward:
- Remove the grates using standard hand tools.
- Lift out the inline catch basin basket and empty collected debris.
- Flush the channel toward the catch basin with a pressure washer or garden hose.
- Use a wet/dry shop vacuum to remove remaining sediment from the outlet area.
- Reinstall the grates and confirm anti-shunt lugs are seated correctly to prevent vehicle rattle.
Protect Your Pavement Before the Storm Arrives
Surface water is the single most destructive element your driveway and parking areas will ever face. When allowed to pool, stormwater seeps into sub-base layers, destabilizes foundational soil, causes asphalt and concrete cracking, and floods garages. Installing a properly sized, high-load trench drain system gives runoff an immediate escape route, preserving your structural investment for decades.
At Lone Star Parking Maintenance, our team specializes in comprehensive pavement health across the DFW Metroplex. From surface cleaning, sealcoating, and precision striping to complete concrete repairs and storm drainage solutions, we bring top-quality materials and industry-standard craftsmanship to every property. Reach out to our team today to evaluate your drainage needs and safeguard your pavement before the next major storm hits.