
Why Blacktop Driveway Crack Repair Can’t Wait
Blacktop driveway crack repair is one of the most important — and most overlooked — maintenance tasks a property owner can tackle. A small crack today can become a costly problem fast.
Quick answer: How to repair blacktop driveway cracks
- Clean the crack — remove all debris, weeds, and moisture
- Choose the right filler — use pourable liquid for narrow cracks, rubberized rope or cold patch for wider gaps
- Apply the filler — force it deep into the crack, slightly overfilling
- Let it cure — allow 24–48 hours before traffic, and wait at least 30 days before sealing
- Seal the driveway — apply a coat of driveway sealer to protect the repair
Here’s the hard truth: cracks in asphalt don’t stay small. Water gets in, freezes, expands, and breaks the pavement apart from the inside out. UV rays dry out the surface. Traffic grinds it down. Before long, what started as a hairline crack turns into a pothole — or worse, a full structural failure.
Ignoring cracks long enough can mean replacing the entire driveway, which can run $2,500 to $6,000 or more.
The good news? Catching cracks early is one of the easiest and most affordable DIY wins in home maintenance. With the right materials and a free afternoon, most homeowners — and property managers — can stop the damage before it spirals.
This guide walks you through everything: what causes cracks, how to pick the right product, and exactly how to fix them properly.
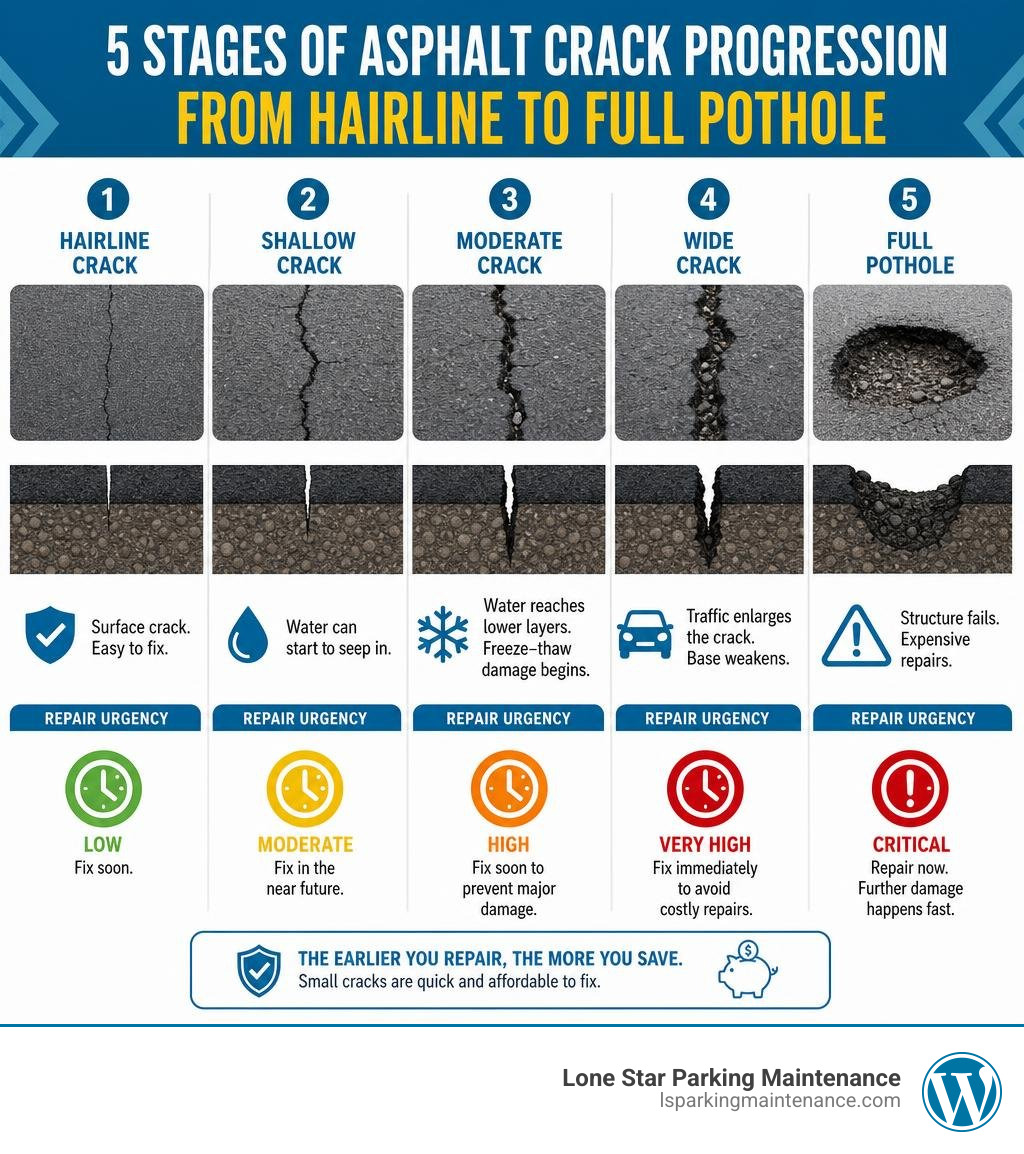
Blacktop driveway crack repair definitions:
Understanding Asphalt Damage: Causes and Crack Types
Before we grab our tools and start squeezing filler into every gap we see, we need to understand what we are dealing with. Asphalt is a flexible pavement made of stone, sand, and liquid asphalt cement. Because it is flexible, it relies heavily on the compacted base beneath it to support heavy vehicle loads. When that base shifts or the asphalt loses its elasticity, cracks appear.
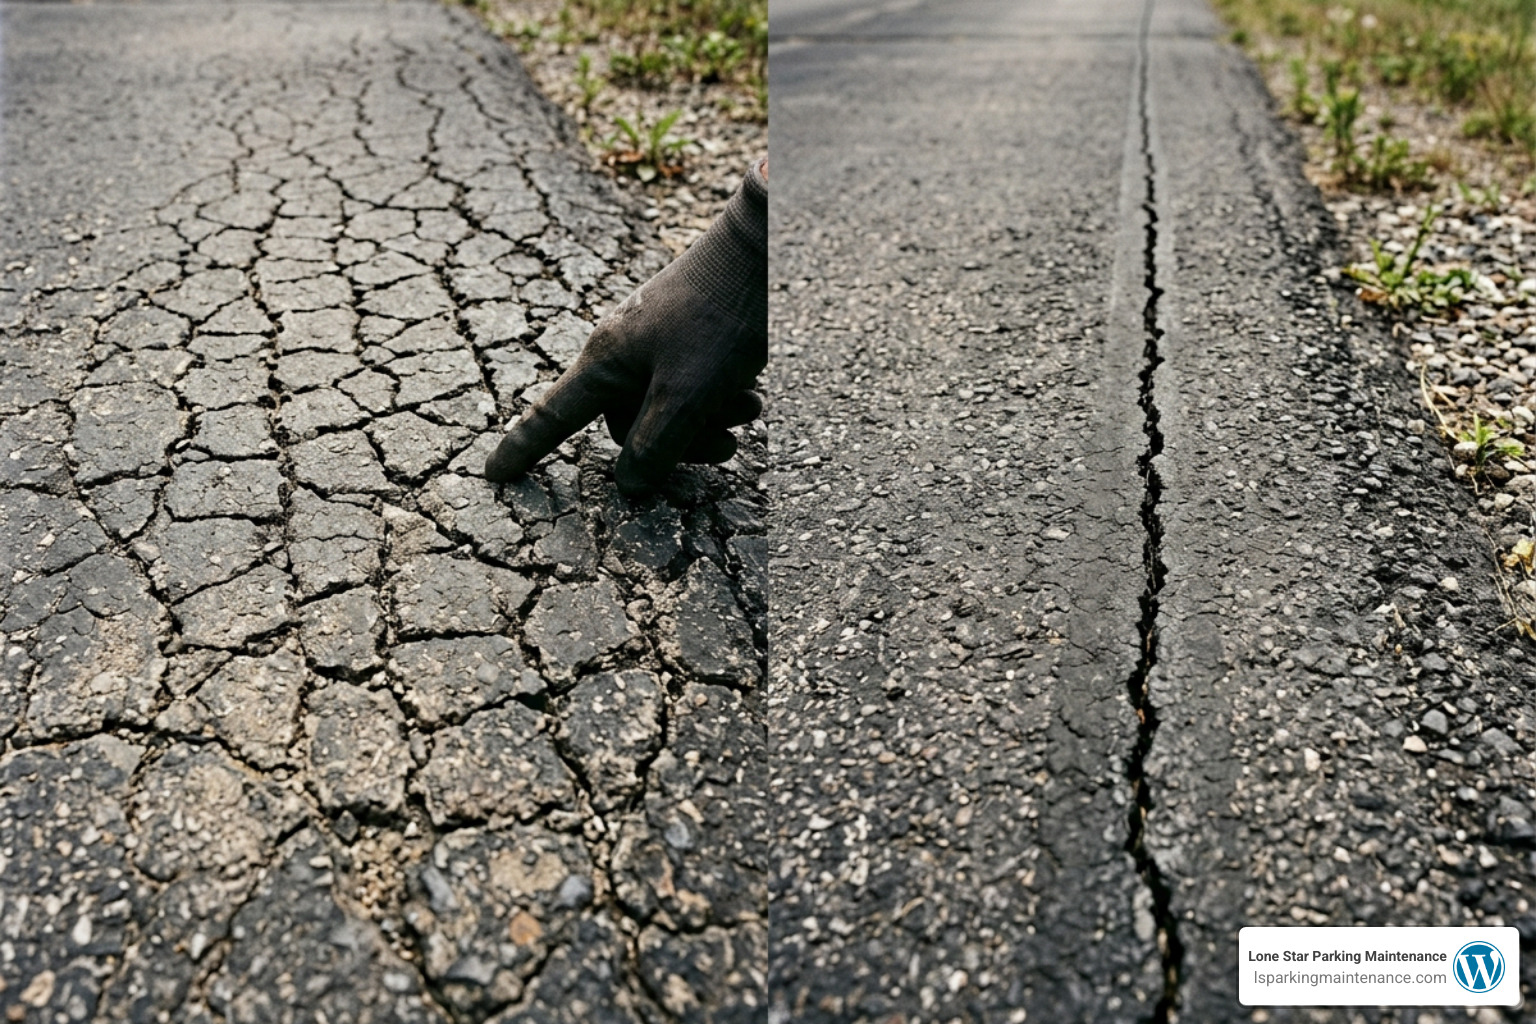
Understanding what type of crack has formed on your driveway helps you choose the right repair method. If you are wondering whether your driveway is past the point of simple DIY fixes, check out our guide on How to identify if your pavement needs attention.
Common Causes of Blacktop Deterioration
Why does blacktop crack in the first place? It is usually a combination of environmental forces and physical wear:
- Water Penetration: Water is the absolute worst enemy of asphalt. When rain runs into unsealed cracks, it seeps into the gravel base below. In areas with freeze-thaw cycles, this water expands as it freezes, forcing the pavement upward and cracking it. Even in warmer regions like the DFW Metroplex, water can wash away the supporting soil beneath the asphalt, causing the surface to sink and fracture.
- UV Rays: Think of the Texas sun as a giant, slow-motion bleach machine. Intense UV rays dry out the liquid asphalt binder, turning your rich black driveway into a brittle, gray surface. Once the binder loses its flexibility, it cracks under the slightest pressure.
- Traffic Load: Parking heavy trucks, RVs, or trailers on a residential driveway not rated for that weight will quickly compromise the base and cause structural cracking.
- Oil and Chemical Spills: Motor oil, gasoline, and transmission fluid act as chemical solvents on asphalt. They dissolve the binder, turning a solid driveway into a soft, crumbling mess.
Identifying and Assessing Blacktop Driveway Crack Repair Needs
To tackle a blacktop driveway crack repair project successfully, we must accurately diagnose the type and size of the cracks. Here is a breakdown of what you might find on your driveway:
- Hairline Cracks (Under 1/8 inch): These are tiny, shallow cracks. They are mostly cosmetic but should still be sealed to prevent them from growing. A simple liquid sealer or a thin coat of pourable filler works perfectly here.
- Medium Cracks (1/8 inch to 1/2 inch): This is the sweet spot for DIY repair. These cracks are deep enough to let water in but small enough to be easily filled with a pourable cold-pour liquid or a rubberized caulk.
- Deep Fissures and Large Cracks (1/2 inch to 1 inch): These require a bit more preparation. You will want to use a foam backer rod or clean sand to fill the bottom of the crack before applying a high-quality rubberized joint filler.
- Longitudinal and Transverse Cracks: These run parallel or perpendicular to the direction of the pavement. They are usually caused by temperature changes or joint shrinkage and are excellent candidates for standard crack filling.
- Alligator Cracks: Named because they look like the scaly skin of an alligator, these are interconnected, web-like cracks. Alligator cracking is a sign of base failure or severe load fatigue. Unfortunately, standard crack fillers will not fix this; the base has failed, and the affected area must be cut out and repaved.
For a deeper dive into evaluating your driveway, read The ultimate guide to filling every crack.
Choosing the Right Materials for Blacktop Driveway Crack Repair
Walking down the home improvement aisle can make your head spin. There are dozens of tubs, tubes, and bags claiming to be the ultimate asphalt savior. Let’s break down the most popular options so you can choose the best product for your specific blacktop driveway crack repair needs.
To help you decide, we have put together this comparison table of the most common repair materials:
| Material Type | Best For | Pros | Cons |
|---|---|---|---|
| Pourable Liquid Filler | Cracks up to 1/2″ wide | Easy to apply, self-leveling, no special tools | Can shrink as it dries, not for deep holes |
| Rubberized Rope (e.g., Pli-Stix) | Cracks 1/2″ to 1″ wide | Extremely flexible, permanent bond, no shrinkage | Requires a propane torch to melt and apply |
| Cold Patch Asphalt | Potholes and wide cracks (>1″) | Highly durable, handles heavy traffic, immediate drive-on | Requires heavy compaction, messy to work with |
When shopping, look for high-performance products that have proven track records. For instance, the Quikrete 50 lb. Commercial Grade Blacktop Repair Patch is a massive crowd-pleaser with over 1,200 reviews, indicating its reliability for larger repairs. For standard cracks, the Latex-ite Pli-Stix 30 ft. Medium Black Permanent Blacktop Joint and Crack Filler has earned over 650 reviews for its incredible durability.
Before you start, make sure to read the Titebond Blacktop Repair Sealant specifications to understand how high-quality acrylic latex sealants behave, or check out A beginner’s guide to blacktop crack fillers for a complete primer.
Pourable Liquid Fillers vs. Rubberized Products
If you are dealing with standard cracks up to 1/2 inch wide, you will likely choose between a cold-pour liquid filler and a rubberized product.
- Cold-Pour Liquid Fillers: These are typically asphalt emulsions fortified with latex or acrylic. They come in squeeze bottles or jugs. They are incredibly easy to use: shake, pour, and smooth. However, because they are water-based, they shrink slightly as they dry, meaning you may need to apply a second coat.
- Rubberized Joint Fillers: These products stay highly flexible even in extreme temperatures. In the DFW Metroplex, summer temperatures can push asphalt surface temperatures past 140°F, while winter can bring hard freezes. Rubberized fillers expand and contract with the pavement without tearing or losing their bond.
Cold Patch vs. Hot-Applied Solutions
For holes, wide trenches, or deep cracks, standard liquid fillers won’t cut it. You need structural products:
- Cold Patch Asphalt: This is a mixture of graded aggregates (stones and sand) and modified asphalt binders. Products like Road Rescue 50 lbs. Asphalt Repair (which boasts over 1,000 top-rated reviews) are designed to patch deep potholes. They harden through compaction — meaning the more you drive over them, the stronger they get.
- Hot-Applied Rope Fillers: Products like 30ft. Pli-Stix Permanent Blacktop Crack Filler are rubberized ropes that you push into the crack and melt using a simple hand-held propane torch. This creates a commercial-grade, watertight bond that mimics professional hot-rubber crack sealing.
Step-by-Step Guide to DIY Blacktop Crack Sealing
Now that you have your materials, it is time to get your hands dirty. Proper application is the difference between a repair that lasts five years and one that washes away with the next thunderstorm.
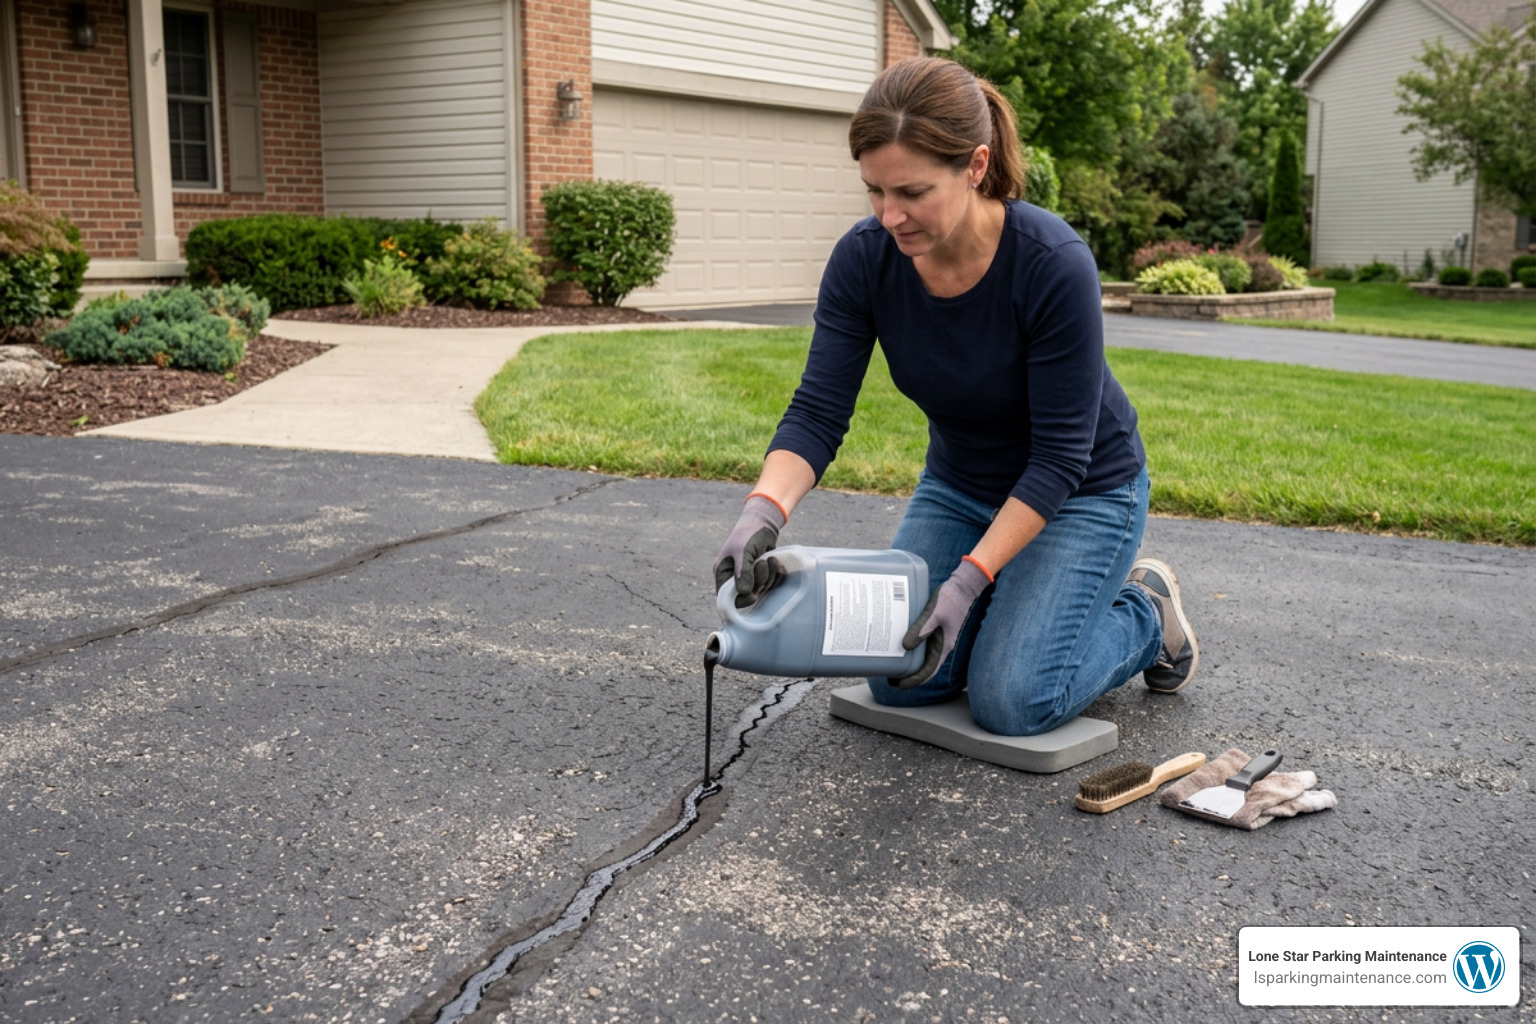
For a solid foundation on the basics, you can review the Lowe’s guide on repairing asphalt cracks or jump straight into our simplified breakdown of How to repair asphalt cracks in 5 easy steps.
Step 1: Preparing the Driveway Surface
We cannot stress this enough: 90% of crack repair failure is caused by poor preparation. If you apply filler over dirt, dust, or weeds, the filler will stick to the debris instead of the asphalt, and it will peel right out.
- Clear the Weeds: Use a screwdriver, a weeding tool, or a wire brush to scrape out any grass or weeds growing inside the cracks. If necessary, apply a non-selective herbicide a few days in advance to kill the roots.
- Brush Out Debris: Use a stiff wire brush to vigorously scrub the inside edges of the cracks. This knocks loose crumbling asphalt, dirt, and old, failed filler.
- Blow It Clean: Use a leaf blower or a shop vac to blast all the dust and loose pebbles out of the cracks.
- Wash and Dry: Rinse the driveway with a garden hose or pressure washer to remove remaining fine dust. Crucial rule: The driveway must be 100% dry before you apply most standard fillers. If water is trapped in the crack, the filler cannot bond.
Step 2: Applying the Crack Filler
With a clean, dry surface, you are ready to apply your product.
- Prep Deep Cracks: If a crack is deeper than 1/2 inch, do not fill the entire depth with liquid filler. It will take forever to dry and will sink. Instead, pack clean sand or a foam backer rod into the crack until it is about 1/4 inch to 3/8 inch from the surface.
- Apply the Product:
- For pourable bottles: Snip the nozzle to match the width of the crack. Pour the liquid slowly into the crack.
- For caulk tubes: Insert the tube into a caulking gun, cut the tip at a 45-degree angle, and drag the tip slowly through the crack while applying steady pressure.
- For hot-applied rope: Press the rubberized rope into the crack (use a screwdriver to pack it in). Light your propane torch and sweep the flame back and forth over the rope from about 3 inches away until it melts completely into the joint.
- The Overfilling Technique: Fill the crack so it is slightly overfilled, then use an asphalt squeegee, a putty knife, or even a piece of stiff cardboard to scrape the excess flat. This creates a smooth, flush patch across the surface.
Step 3: Curing and Post-Repair Maintenance
Once applied, give your hard work time to set up.
- Protect the Repair: Keep cars, pets, and children off the wet filler. Most cold-pour fillers require 24 to 48 hours to fully cure.
- Speeding Up the Cure: If you are worried about tracking or need to walk on the driveway sooner, you can lightly sprinkle clean, dry sand over the damp filler. This removes the stickiness and helps it cure faster.
- Plan to Seal: For a truly seamless and long-lasting finish, apply a high-quality driveway sealer over the entire blacktop surface. Make sure to review the Best practices for patching and sealing to ensure you don’t compromise your fresh repairs.
DIY vs. Professional Asphalt Repair Services
Taking the DIY route is an excellent way to save money and gain some weekend satisfaction. However, it is important to know your limits. While a homeowner can easily seal a dozen linear feet of minor cracks, larger properties or severely damaged driveways are a completely different story.
Here are the primary benefits of choosing professional crack sealing over a DIY kit:
- Commercial-Grade Hot Rubber: Professionals use specialized oil-jacketed melters to heat pure rubberized asphalt block to 350°F+. This molten rubber penetrates deep into the crack and creates a highly flexible, highway-grade seal that DIY cold-pour liquids simply cannot match.
- Superior Surface Preparation: Professional crews use high-velocity heat lances that simultaneously blast out dirt, kill weed roots, and completely dry the crack with intense heat, ensuring a perfect bond.
- Speed and Efficiency: What might take you two full weekends of back-breaking work can be completed by a professional crew in a matter of hours.
- Increased Property Value and Longevity: Professionally maintained asphalt lasts up to twice as long, delaying the massive expense of repaving.
To help weigh your options, check out our breakdown of The benefits of professional crack filling.
When to Call the Experts
You should put down the caulking gun and call in a professional service if you notice any of the following signs on your property:
- Extensive Alligator Cracking: As mentioned, this indicates a failed foundation. The subgrade must be repaired, which requires heavy commercial machinery.
- Sunken Asphalt or Large Potholes: If sections of your driveway are sinking, the underlying soil has washed away. This requires professional grade cutting, base compaction, and hot-mix patching.
- Cracks Wider Than 1 Inch: Extremely wide gaps are difficult to seal permanently with DIY products and usually point to larger shifting issues.
- Commercial Parking Lots: If you manage a commercial property, HOA, or retail space in the DFW area, DIY repairs won’t meet safety and ADA compliance standards.
When you need professional-grade durability, it is best to consult with Texas asphalt crack repair experts.
Frequently Asked Questions
We hear a lot of the same questions from homeowners trying to navigate their first asphalt repair project. Here are the answers to the most common queries.
What is the best temperature for blacktop driveway crack repair?
The ideal weather for asphalt crack repair is dry, clear, and warm.
- Temperature Range: Most cold-pour liquid fillers and acrylic sealants require air and surface temperatures to be above 50°F (10°C) during application and for at least 24 hours afterward.
- Rain Forecast: Do not attempt to fill cracks if rain is predicted within 24 hours. Rain will wash away uncured water-based fillers, leaving a messy black stain on your concrete walkways and lawn.
- Seasonal Timing: In the DFW Metroplex, late spring and early autumn are the absolute best times for crack repair. The extreme heat of mid-summer can make liquid fillers highly tacky and slow to cure, while winter temperatures are often too cold for the materials to bond properly.
How long should I wait to seal my driveway after filling cracks?
Patience is a virtue, especially when it comes to asphalt maintenance.
- For Standard Liquid Fillers: We recommend waiting at least 30 days before applying a driveway sealer over fresh crack repairs. This allows the solvents in the filler to fully evaporate and the product to harden. If you seal too early, the trapped solvents will soften the patch, causing it to fail.
- For Cold Patch Pothole Repairs: If you used a deep aggregate patch like Quikrete Blacktop Patch, you should wait a minimum of 30 days (and ideally 90 days) before sealing.
- For detailed project guidelines, you can review the official Quikrete blacktop repair project instructions.
Can I use concrete to patch a blacktop driveway?
While it might seem tempting to pour a leftover bag of concrete into an asphalt hole, we strongly advise against it. Asphalt and concrete are fundamentally different materials. Asphalt is flexible and expands with heat, while concrete is rigid.
If you put concrete into an asphalt crack, the natural shifting of the asphalt will quickly break the bond, causing the concrete patch to crack, crumble, and pop out.
However, some builders suggest unique workarounds for large, deep holes where cold patch asphalt keeps failing. For example, you can read about Ask the Builder’s alternative blacktop patching method, which involves undercutting the edges of a deep hole to create a mechanical lock, pouring a high-strength concrete patch, and then broadcasting crushed original blacktop into the wet surface so it can be sealed to match the rest of the driveway. Still, for standard crack repair, stick to flexible, asphalt-specific products!
Conclusion
At the end of the day, keeping up with blacktop driveway crack repair is the single best way to protect your pavement investment. By spending a little time and effort sealing cracks while they are small, you can easily prevent water infiltration, stop potholes in their tracks, and dodge a massive replacement bill down the road.
If you are located in the DFW Metroplex and find yourself facing a driveway or commercial parking lot that is overwhelmed by cracks, potholes, or fading paint, you do not have to tackle it alone. We at Lone Star Parking Maintenance are here to help. We bring top-quality materials, industry-standard equipment, and an absolute commitment to safety and customer satisfaction to every project we touch.
Let us handle the dirty work so you can enjoy a smooth, beautiful, and long-lasting pavement surface. Schedule professional parking lot sealing and crack filling with us today, and let’s put an end to the crack madness once and for all!