
Bollard Lighting Installation Starts With a Secure Base
For a commercial bollard lighting installation, start with the fixture’s instructions and a stable concrete foundation. Set the anchor bolts with the supplied template, run the electrical supply through the base, and level and fasten the bollard. A qualified electrician should confirm the voltage, connect and ground the wiring, then assemble, seal, and test the fixture.
Done well, bollard lights help people see walkways, parking areas, and property edges after dark. I’m Cason, and I’ll walk you through the safety checks and installation steps that matter most.
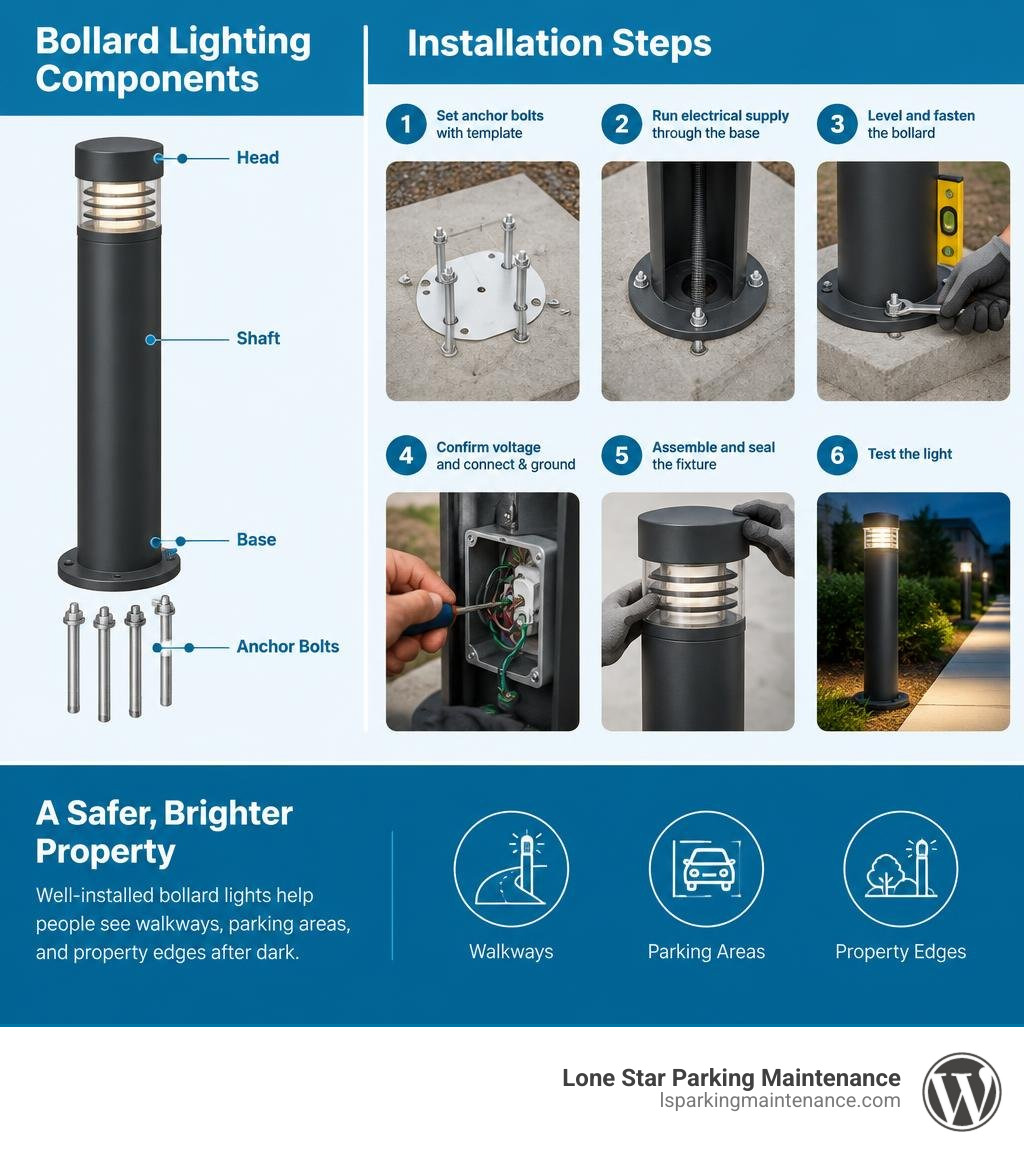
Quick bollard lighting installation terms:
Essential Safety Precautions and Code Compliance
Exterior commercial electrical work requires rigorous planning before any ground is broken. When deploying low-level architectural or security luminaires, strict adherence to OSHA workplace standards, National Electrical Code (NEC) guidelines, and regional municipal codes is mandatory.
Working with electrical infrastructure carries serious hazards, including arc flash, electrocution, and fire risks. Always implement comprehensive Lockout/Tagout (LOTO) protocols at the primary service panel before handling any wiring or removing structural components. Every circuit must be tested and proven de-energized with a calibrated multimeter prior to touching conductors.
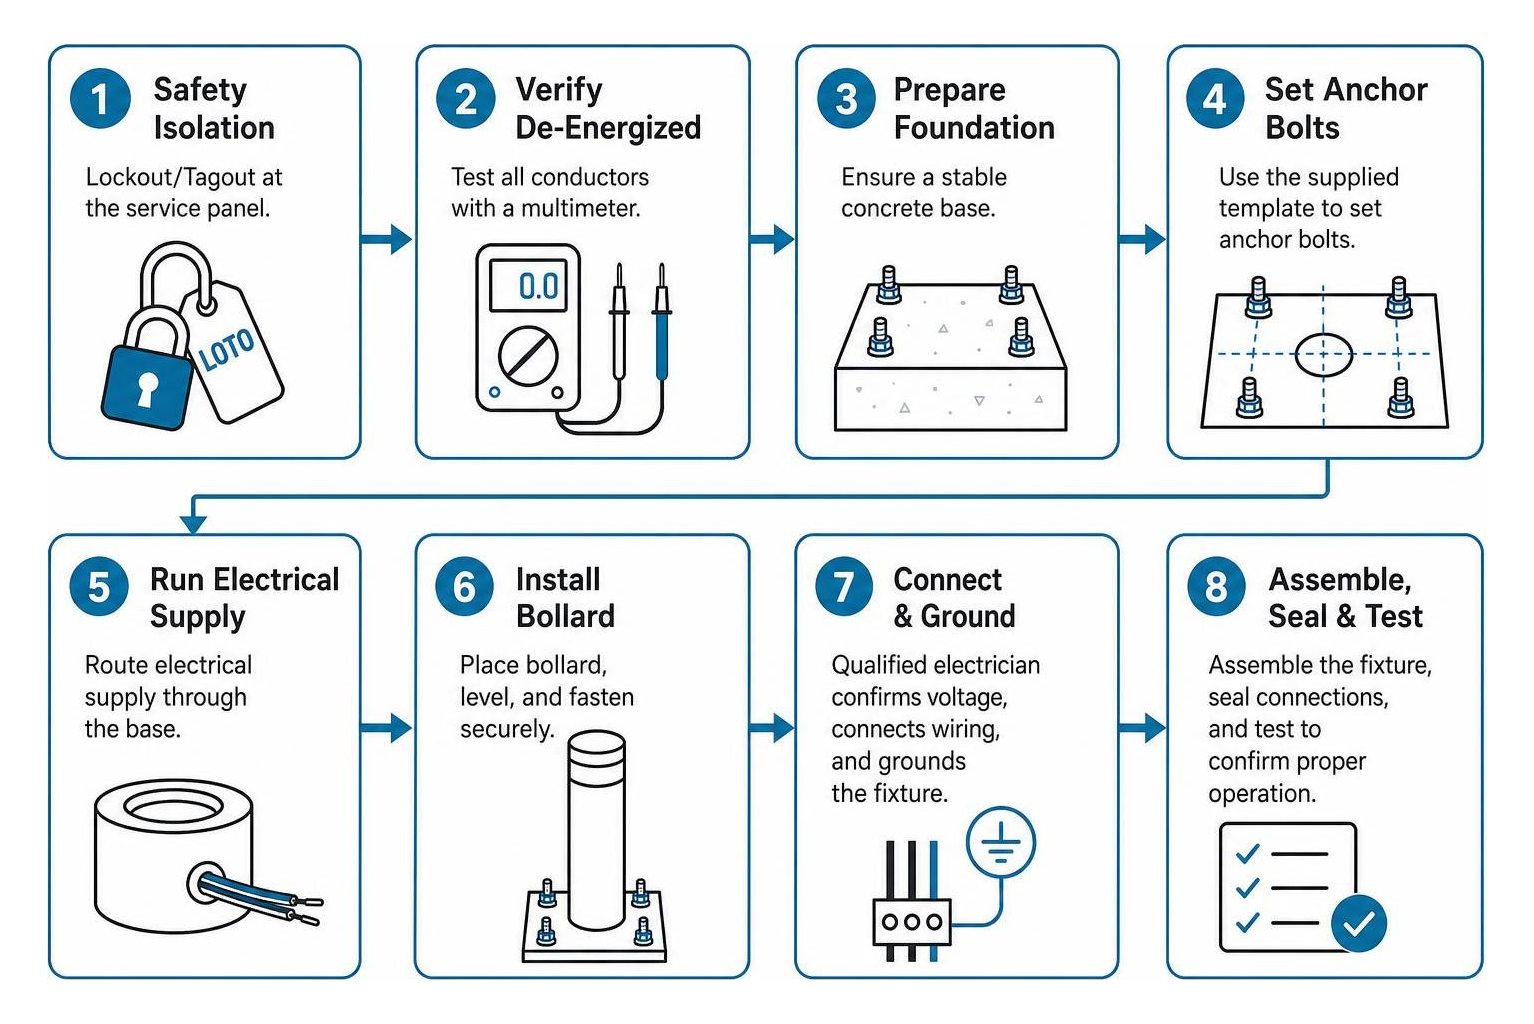
Personal protective equipment (PPE) is non-negotiable on commercial jobsites:
- Mechanics-style or puncture-resistant gloves to protect hands from sharp metal edges and concrete abrasion
- Rated eye protection and impact-resistant hard hats
- Dielectric safety footwear to prevent accidental ground faults
All commercial pathway fixtures require wet-location ratings and high ingress protection standards (such as IP65 or IP68 water-tight enclosures) to withstand heavy rain, high-pressure irrigation, and ground runoff. Because bollards operate close to pedestrian traffic and standing surface water, grounding must be continuous from the main distribution panel through class I luminaire chassis points.
All electrical connections, circuit configurations, and line-voltage terminations must be executed by licensed electricians. For comprehensive commercial lighting infrastructure layouts across surface lots and garages, coordinating your low-level lighting with overhead parking lot lighting systems ensures balanced visibility and complete code compliance. Always cross-reference manufacturer technical standards such as Signify commercial luminaire installation specifications to ensure the hardware aligns with your electrical distribution design.
Step-by-Step Commercial Bollard Lighting Installation Guide
A smooth installation relies on having the right mechanical tools and electrical equipment on hand before mixing concrete or pulling conduit.
Required Mechanical & Electrical Tools:
- Ratchet set with a 9/16-inch deep socket and open-end leveling wrenches
- Complete metric and imperial hex key (Allen wrench) sets
- #4 Phillips screwdriver and precision flat-head screwdrivers (for terminal block blocks)
- Torpedo spirit level (magnetic base preferred)
- Digital multimeter and wire strippers/crimpers
- Calibrated torque wrench (reading in Newton-meters / inch-pounds)
- Non-corrosive anti-seize lubricant and electrical-grade silicone sealant
| Parameter / Feature | Standard Bollard Anchoring | Heavy-Duty / High-Impact Anchoring |
|---|---|---|
| Typical Bolt Size | M8 to M10 J-Bolts (3/8″ to 1/2″) | M12 to 5/8″ High-Tensile J-Bolts |
| Foundation Depth | 18 – 24 inches | 30 – 42 inches (below local frost line) |
| Bolt Circle Diameter | 4 to 6 inches (3-bolt pattern) | 8 to 10 inches (3 or 4-bolt pattern) |
| Thread Protrusion | 1.5 to 2.0 inches | 3.0 inches (allows double nutting) |
| Recommended Torque | 10.5 Nm (M8) / 20 Nm (M10) | 35 – 45 Nm |
| Primary Application | Pedestrian walkways, landscape beds | Perimeter security, parking lot islands |
Preparing the Foundation for Bollard Lighting Installation
The structural integrity of any pathway luminaire depends on its concrete footing. A leaning fixture usually stems from a rushed footing rather than a manufacturing defect.
Pouring footings requires digging below local frost lines, placing circular sonotube forms, and running rigid PVC or EMT conduit directly through the center of the footing. Maintain at least 4 feet of supply wire slack extending from the conduit stub-up above the finished grade to ensure comfortable, stress-free wiring inside the shaft.
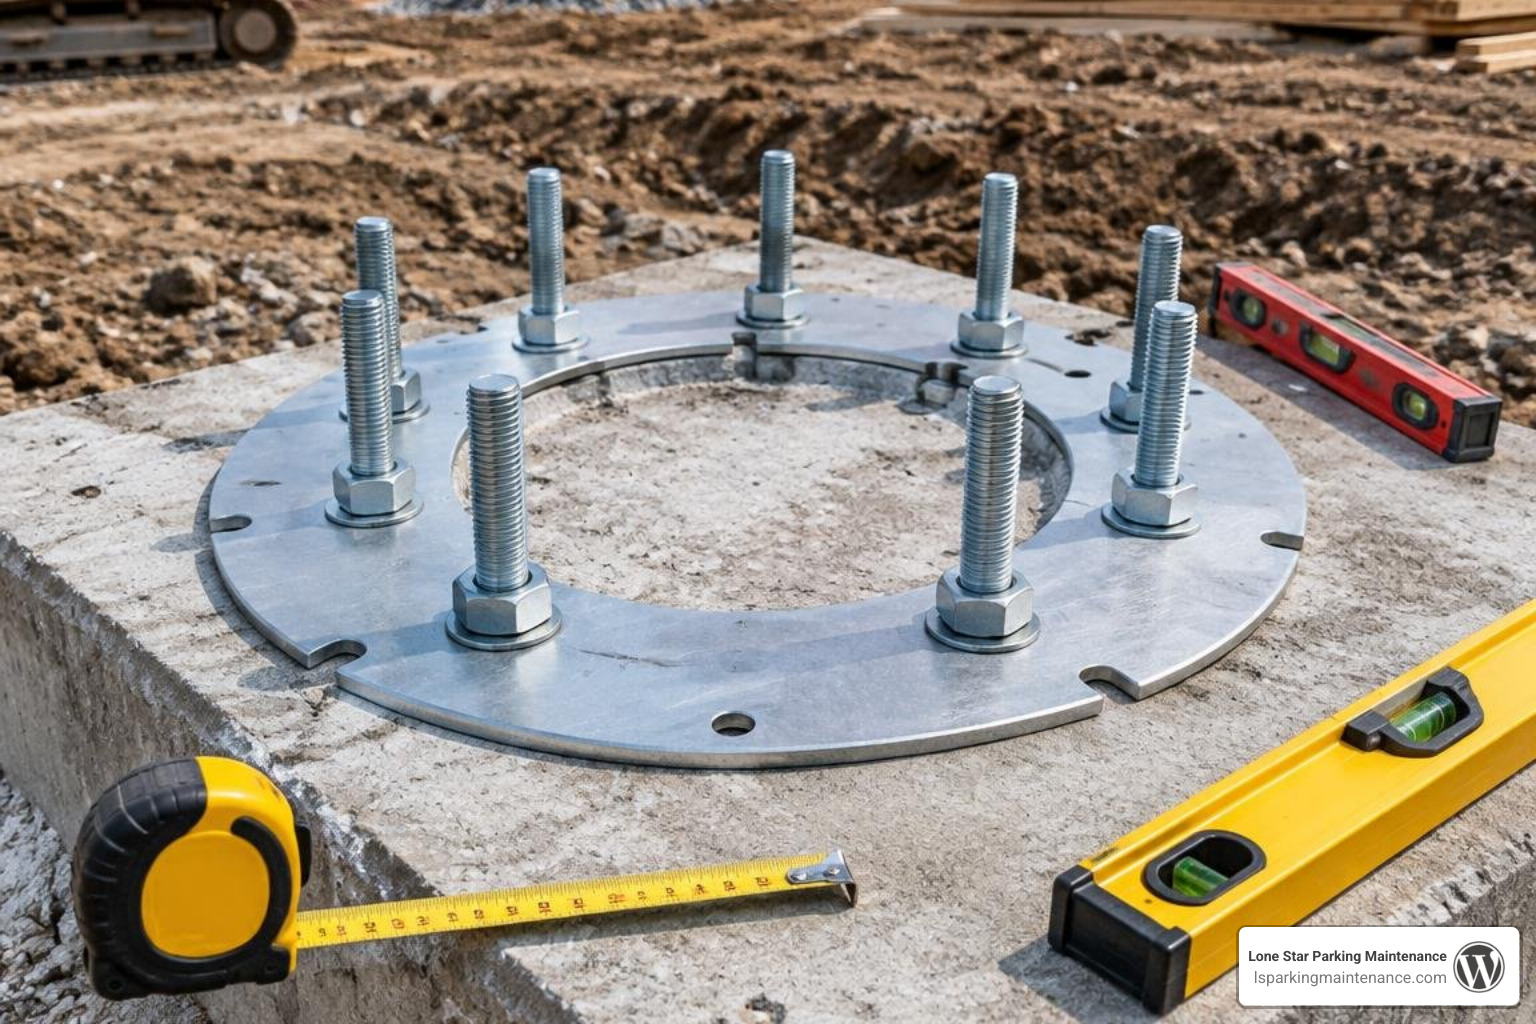
When pouring concrete, suspend the anchor J-bolts using the manufacturer-supplied bolt carrier alignment template. Never wet-set bolts freehand into wet concrete without a template; misaligned bolts will bind against the base plate casting and ruin the installation.
Ensure that the bolt threads protrude above the cured concrete according to the fixture requirements:
- Standard round LED bollards typically require 1.5 to 2.0 inches of exposed thread.
- Specialized models like the BL25 series demand a minimum of 3.0 inches of thread clearance to accommodate lower leveling hardware.
Keep all threads protected with tape during the concrete pour to prevent slurry buildup. For broader structural engineering guidelines on deep foundations, refer to our detailed resource on structural parking lot poles.
Leveling the Base Plate and Structural Mounting
A level bollard creates clean sightlines along a commercial property. Achieving a vertical stance on an uneven concrete surface requires a dual-nut mounting method.
- Thread one leveling nut and one flat washer onto each embedded J-bolt down toward the concrete surface.
- Lower the cast aluminum base plate over the bolts so it rests on the leveling washers.
- Place a torpedo spirit level across the base plate in multiple directions (North-South and East-West).
- Rotate the lower leveling nuts up or down until the base plate is level across its entire circumference.
- Place an upper flat washer, spring washer, and locking nut onto each bolt above the plate.
- Hand-tighten all top nuts, verify level one final time, and secure the hardware. For M8x1.25 anchor bolts, apply a precise torque of 10.5 Nm using a calibrated torque wrench. For larger M10 hardware, torque up to manufacturer limits to prevent loosening from wind vibration or pedestrian contact.
Electrical Wiring and Safety Steps for Bollard Lighting Installation
With the base secured, prepare your line voltage connections. Commercial bollard luminaires feature auto-adjusting drivers that accommodate universal 120–277V AC supplies, with heavy commercial and industrial fixtures handling 120–347V AC (50/60 Hz). These systems operate in temperatures ranging from -40°C to 50°C (-40°F to 122°F), easily handling both freezing winters and extreme summer heat.
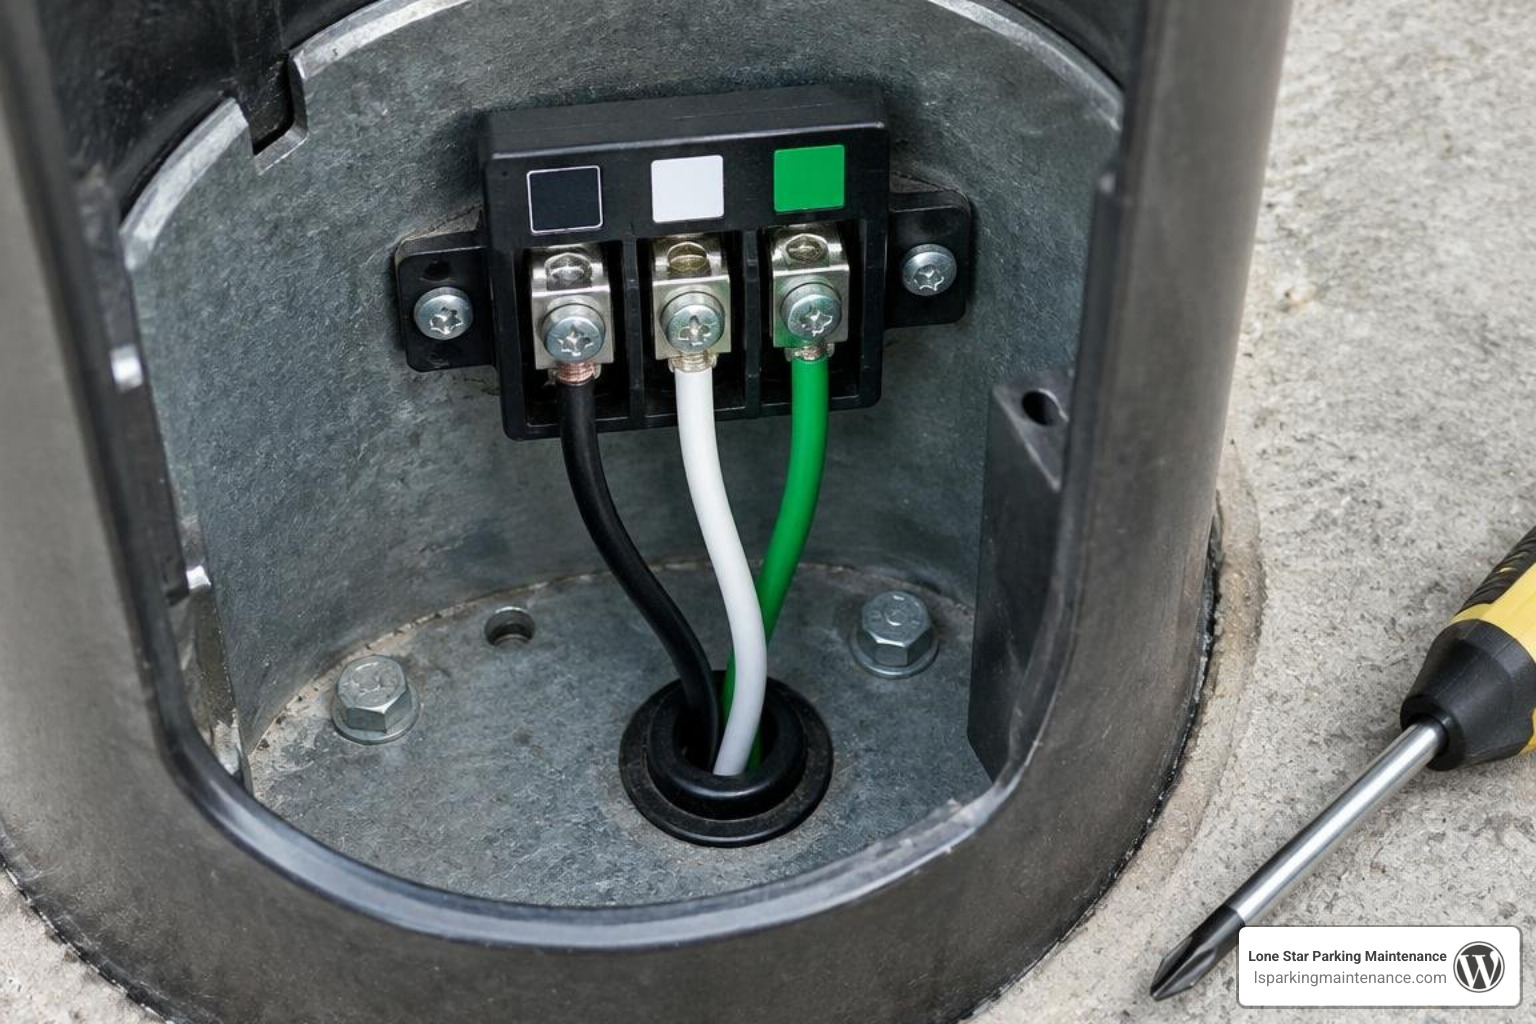
Inside the bollard housing or lower base compartment, you will encounter either a 5-port or 6-port screw-down terminal block, or pre-wired water-tight disconnect plugs:
- Line (Hot): Connect incoming black supply wire to the black line lead or ‘L’ marked terminal.
- Neutral: Connect incoming white supply wire to the white common lead or ‘N’ marked terminal.
- Ground: Connect the bare copper or green equipment ground wire directly to the fixture grounding lug or ‘G/GND’ terminal. Class I fixtures must maintain solid earth bonding.
- Dimming Controls (0–10V): Land purple (Dim +) and pink/gray (Dim -) wires onto their isolated ports. Cap these leads individually with wire nuts if dimming is not utilized.
For commercial locations exposed to transient utility surges, ensure your system includes integrated surge suppression. Luminaires like the Ratio Bollard come standard with a 20kA Surge Protector and internal fusing (single fuse for 120V/277V/347V; double fuses for 208V/240V/480V systems). For model-specific terminal block schematics, consult the Ratio Bollard technical wiring guidelines. Always use IP68-rated waterproof connectors and UV-resistant outdoor cable (cable lengths typically measure 200 mm for internal sub-assemblies).
Assembling the Shaft, Head, and Optical Configurations
After completing and testing your electrical connections, finish the mechanical assembly:
- Carefully slide the bollard shaft housing over the mounted base plate, ensuring internal conductors are not pinched against metal edges.
- Align the internal mounting slots or perimeter holes and secure the shaft using stainless-steel set screws and a hex wrench. Tighten screws evenly in an alternating cross-pattern.
- If your fixture features field-selectable optics, configure your internal DIP switches prior to locking the top cap down:
- Wattage Selection: Adjust switches to toggle output between standard driver outputs (e.g., 15W, 25W, or 35W).
- CCT Selection: Set color temperature to 3000K (warm white), 4000K (neutral commercial white), or 5000K (crisp daylight).
- Light Distribution Selector: For fixtures with optical distribution toggles, rotate the 4-position selector switch to project 360°, 180°, 270°, or 90° forward-throw patterns.
- Seat the internal closed-cell silicone perimeter gasket. Gaskets must sit flat in their channels without pinches or tears to block moisture, dust, and insects.
- Place the optical head assembly onto the shaft, align the retaining holes, and torque the final set screws to 2.5 Nm.
Optimizing Bollard Photometrics and Smart Control Features
Proper bollard placement balances safety, visual clarity, and energy efficiency across your property. Placing fixtures without photometric planning can lead to uneven lighting with alternating bright spots and dark patches that create safety concerns for pedestrians and drivers.
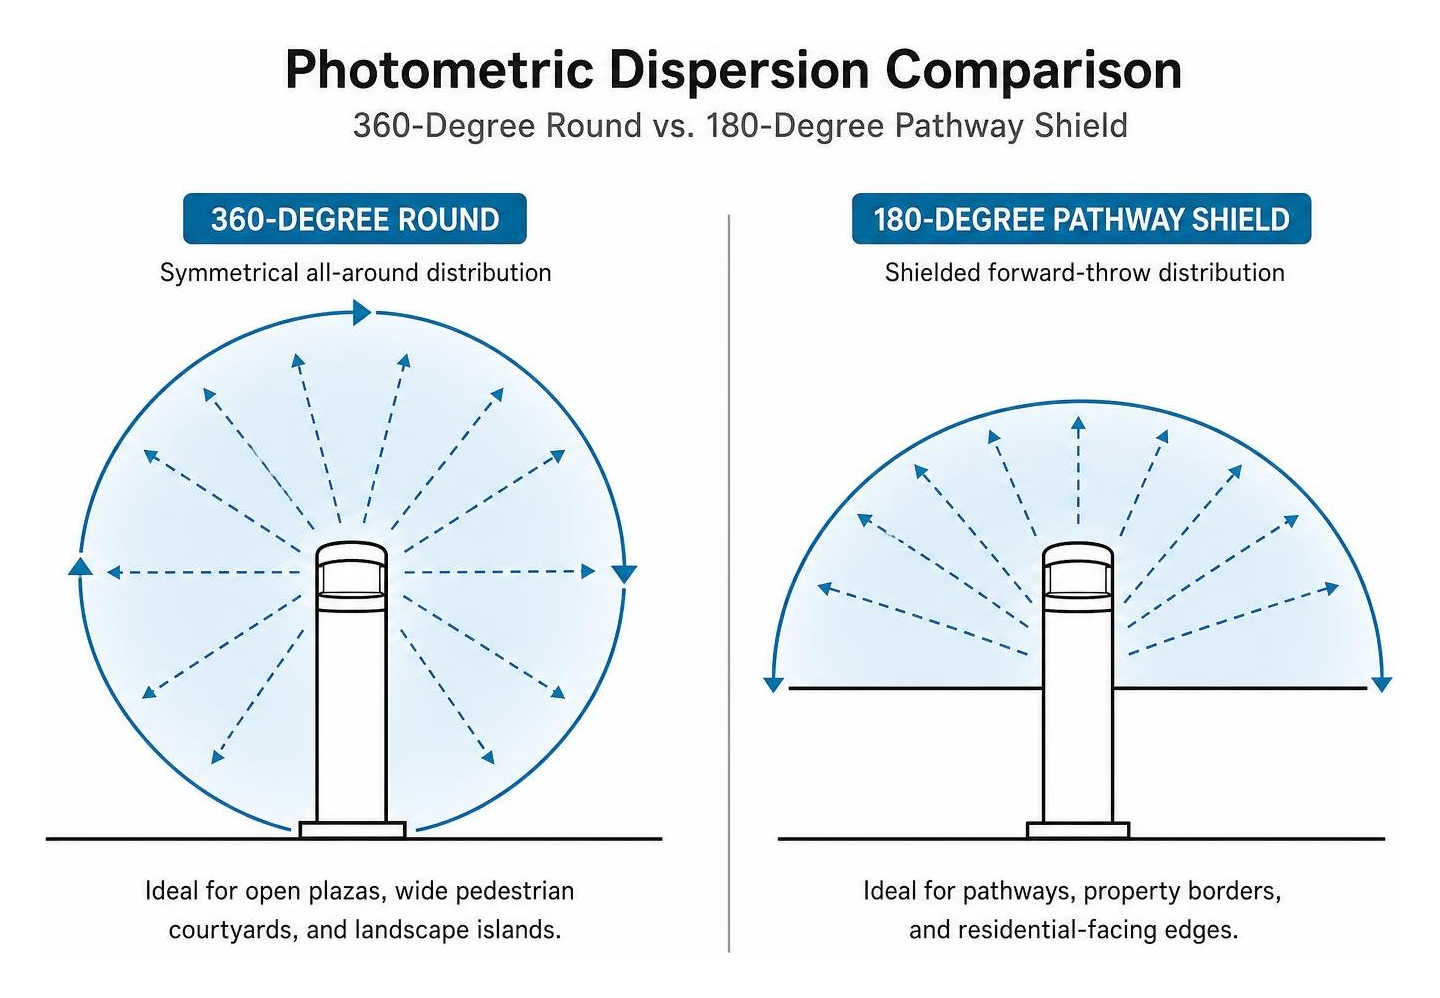
When selecting optical packages, evaluate how the light interacts with surrounding surfaces:
- 360-Degree Symmetrical Distribution: Ideal for open plazas, wide pedestrian courtyards, and landscape islands where all-around illumination is needed.
- 180-Degree or 90-Degree Shielded Forward-Throw: Essential along property borders, zero-lot lines, and residential-facing edges to prevent light trespass while illuminating the walking path.
If your bollards feature integrated Button Photoelectric Controls (PEC photocells), orient the sensor away from direct artificial lighting. If a photocell faces an adjacent wall pack or tall light pole, the ambient beam can cause the fixture to turn off unexpectedly at night.
For comprehensive lighting calculations, consult our deep dive on photometric lighting design for safer commercial properties. To ensure your layout delivers the right foot-candle levels for vehicle and foot traffic, review commercial parking lot lumen standards. Upgrading older high-intensity discharge (HID) bollards with modern luminaires offers substantial operational savings; discover how in our guide to energy-efficient LED upgrades.
Routine Maintenance and Troubleshooting Common Fixture Issues
Commercial bollard lighting systems are built for long service lives, but harsh weather, landscaping equipment, and irrigation minerals require regular upkeep.
Recommended Maintenance Protocol:
- Lens and Housing Care: Clean optical lenses every six months using a soft microfiber cloth and solvent-free mild detergents. Never use high-pressure power washers directly against bollard seams, and avoid abrasive chemical cleaners that degrade UV-stabilized polycarbonate lenses.
- Gasket and Seal Inspection: Inspect silicone sealing rings annually. Replace any cracked or dry-rotted gaskets to prevent condensation buildup and internal corrosion.
- Hardware Check: Verify that mounting base anchor nuts and housing set screws remain torqued to spec. Ground vibration from nearby traffic can loosen hardware over time.
Systematic Troubleshooting Matrix
| Problem | Probable Cause | Corrective Action |
|---|---|---|
| Fixture fails to illuminate | Line breaker tripped; blown internal fuse; tripped surge protector; loose line/neutral terminal connection. | Verify voltage at the terminal block with a multimeter. Inspect internal inline fuse (replace with matching rating). Reset breaker. |
| Intermittent flickering | Loose 0–10V dimming lead; incompatible line-voltage dimmer; line voltage fluctuation below 120V; failing driver. | Disconnect and isolate purple/pink dimming leads. Confirm input voltage stability. Replace LED driver if voltage input is steady but DC output fluctuates. |
| Water inside optical housing | Displaced perimeter silicone gasket; missing set screw rubber washer; blocked base drainage weep hole. | De-energize fixture, dry internal cavity, inspect/reseat silicone gasket, and verify base weep holes are free of landscape mulch. |
| Fixture cycles on and off | Photocell sensor receiving reflected light from its own LED head or a nearby pole luminaire. | Reorient photocell direction or install an optical shield to prevent artificial light from triggering the sensor. |
Frequently Asked Questions About Bollard Lighting Installation
Who is qualified to install and service commercial bollard lights?
Only licensed commercial electricians and certified lighting technicians should perform electrical work on bollard systems. Commercial installations require high-voltage line terminations (120–347V AC), trenching, continuous grounding, and adherence to the National Electrical Code (NEC) and local building safety codes.
What is the recommended anchor bolt protrusion for bollard bases?
Standard commercial LED bollards typically require anchor bolts to protrude between 1.5 and 2.0 inches above the finished concrete. However, specialized deep-recess bases (such as the BL25 series) require a minimum 3.0-inch protrusion to provide sufficient room for bottom leveling nuts, washers, and top locking hardware. Always check your model’s mounting template before pouring concrete.
How do you fix a bollard light that flickers or fails to illuminate?
Start by de-energizing the circuit and confirming input voltage at the primary terminal block with a digital multimeter. Check for loose connections on line, neutral, and ground wires. If the supply voltage is correct (120–277V) and connections are solid, check the 20kA surge protector module and inline fuses. If the surge protector took a voltage spike, it may need replacement to restore current flow to the driver.
Professional Commercial Exterior Lighting Solutions
A properly installed bollard lighting system protects pedestrians, guides vehicles, and highlights your property’s architectural profile. From pouring solid concrete foundations to landing terminal wiring and balancing photometrics, quality installation ensures decades of reliable performance.
At Lone Star Parking Maintenance, we deliver dependable parking facility solutions throughout the DFW Metroplex. Whether you manage an office park, retail center, or commercial parking garage, our team provides turn-key services—including parking lot striping, asphalt repairs, concrete foundations, and comprehensive expert commercial facility maintenance and exterior lighting solutions. Contact us today to upgrade your exterior lighting and protect your commercial property.