
Why Parking Lot Wheel Stop Placement Can Make or Break Your Lot’s Safety
Parking lot wheel stop placement is one of the most overlooked details in parking lot design — and one of the most consequential.
Get it right, and your lot runs smoothly. Vehicles stay in their stalls, pedestrians move safely, and you stay on the right side of ADA code. Get it wrong, and you’re looking at trip-and-fall liability, ADA violations, and vehicles overrunning sidewalks or hitting buildings.
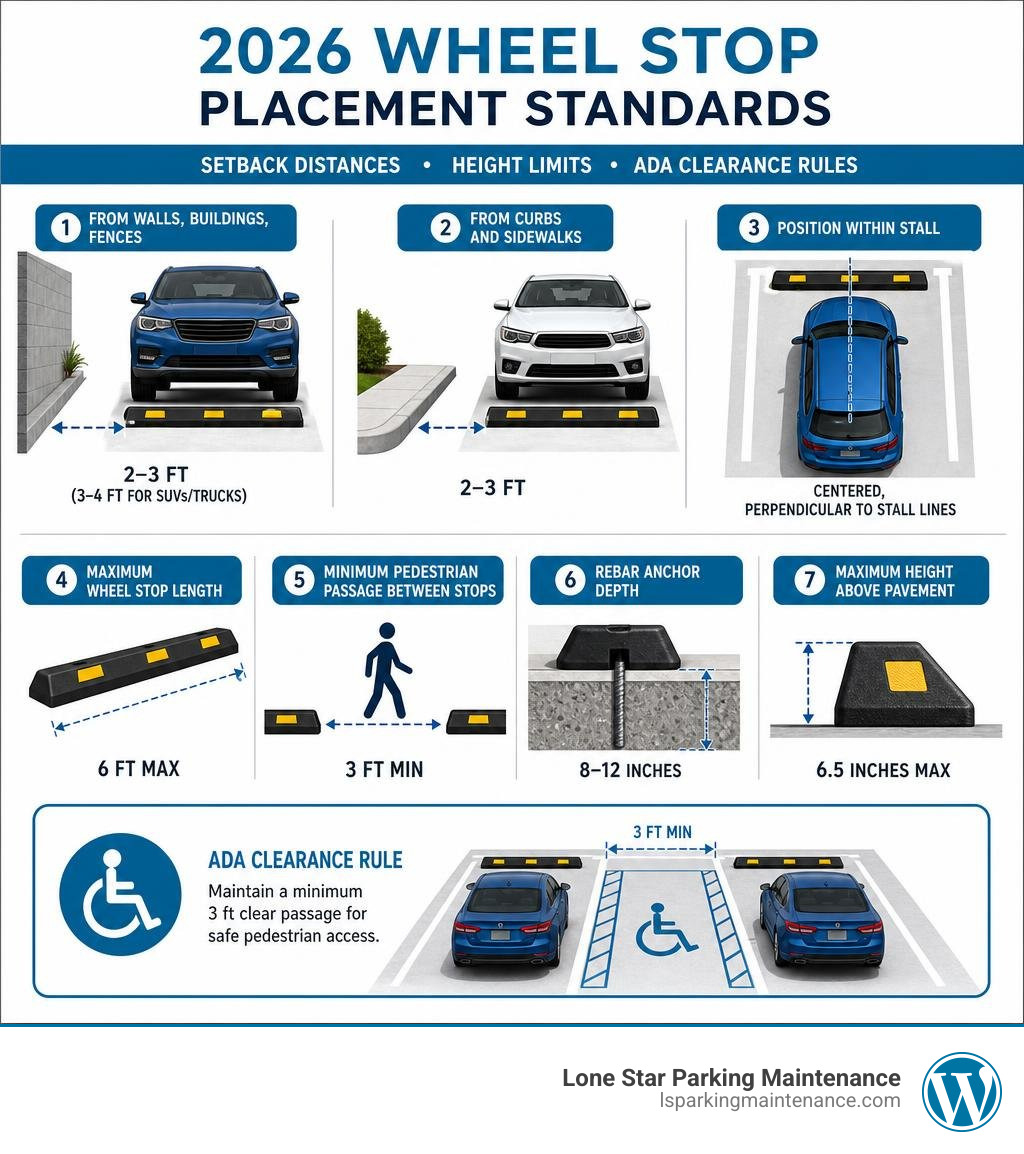
Here’s a quick reference for the core placement standards:
| Placement Scenario | Recommended Distance |
|---|---|
| Distance from walls, buildings, fences | 2–3 ft (3–4 ft for SUVs/trucks) |
| Distance from curbs and sidewalks | 2–3 ft |
| Position within stall | Centered, perpendicular to stall lines |
| Maximum wheel stop length | 6 ft |
| Minimum pedestrian passage between stops | 3 ft |
| Rebar anchor depth | 8–12 inches |
| Maximum height above pavement | 6.5 inches |
The stakes are real. According to industry data, 500 people are killed and 4,000 injured every year by vehicle-into-building crashes in parking lots and storefronts. Proper wheel stop placement is one of the simplest ways to reduce that risk on your property.
For DFW property managers and business owners, this guide walks through everything you need to know — from setback distances and ADA code requirements to material selection, anchoring methods, and long-term maintenance.
Parking lot wheel stop placement terms to remember:
Standard Dimensions and Parking Lot Wheel Stop Placement Rules
When setting up a professional parking layout, uniform placement is key. If your wheel stops are placed haphazardly, drivers won’t know where to stop, resulting in scuffed curbs, blocked walkways, and misaligned parking rows.
To prevent these issues, we follow strict dimensional guidelines for every installation. Standard wheel stops are typically 6 feet long (though some heavy-duty industrial versions reach 7 or 8 feet) and stand between 4 and 6.5 inches high. This height is optimized to catch a standard vehicle’s tires without scraping the low-clearance front spoilers of modern sedans.

When calculating the perfect setback distance, you must account for “vehicle front overhang”—the distance from the front axle (where the tire contacts the wheel stop) to the tip of the front bumper. For standard passenger cars, this overhang ranges from 32 to 38 inches.
| Target Obstruction | Standard Setback (Front-In) | Heavy Vehicle Setback (SUVs/Trucks) | Key Consideration |
|---|---|---|---|
| Concrete Walls & Fences | 30 to 36 inches (2.5 to 3 feet) | 36 to 48 inches (3 to 4 feet) | Prevents structural and bumper damage |
| Raised Curbs & Sidewalks | 24 to 36 inches (2 to 3 feet) | 36 to 48 inches (3 to 4 feet) | Keeps pedestrian walkways clear |
| Perimeter Striping Edges | 8 to 10 inches from inner edge | 8 to 10 inches from inner edge | Minimizes trip hazards for passing foot traffic |
Optimal Parking Lot Wheel Stop Placement for Walls, Buildings, and Fences
When parking stalls face structural walls, glass storefronts, or utility equipment, the wheel stop acts as your last line of defense. A standard car’s front overhang requires a minimum setback of 2.5 to 3 feet from the wall to prevent the front bumper from making contact.
However, the vehicle mix in the DFW Metroplex leans heavily toward large SUVs, dual-cab work trucks, and commercial vans. These larger vehicles have a significantly longer front overhang. If your lot serves a high volume of these vehicles, we recommend increasing the setback to 3 to 4 feet. This extra buffer ensures that even a heavy-duty pickup can park completely without its bumper denting your metal siding, shattering storefront glass, or compromising structural walls.
Recommended Setback Distances from Curbs and Sidewalks
Sidewalks and curbs require a delicate balance. If you install the wheel stop too close to a sidewalk, the front of the vehicle will overhang the walkway. This reduces the usable width of the sidewalk, forcing pedestrians—especially those using wheelchairs, strollers, or walking aids—to steer around the vehicle’s bumper.
To maintain a clear and compliant pedestrian passage, wheel stops must be setback 2 to 3 feet from the curb or sidewalk edge. For flush curbs (where the sidewalk is level with the asphalt), this setback is even more critical.
Using a high-quality wheel stopper ensures that car bumpers never encroach on pedestrian spaces, keeping your walkways safe, accessible, and fully functional.
Code Compliance and ADA Regulations
Compliance isn’t just about avoiding fines; it’s about protecting your business from costly premises liability lawsuits. Under federal ADA Standards for Accessible Design, all public accommodations must provide accessible routes that are free of obstructions.
Because wheel stops sit low to the ground and are often difficult to see, they are legally recognized as potential trip hazards if they are improperly placed, poorly maintained, or lack adequate visual contrast.
California Building Code (CBC 11B-502.7.2) and ADA Parking Lot Wheel Stop Placement
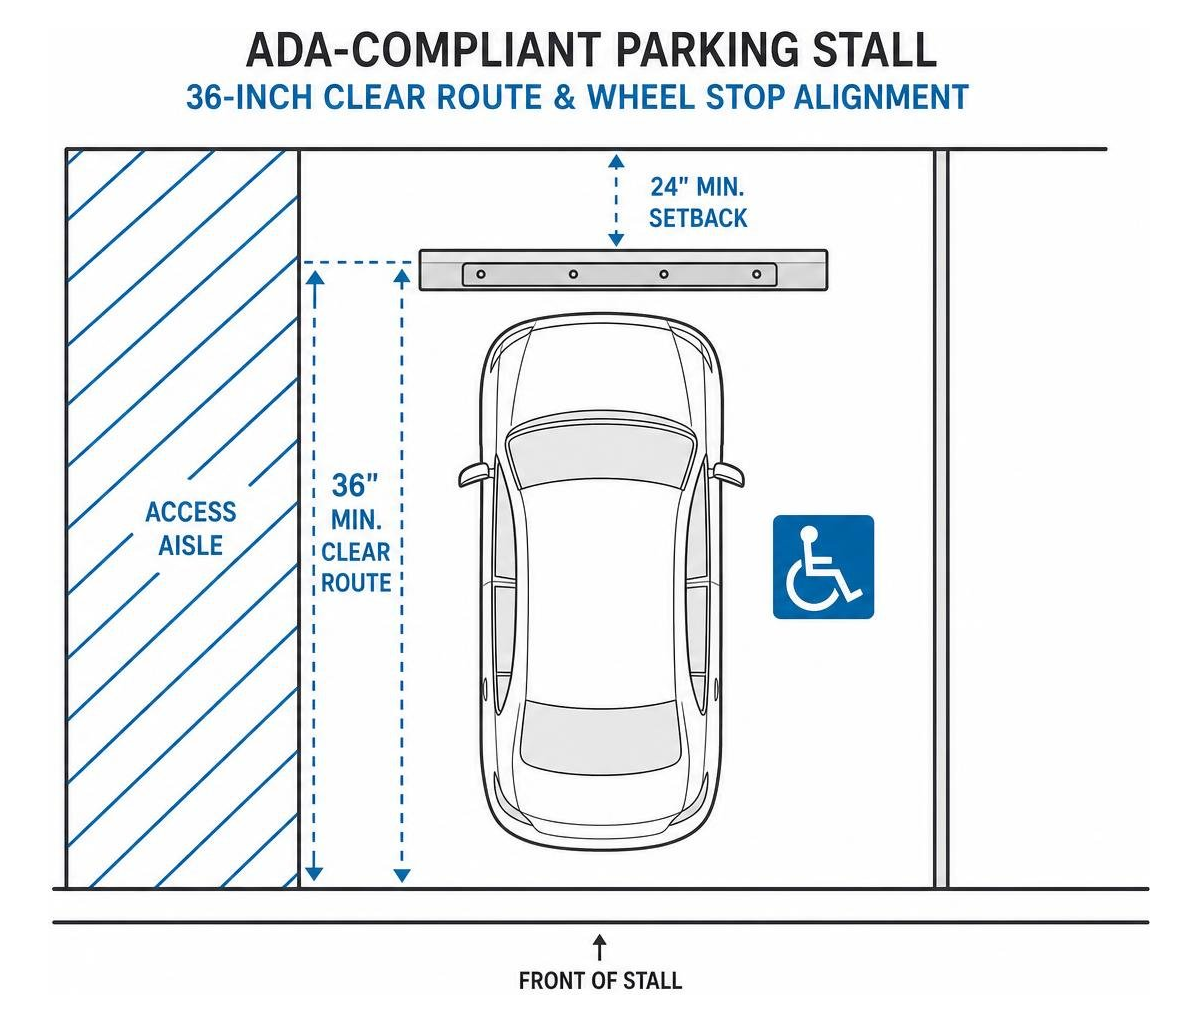
While we operate in the DFW Metroplex, looking at strict standards like the California Building Code (CBC Section 11B-502.7.2) provides excellent benchmarks for risk mitigation. The CBC states: “A curb or wheel stop shall be provided if required to prevent encroachment of vehicles over the required clear width of adjacent accessible routes.”
Under the federal ADA and state equivalents, if a parked vehicle’s bumper overhangs a sidewalk and reduces its clear width to less than 36 inches, it constitutes an immediate violation. In states with strict civil rights laws, like California’s Unruh Civil Rights Act, even a minor 1- to 2-inch encroachment can trigger statutory penalties of $4,000 per violation.
To stay compliant, we ensure that our safety line striping and wheel stop layouts are perfectly coordinated. This keeps all vehicle bumpers completely clear of designated accessible paths.
Common ADA Violations and Pedestrian Trip Hazards
The most common ADA violations we see in the field include:
- Access Aisle Encroachment: Placing wheel stops inside the painted crosshatched access aisles next to handicap spaces. Wheel stops must never be placed in access aisles, as they block wheelchairs from deploying ramps.
- Inadequate Wheelchair Clearance: Allowing vehicle bumpers to overhang sidewalks, reducing the continuous accessible route below the mandatory 36-inch minimum.
- Poor Color Contrast: Installing dark grey or weathered concrete stops that blend into the asphalt, creating a major trip hazard. Accessible stalls require highly visible stops, often painted in ADA blue or safety yellow.
- Protruding Anchors: Leaving rebar pins or bolts sticking up above the top surface of the wheel stop.
To avoid these issues, proper planning is essential. Combining precise layout design with expert lot line painting ensures that your parking lot remains safe, accessible, and compliant with all local and federal regulations.
Material Selection: Concrete vs. Rubber vs. Plastic
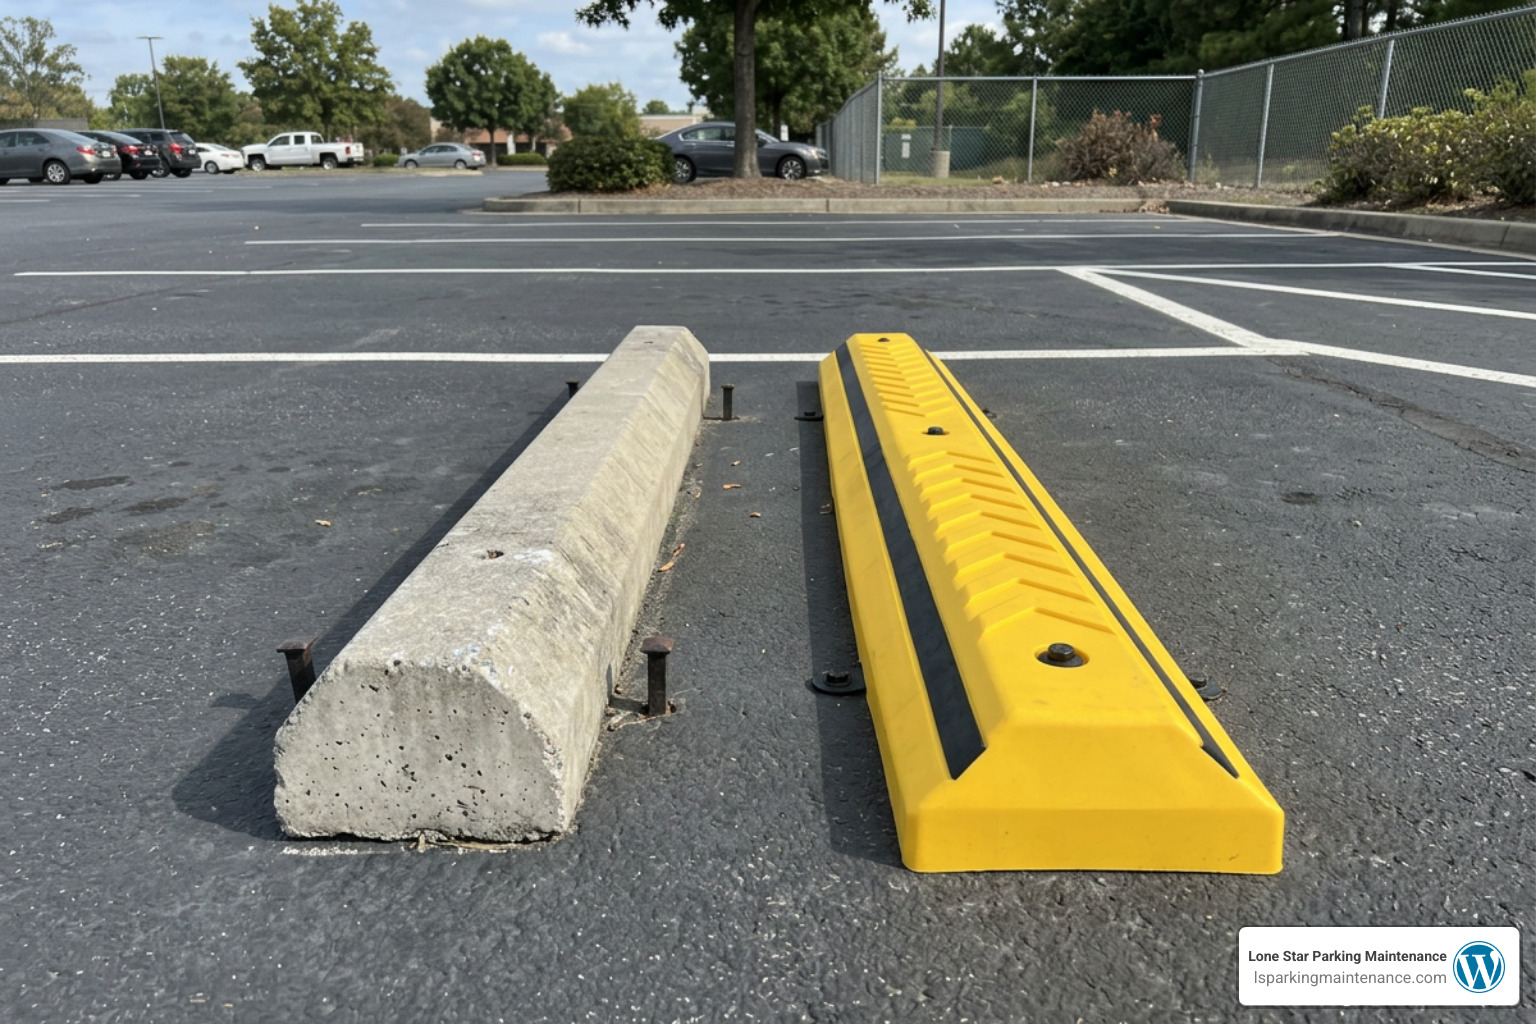
Choosing the right material for your wheel stops is a long-term financial decision. The three primary materials used in commercial lots are precast concrete, recycled rubber, and recycled plastic. Each has its own distinct performance characteristics, lifespan, and lifecycle costs.
Pros and Cons of Concrete, Rubber, and Plastic Stops
Precast Concrete
- Pros: Exceptional durability (lasting 20 to 30 years); high compressive strength (typically 5,500 PSI reinforced with internal rebar); immune to Texas heat and UV degradation; highly stable once anchored.
- Cons: Extremely heavy (weighing 195 to 260 lbs for a 6-foot stop), requiring specialized equipment and multiple crew members to install; can chip or crack under heavy impact from commercial trucks.
- Best For: Permanent commercial lots, industrial facilities, and high-traffic retail centers. Learn more about how a concrete wheel stopper can protect your property.
Recycled Rubber
- Pros: Lightweight (50 to 100 lbs), making installation fast and cost-effective; molded-in reflective tape provides superior nighttime visibility; will not chip, crack, or warp; gentle on low-profile vehicle bumpers.
- Cons: Shorter lifespan than concrete (5 to 10 years); can degrade over time under intense UV exposure; slightly higher upfront material cost.
- Best For: Parking garages, retail lots with high pedestrian traffic, and temporary parking layouts.
Recycled Plastic
- Pros: Very lightweight; available in various solid colors (including safety yellow and ADA blue) that never require repainting; resistant to chemicals and salt.
- Cons: Extremely brittle in cold temperatures; prone to cracking under heavy impact; low weight makes them easy to dislodge if the anchors strip through the plastic mounting holes.
- Best For: Light-traffic commercial lots or indoor residential garages.
Professional Installation Costs and Considerations
Budgeting for parking lot wheel stop placement requires looking beyond the initial purchase price of the units. Professional installation rates in 2026 typically break down as follows:
- Concrete Wheel Stops: $65 to $125 per stop (includes supply, heavy-duty rebar anchoring, and initial painting).
- Rubber Wheel Stops: $85 to $150 per stop (includes supply, specialized expansion bolts/anchors, and built-in reflective striping).
- Removal of Old/Damaged Stops: $20 to $45 per unit.
- Repainting Services: $15 to $30 per stop (using high-durability, slip-resistant traffic paint).
While rubber stops are cheaper to transport, precast concrete stops offer a much lower lifecycle cost. Because concrete lasts up to three times longer than rubber or plastic, it remains the most cost-effective choice for permanent commercial properties in the DFW area.
Step-by-Step Installation and Anchoring Methods
Proper anchoring is what keeps a wheel stop from shifting over time. If a wheel stop is loose, it quickly becomes a major trip hazard and fails to stop vehicles effectively.
Rebar Pinning vs. Expansion Bolts vs. Adhesive
The anchoring method you choose depends entirely on your parking lot’s surface substrate:
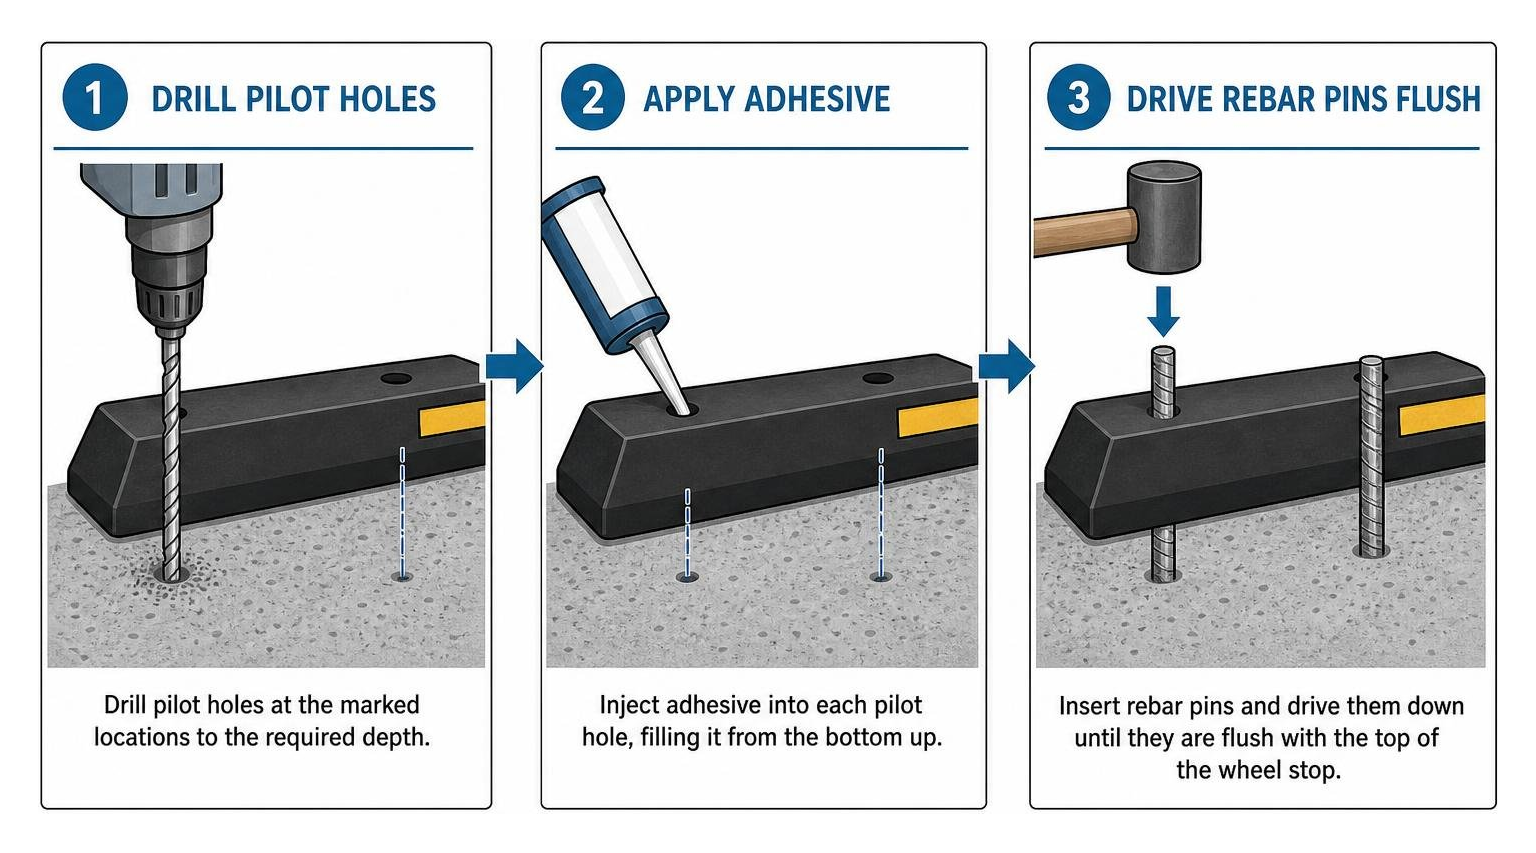
1. Rebar Pinning (Recommended for Asphalt)
Asphalt is a flexible pavement that expands and contracts with the intense North Texas heat. For asphalt installations, we drill pilot holes through the wheel stop and down 8 to 12 inches into the substrate. We then drive heavy-duty rebar pins through the holes. The friction fit of the rebar in the asphalt allows for slight thermal movement without cracking the pavement.
2. Expansion Bolts (Recommended for Concrete)
Concrete is a rigid surface that will crack if you try to hammer rebar into it. For concrete parking decks and surface lots, we use heavy-duty expansion bolts or lag shields. We drill precise holes, insert the expansion anchors, and bolt the wheel stop securely to the deck.
3. The Combination Method (Best Overall)
For high-traffic commercial applications, we combine mechanical anchoring (rebar or bolts) with heavy-duty construction adhesive. Applying adhesive to the underside of the stop before pinning it prevents water from seeping under the unit, which can freeze and loosen the anchors over time.
To see this process in action, read our guide on how to install wheel stops in five simple steps.
Long-Term Maintenance and Inspection Protocols
Like any other asset on your property, wheel stops require regular maintenance to remain safe and compliant. We recommend implementing the following inspection protocols:
- Monthly Visual Inspections: Check for cracked concrete, loose anchors, or shifted units. Pay close attention to stops located near high-turnover stalls.
- Post-Weather Checks: Inspect your wheel stops after severe storms or snow-plowing events. Snowplows are notorious for catching the edges of wheel stops and tearing them from their anchors.
- Anchor Tightening: Over time, vehicle impacts can loosen bolts. Ensure all anchors are driven flush or slightly countersunk below the top surface of the stop to eliminate trip hazards.
- Repainting & Visibility: Apply fresh, high-contrast reflective paint (safety yellow, white, or ADA blue) regularly to keep the stops highly visible to both drivers and pedestrians.
Frequently Asked Questions about Parking Block Layouts
When are wheel stops legally required by building codes versus recommended?
Wheel stops are legally required by building codes whenever a parked vehicle could potentially encroach on an accessible route, block a pedestrian walkway, or damage a structural element.
Specifically, if your curb height is less than 6 inches, or if you have a flush sidewalk adjacent to parking stalls, wheel stops must be installed to protect pedestrians. They are also highly recommended in front of light poles, structural columns, and glass storefronts to prevent low-speed impact damage.
How should wheel stops be positioned within a parking stall to ensure proper vehicle contact?
A standard wheel stop should be centered laterally within the parking stall, perpendicular to the painted stall lines. For a typical 9-foot-wide parking space, a 6-foot wheel stop should leave exactly 18 inches of clearance on either side. This centering ensures that both front tires of an incoming vehicle make contact with the stop simultaneously, distributing the impact force evenly and preventing the vehicle from twisting or parking at an angle.
What is the standard depth and method for anchoring wheel stops to asphalt?
For asphalt installations, the standard depth for anchoring is 8 to 12 inches. We drill pilot holes through the pre-cast holes in the wheel stop and into the asphalt using a high-speed hammer drill. We then drive #4 or #5 steel rebar pins through the stop until they are flush with or slightly recessed below the top surface. This depth ensures the stop remains securely anchored, even under repeated impacts from heavy vehicles.
Conclusion
At Lone Star Parking Maintenance, we know that a safe, compliant, and well-organized parking lot is essential for your business. From precise parking lot wheel stop placement to high-durability striping and professional repairs, we deliver top-quality results across the DFW Metroplex.
Whether you need to install new precast concrete stops, replace damaged rubber units, or perform a complete ADA compliance audit, our team is here to help.
Keep your property safe, protect your customers, and ensure your lot is fully compliant. Explore our protective pole covers and curb stop installation services today, or reach out to us for a professional consultation.