
The Cheapest Way to Patch Asphalt for a Quick Repair
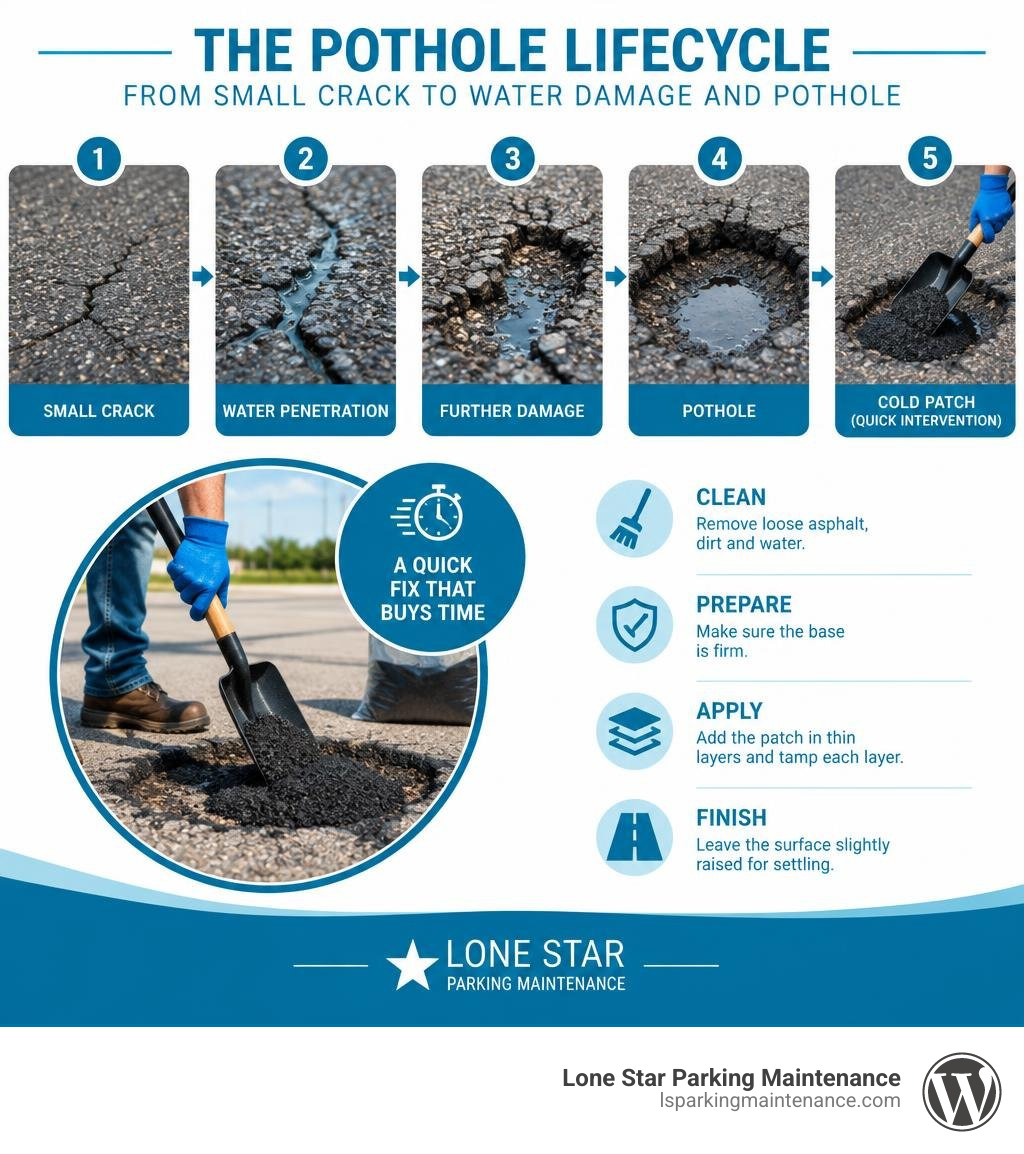
For a small pothole, bagged cold patch is often the cheapest quick fix because you can install it without heating equipment. Remove loose asphalt, dirt, and standing water. Make sure the base is firm, then add the patch in thin layers and tamp each layer hard. Leave the finished surface slightly raised to allow for settling.
That can buy time on a driveway or parking lot, but a sinking patch or soft base needs more than another bag of mix. I’m Cason, and I’ll walk you through the low-cost options and when a bigger repair is worth it.
Understanding Asphalt Patch Materials and Cost-Effective Options

When maintaining paved surfaces across North Texas, keeping water from penetrating the base layer is the single most important rule. A sudden freeze or heavy downpour can turn a hairline fissure into an axle-busting pothole overnight. Pothole repair doesn’t always require commercial paving equipment right away. Selecting the right product will keep your budget intact while providing a reliable surface.
Asphalt patching products fall into distinct categories based on their binder chemistry, aggregate size, and installation requirements. Understanding how these materials behave helps you balance immediate costs against long-term performance, following the essential guide to asphalt repair and protection.
Standard Cold Mix vs. Water-Activated Asphalt Patch
Standard cold mix asphalt uses liquid cutback asphalt or proprietary polymer emulsions to coat graded crushed stone. These standard mixes remain pliable in the bag and rely on air evaporation and mechanical compaction to harden. Many budget-friendly retail blends incorporate over 90% recycled asphalt pavement (RAP), making them an affordable, low-VOC choice.
Water-activated products represent a significant step up in repair technology. Instead of waiting weeks for liquid binders to off-gas, products like AQUAPHALT 6.0 | Water-Activated Cold Asphalt Patch use a specialized, eco-friendly binder that chemically cures when exposed to water. The water serves as the catalyst rather than a weather hazard, locking the aggregate into a permanent, rock-hard matrix within minutes.
Water-activated options are available in multiple aggregate gradations:
- Fine aggregate mixes (around 4.0 mm): Best for shallow surface spalls and thin cracks.
- Medium aggregate mixes (around 6.0 mm): Designed for standard potholes, utility trench reinstatements, and deep depressions.
| Patch Type | Average Cost (50 lb) | Curing Mechanism | Traffic Readiness | Expected Durability |
|---|---|---|---|---|
| Standard Cold Patch | $15 – $25 | Air drying / Solvent evaporation | Immediate (soft initially) | 1 to 2 Years (Temporary) |
| Water-Activated Patch | $50 – $65 | Chemical reaction via H₂O | Immediate (hardens fast) | 3 to 5+ Years (Semi-Permanent) |
| Hot Mix Asphalt (HMA) | Contractor Bulk Rates | Thermal cooling & compaction | 24 Hours | 10 to 20+ Years (Permanent) |
Hot Mix vs. Cold Mix Durability and Cost Breakdown
Hot mix asphalt (HMA) remains the gold standard for large-scale municipal road construction and commercial repaving. It requires heating virgin aggregates and asphalt cement to roughly 300°F at an industrial batch plant, transporting it in insulated dump trucks, and compacting it with heavy vibratory rollers before it cools. While HMA delivers unmatched structural longevity, the material logistics make it impractical for individual DIY pothole fixes. Batch plants often have minimum order tonnages, and mobile heating units are expensive to rent.
For single potholes or small repair zones, cold mix patches avoid batch plant minimums and equipment rental fees. Standard cold patch serves as an inexpensive temporary plug, while high-performance water-activated patches offer a near-permanent solution without the hot-mix footprint. For broader property budgeting, reviewing the complete guide to parking lot repairs can help determine when isolated patching makes sense versus professional repaving.
Step-by-Step Guide to Inexpensive DIY Pothole Repair
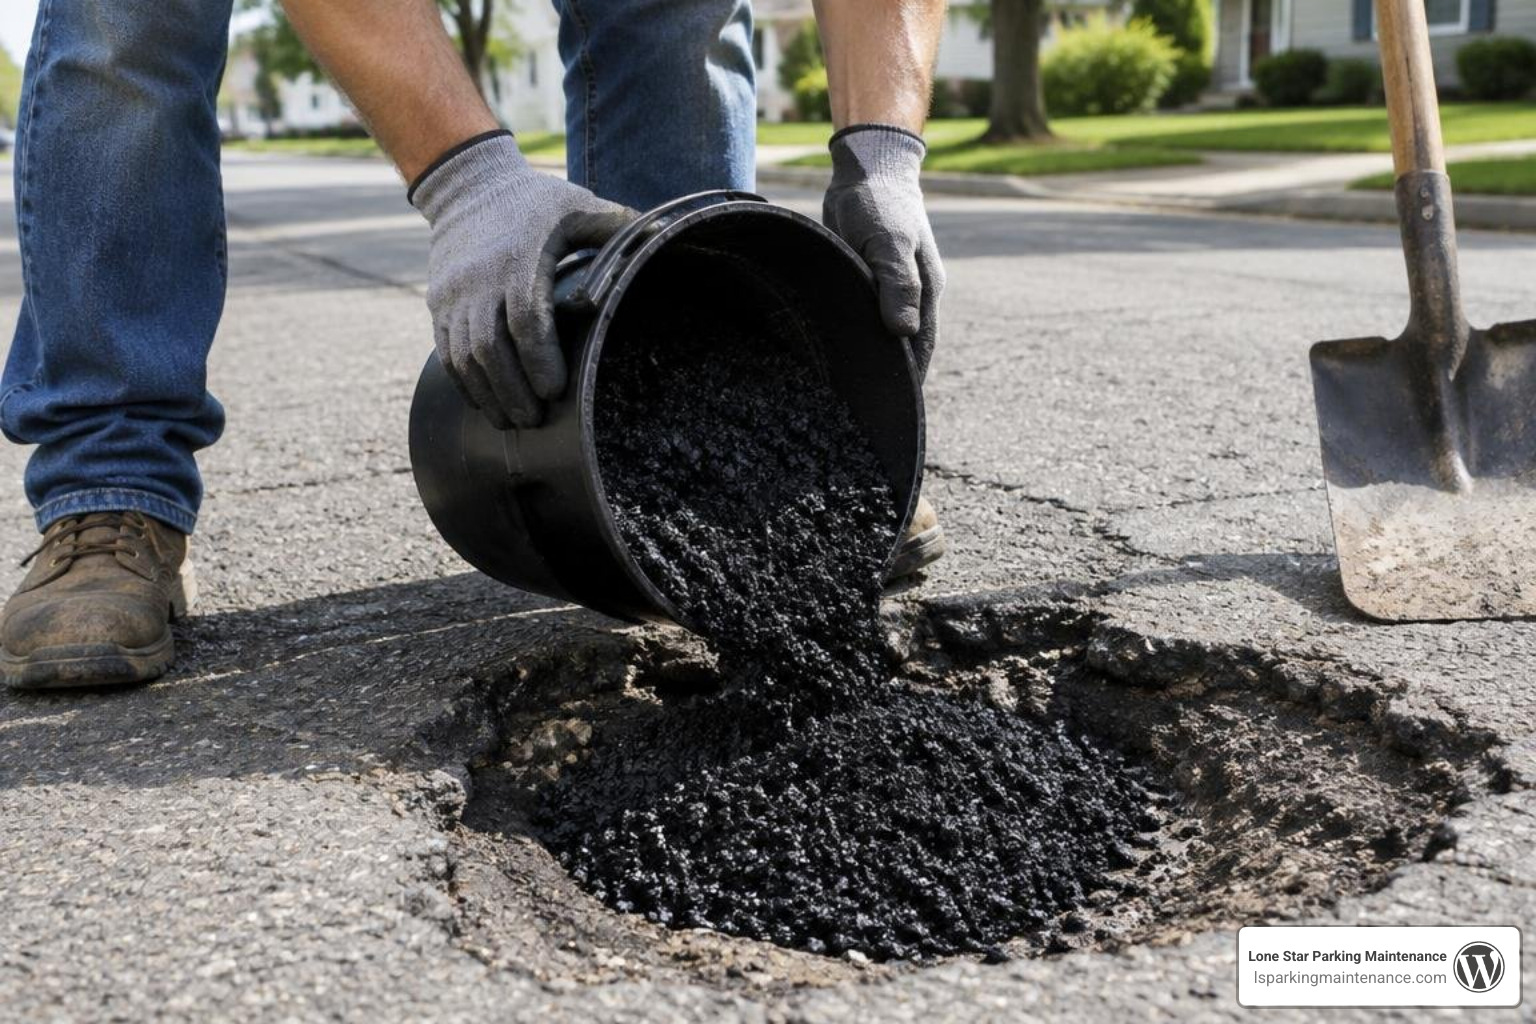
A successful asphalt patch depends heavily on proper preparation. Pouring patching compound directly into a crumbling, debris-filled crater will cause the new material to unravel under heavy tire loads. Taking the time to prepare the foundation ensures your patch lasts.
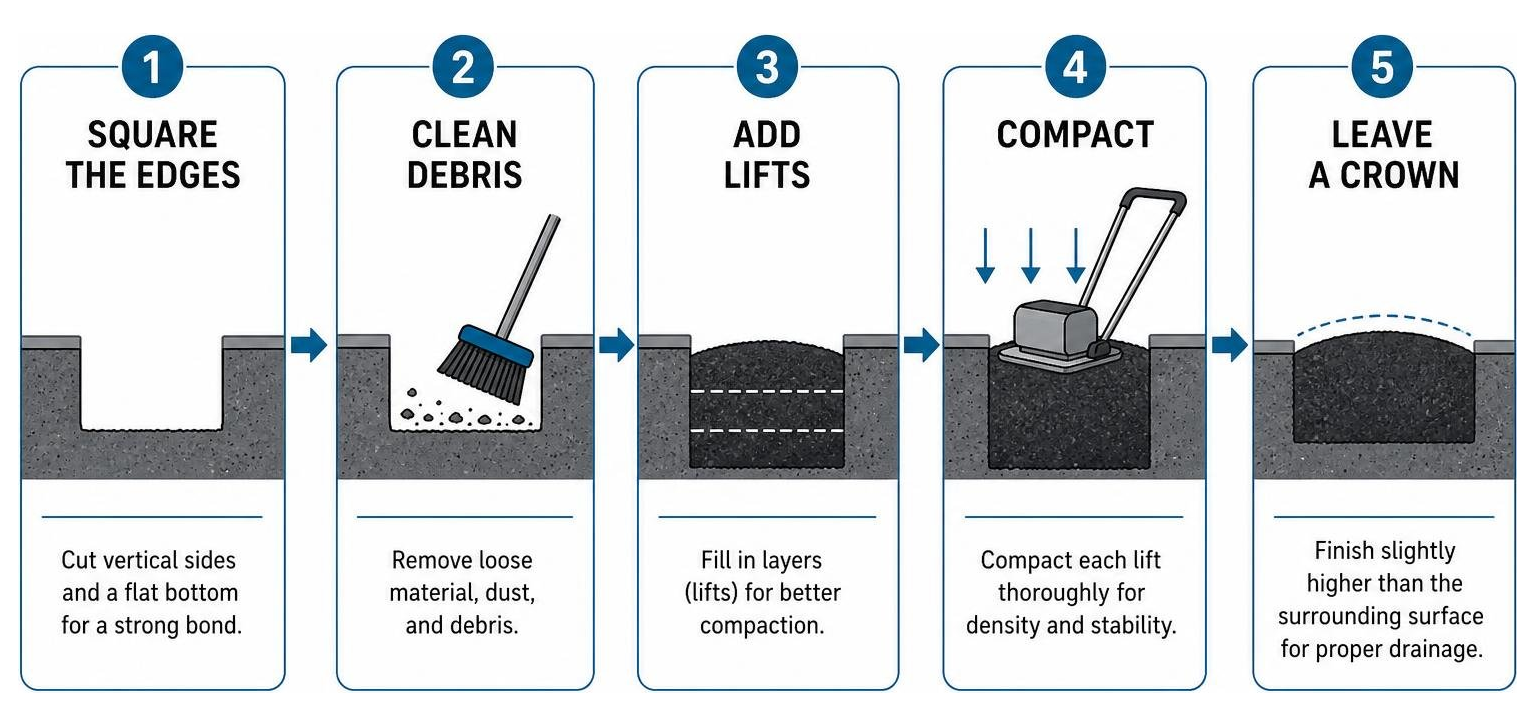
Following a few contractor-tested practices will help you learn how to patch pavement like a pro using basic household equipment.
Essential Tools and Surface Preparation
You don’t need expensive equipment to achieve great results. The following tools will get the job done:
- Stiff-bristle wire broom or shop vacuum
- Flat-blade shovel or margin trowel
- Cold chisel and hand sledge (for squaring edges)
- Standard 8×8-inch steel hand tamper (or a scrap 4×4 post with a flat wooden base)
- Dedicated asphalt cleaner or biodegradable degreaser
- Safety glasses and heavy-duty work gloves
Begin by inspecting the perimeter of the pothole. Asphalt fails from the edges inward, leaving weak, rounded margins. Use a cold chisel or circular masonry saw to square off the hole, creating near-vertical sidewalls. These 90-degree edges provide a solid structural shoulder that keeps the compacted aggregate confined.
Next, remove all loose gravel, dirt, and plant growth from the hole using a wire broom or blower. If oil or motor fluids have contaminated the base, scrub the cavity with an asphalt-safe degreaser and rinse it clean. Refer to the manufacturer’s technical specifications for asphalt cold patch to ensure the surface meets preparation standards. Most importantly, inspect the subbase: if the soil underneath is soft or wet, dig it out and compact a layer of crushed aggregate before applying your patch.
Layering Lifts and Compaction Techniques
Compaction density directly determines how well an asphalt patch resists water and wheel wear. Pouring 4 inches of cold patch into a hole all at once prevents the bottom layer from compacting, leaving a soft core that will rut under vehicle traffic.
- Apply in Lifts: For holes deeper than 1.5 to 2 inches, build the repair in incremental layers (lifts) no thicker than 1 to 2 inches each.
- Compact Each Layer: Use a manual hand tamper or a 4×4 timber block to tamp down each lift before adding the next. Strike the surface firmly until the material stops compressing.
- Crown the Final Lift: Fill the top layer so it sits approximately 1/4 inch to 1/2 inch proud (above) the surrounding pavement grade.
- Final Rolling: Compact the top layer thoroughly. You can place a scrap piece of plywood over the patch and drive a vehicle tire slowly across it several times to achieve high mechanical compaction. The slight remaining crown will settle flush with the driveway over time while shedding rainwater away from the seam.
Weather Adaptations and Multi-Surface Applications
Potholes often appear during the coldest, wettest months of the year when moisture gets into surface micro-fissures and freezes. Knowing how to adjust your patching strategy for different weather conditions and pavement surfaces will help your repairs hold up year-round.
When dealing with fine, linear surface cracks rather than open potholes, you can fix asphalt driveway cracks permanently with cold and hot pour methods instead of using bulk aggregate patches.
How to Apply an Asphalt Patch on Wet Surfaces or Concrete
Standard cutback patches require relatively dry conditions because excess water can prevent the asphalt binder from adhering to the aggregate. If you have to make an emergency winter repair in standing water, choose an all-weather or water-activated patch.
When applying water-activated products:
- Pour the compound directly into the wet depression.
- Add approximately 0.5 gallons of clean water per 50-pound container to trigger the binder reaction.
- Tamp the saturated mix until it forms a dense, solid mass.
Applying to Concrete Surfaces: Cold patch compounds also work well for filling spalls and utility trenches in concrete driveways and walkways. Before applying the material to concrete:
- Chisel away crumbling edges to a minimum depth of 1 inch (feathered edges will flake off).
- Sweep the concrete clean of all dust and slurry.
- Apply a thin asphalt tack coat or concrete bonding primer along the bottom and sides to improve adhesion.
- Install and compact your patch using the same multi-lift method.
Material Estimation and Proper Storage Methods
Running out of material halfway through a repair leaves the base exposed, while buying too much leads to wasted product. A standard 50-pound bag or 3.5-gallon pail yields roughly 0.45 to 0.5 cubic feet of compacted material. This amount covers 5 to 6 square feet at a 1-inch compacted thickness, or about 2.5 square feet at a 2-inch thickness.
To calculate how many 50 lb bags you need for your repair:
$$\text{Bags Needed} = \frac{\text{Length (ft)} \times \text{Width (ft)} \times \text{Depth (in)}}{1 \text{ in} \times 5.5}$$
If you have leftover material, proper storage will keep it usable for future repairs:
- Seal the inner plastic liner tightly with a zip tie to prevent the binder from oxidizing.
- Close the bucket lid securely and store it in a dry location above 50°F (10°C).
- Properly sealed containers maintain a shelf life of up to 12 months.
- If a stored bag feels stiff in cold weather, drop it flat onto a hard concrete surface several times or roll it back and forth to loosen the aggregate before opening.
Common Repair Mistakes and How to Fix Sinking Patches
Most DIY asphalt patch failures happen because of skipped prep work rather than bad materials. Understanding why patches fail will help you avoid costly redos down the road.
Common installation missteps include:
- Feathering the edges: Tapering cold patch down to a razor-thin edge causes the aggregate to break apart. Always maintain a minimum repair depth of 1 inch.
- Under-compaction: Lightly stepping on the mix leaves air pockets, allowing water inside and causing premature rutting.
- Overfilling without tamping: Leaving an uncompacted mound creates a rough bump that gets torn up by passing tires and snowplows.
- Skipping base stabilization: Patching over soft, saturated subbase mud will cause the repair to sink within weeks.
Reviewing don’t let cracks win with these asphalt patching and sealing best practices will help keep your pavement protected throughout the year.
Troubleshooting Failed Pothole Repairs
If an older patch has sunken below the surrounding pavement, you can fix it without starting from scratch:
- Sweep the sunken patch clean and scrape away any loose debris with a wire brush.
- Check the depth of the depression. If the base has settled more than 2 inches, chisel out the loose patch material down to the firm base.
- If the sunken patch is structurally solid but simply sitting low, apply a fresh 1-inch lift of cold patch directly on top.
- Tamp the new layer firmly, leaving a slight 1/8-inch crown above the surrounding asphalt grade.
- Once cured, seal the edges to keep moisture out of the seams.
Safety Precautions, VOCs, and Environmental Benefits
Modern asphalt repair formulations are safer and more eco-friendly than older cutback materials. Many current products incorporate high percentages of recycled asphalt pavement (RAP), keeping tons of aggregate and bitumen out of local landfills. Low-VOC and solvent-free formulas also comply with strict air quality standards, like AQMD Rule 1108.
Take these basic safety precautions during installation:
- Personal Protective Equipment (PPE): Wear safety glasses, long pants, and heavy work gloves to prevent abrasive contact with aggregate and petroleum binders.
- Ventilation: Always work in well-ventilated outdoor areas or open parking structures.
- Skin Cleanup: If asphalt binder gets on your skin, avoid harsh chemical thinners. Natural mineral oil, baby oil, or specialized citrus mechanics’ hand cleaner will safely dissolve the residue. Wash afterward with warm, soapy water.
Frequently Asked Questions About Asphalt Maintenance
How long does cold patch take to cure before driving?
Standard cold patch can handle straight-line vehicle traffic immediately after thorough compaction, though it remains slightly pliable beneath the surface for several weeks. Avoid turning your steering wheel while parked on a fresh patch to prevent scuffing. For water-activated patches, the material chemically sets within 1 to 2 hours. If you plan to sealcoat your driveway, wait at least 30 to 90 days for standard cold patches to fully off-gas and cure.
How much area does a 50 lb bag of patch material cover?
A 50 lb bag covers approximately 5 to 6 square feet at a 1-inch compacted depth, or roughly 2.5 to 3 square feet at a 2-inch depth. Yield can vary slightly based on aggregate gradation and compaction force.
Can you apply a cold patch directly over a soft base or dirt?
No. Applying patch material over soft mud or uncompacted dirt is the leading cause of premature failure. The patch will flex under wheel loads, crack along the edges, and sink into the subgrade. Always dig out soft spots and install a firmly tamped base of crushed aggregate gravel before patching.
Conclusion
Affordable DIY asphalt maintenance comes down to three basic steps: square your edges, clean out loose debris, and compact the material in thin lifts. Using bagged cold mix or water-activated asphalt patch gives property owners an easy, cost-effective way to repair pavement damage before minor potholes become major structural headaches.
For large commercial parking lots, extensive utility trenches, or pavement needing structural rehabilitation, professional equipment and bulk hot mix offer the best long-term value. At Lone Star Parking Maintenance, we keep commercial parking lots, surface facilities, and garages across the DFW Metroplex safe, functional, and looking sharp with striping, sealcoating, sweeping, and comprehensive asphalt repairs.
To find the right product for your next weekend project, check out our guide to the top-rated asphalt patches to fix your driveway fast. For professional commercial maintenance across Dallas-Fort Worth, reach out to our team today for a tailored property assessment.