
Install Garage Wheel Stops for Safer, More Precise Parking
For reliable wheel stop installation for garages, first park the vehicle exactly where it should sit, then mark both front-tire positions. Set the stop far enough from the wall to protect bumpers, cabinets, and walkways – usually 24 to 30 inches in a home garage, or about 1.1 meters where space allows. Align the stop with a chalk line, then secure it with anchors or an approved adhesive for the floor surface.
A properly placed wheel stop gives drivers a clear, repeatable stopping point. It helps prevent wall strikes, protects equipment, and reduces the guesswork that leads to creeping too far forward. It also needs to stay put: a loose or poorly aligned stop can shift under tire contact and become a trip hazard.
I’m Cason, and this guide will walk you through choosing, placing, anchoring, and testing garage wheel stops for a safer parking area.
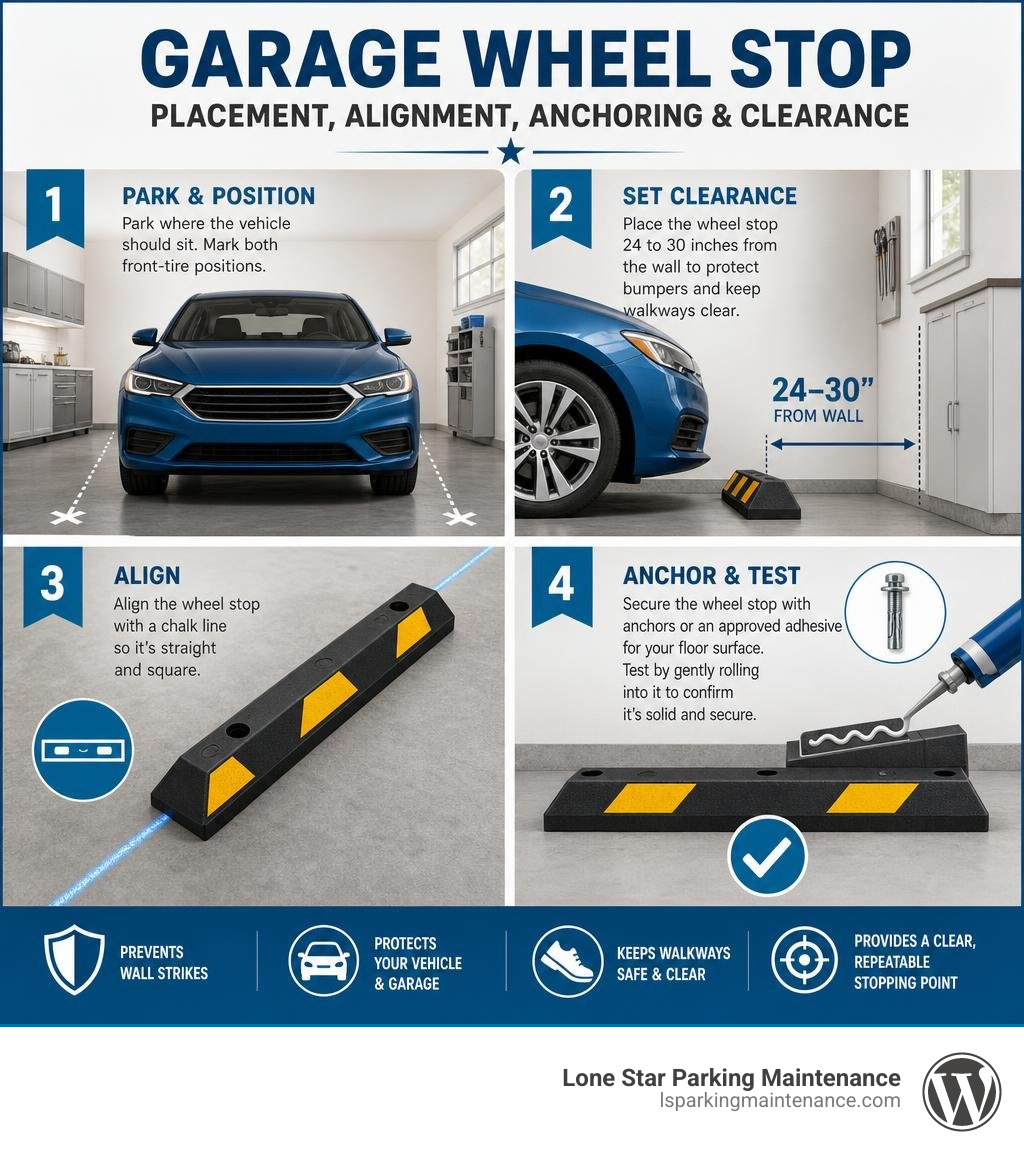
Simple guide to wheel stop installation for garages:
Selecting the Right Material: Rubber, Plastic, or Concrete?
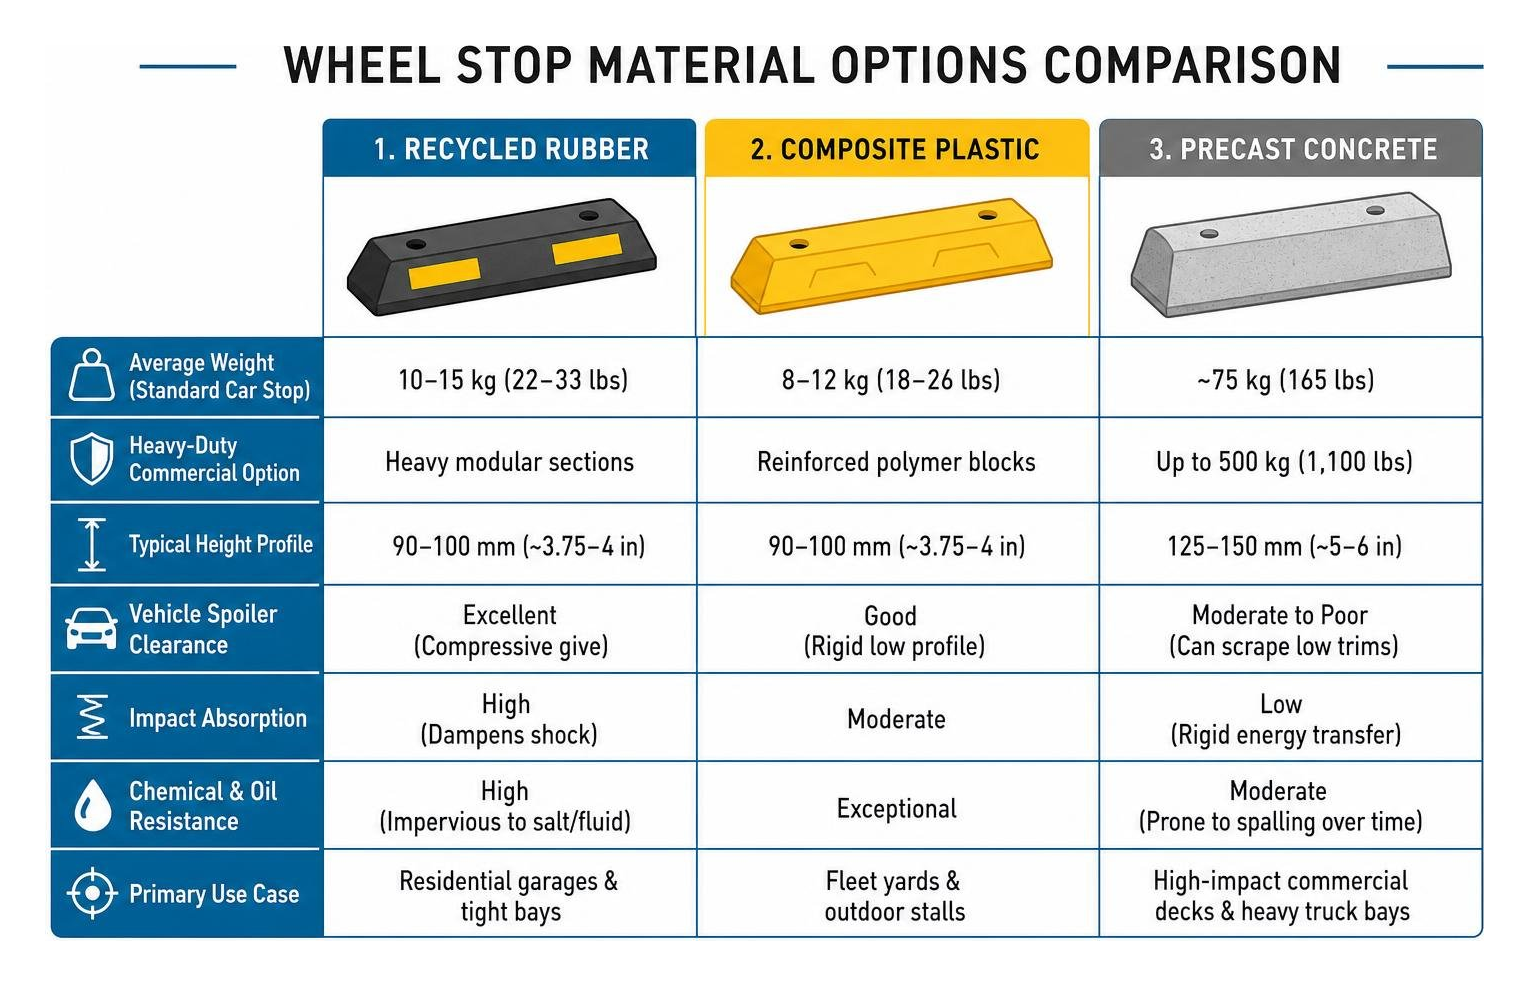
Choosing the right material is the first critical step when outfitting a residential or commercial parking structure. While all parking blocks serve the same primary function—physically halting forward motion—their performance, weight, impact absorption, and installation requirements vary substantially.
| Feature / Metric | Recycled Rubber | Composite Plastic | Precast Concrete |
|---|---|---|---|
| Average Weight (Standard Car Stop) | 10–15 kg (22–33 lbs) | 8–12 kg (18–26 lbs) | ~75 kg (165 lbs) |
| Heavy-Duty Commercial Option | Heavy modular sections | Reinforced polymer blocks | Up to 500 kg (1,100 lbs) |
| Typical Height Profile | 90–100 mm (~3.75–4 in) | 90–100 mm (~3.75–4 in) | 125–150 mm (~5–6 in) |
| Vehicle Spoiler Clearance | Excellent (Compressive give) | Good (Rigid low profile) | Moderate to Poor (Can scrape low trims) |
| Impact Absorption | High (Dampens shock) | Moderate | Low (Rigid energy transfer) |
| Chemical & Oil Resistance | High (Impervious to salt/fluid) | Exceptional | Moderate (Prone to spalling over time) |
| Primary Use Case | Residential garages & tight bays | Fleet yards & outdoor stalls | High-impact commercial decks & heavy truck bays |
1. Recycled Rubber Wheel Stops
Molded from 100% recycled tire rubber, these units provide an eco-friendly, highly resilient solution. Rubber stops naturally compress under load, dissipating dynamic energy from the vehicle rather than transmitting brute force back into the vehicle’s suspension or the garage subfloor.
A standard 96mm height profile is engineered specifically to comply with modern dimensional standards (such as AS/NZS 2890.1:2004), ensuring optimal contact with tires while eliminating low-hanging front spoiler scraping. Rubber stops are lightweight enough for one-person handling, making them the top choice for residential setups and multi-bay parking decks.
2. Composite Plastic Wheel Stops
Engineered from solid or hollow high-density polyethylene (HDPE) resins, plastic stops offer extreme resistance to automotive fluids, brake dust, and UV degradation. They come in bright molded colors—such as safety yellow or handicap blue—eliminating the need for periodic repainting. However, because plastic lacks the internal dampening of rubber, improper anchor tightening can cause thin-walled plastic flanges to crack over years of heavy use.
3. Precast Concrete Wheel Stops
Precast concrete remains an industry benchmark for external commercial parking lots. Reinforced with internal steel rebar, these blocks deliver unyielding physical resistance. A standard 6-foot concrete curb weighs approximately 165 pounds, while industrial-grade truck blocks reach upwards of 1,100 pounds. Because of their weight, transport is resource-intensive—a standard flatbed freight load holds only about 42 heavy-duty concrete units.
For commercial decks where structural anchoring or heavy commercial delivery vans are present, reviewing the reasons why every commercial lot relies on a solid parking space concrete stop provides clear context on structural load management.
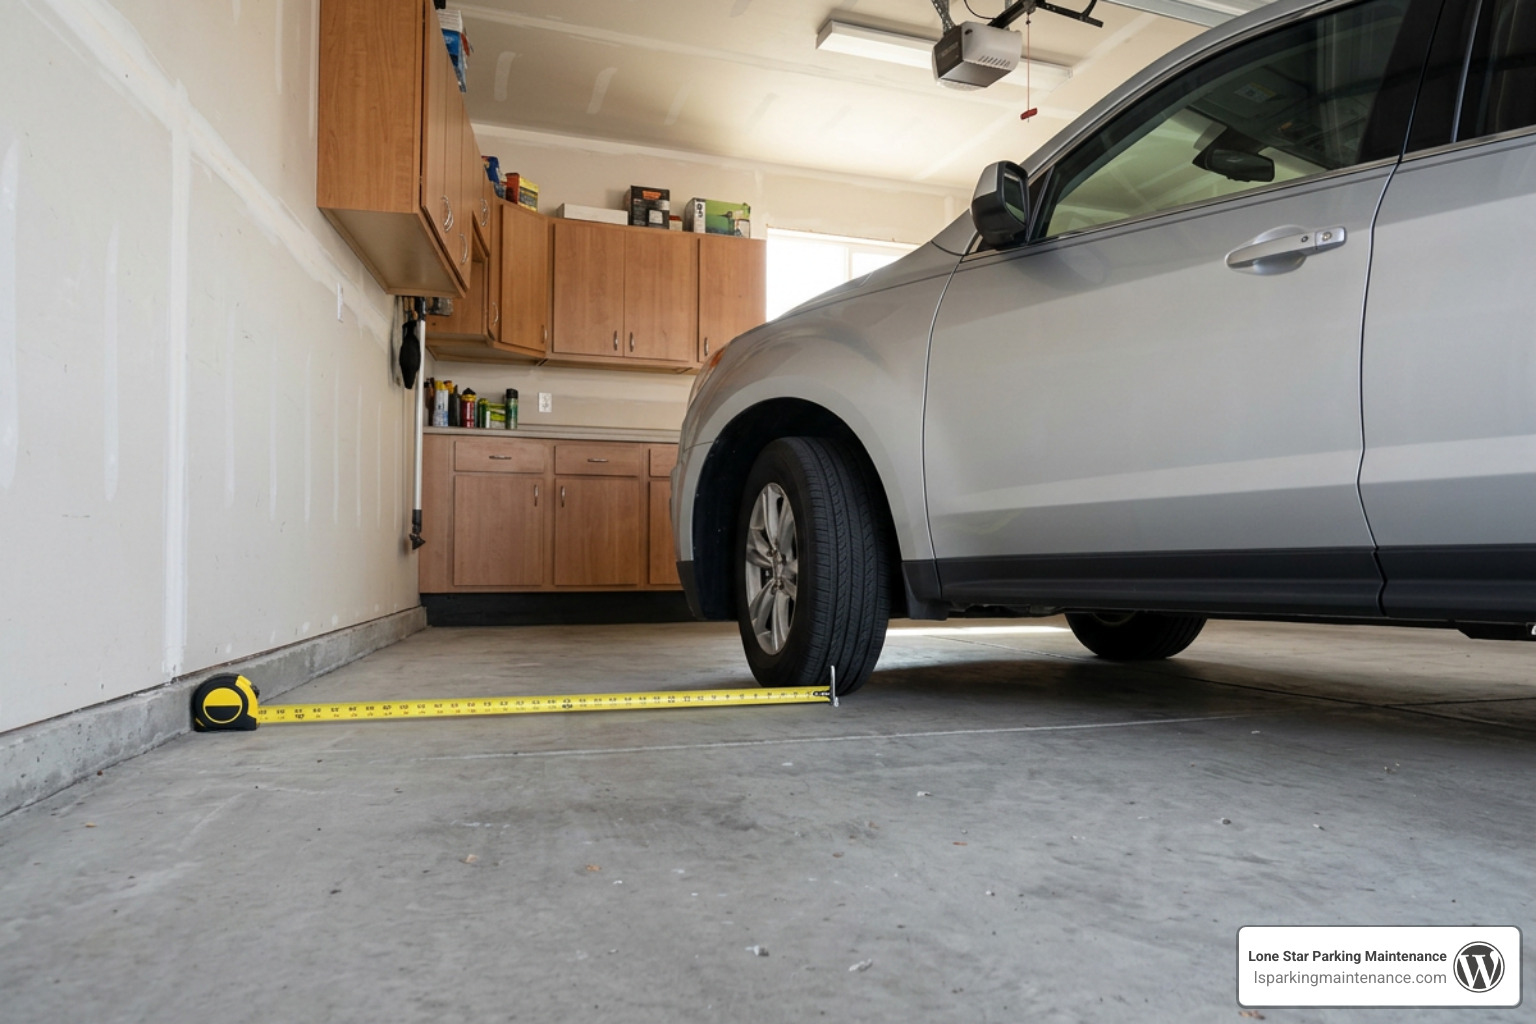
Determining Placement, Setback, and Floor Alignment
Improper setback is the leading cause of wheel stop failures and vehicle damage. If the block is placed too close to the garage wall, front bumpers or aftermarket grilles will slam into drywall, structural columns, or utility meters before the tires reach the stop. If placed too far back, the rear of the vehicle will protrude into the overhead door opening or cross-aisle.
Calculating the Wall Setback
To calculate the ideal positioning for a residential garage:
- Drive the Vehicle In: Carefully position the car where you want it parked, confirming that you have at least 12 to 18 inches of walkway space behind the rear bumper when the overhead garage door is fully closed.
- Measure the Front Overhang: Check the front bumper clearance. Ensure there is at least a 24 to 30-inch spacing (or up to 1.1 meters / 3′ 7″ for long-nose trucks and SUVs) between the front wall/cabinets and the leading edge of the front tires.
- Establish a Safety Buffer: Include a 1-inch compression allowance. When tires make contact with a stop, radial tire bulge compresses slightly under low-speed momentum.
Alignment Across Both Wheel Tracks
Eyeballing the position of a wheel stop is a recipe for crooked parking. Both front tires must meet the block simultaneously so the braking force is distributed evenly.
- Chalk Line Snapping: Measure out from the back wall to the front face of each planned anchor point on both the driver and passenger sides. Snap a vibrant chalk line across the bay floor to establish a true perpendicular reference.
- Centerline Calibration: Align the center axis of your 1,650mm standard wheel stop with the vehicle’s track width. If using two split blocks, align each individual block directly in the center of each wheel track path.
For broader commercial layout considerations, our practical guide on proper wheel stop placement covers critical lane geometry and pedestrian clearance standards. You can also review comprehensive technical parameters outlined in the Wheel Stop Installation Guide to match specific vehicle profiles.
Step-by-Step Wheel Stop Installation for Garages
Proper installation creates a durable, reliable barrier. The entire process follows a structured sequence from surface prep to final anchoring:
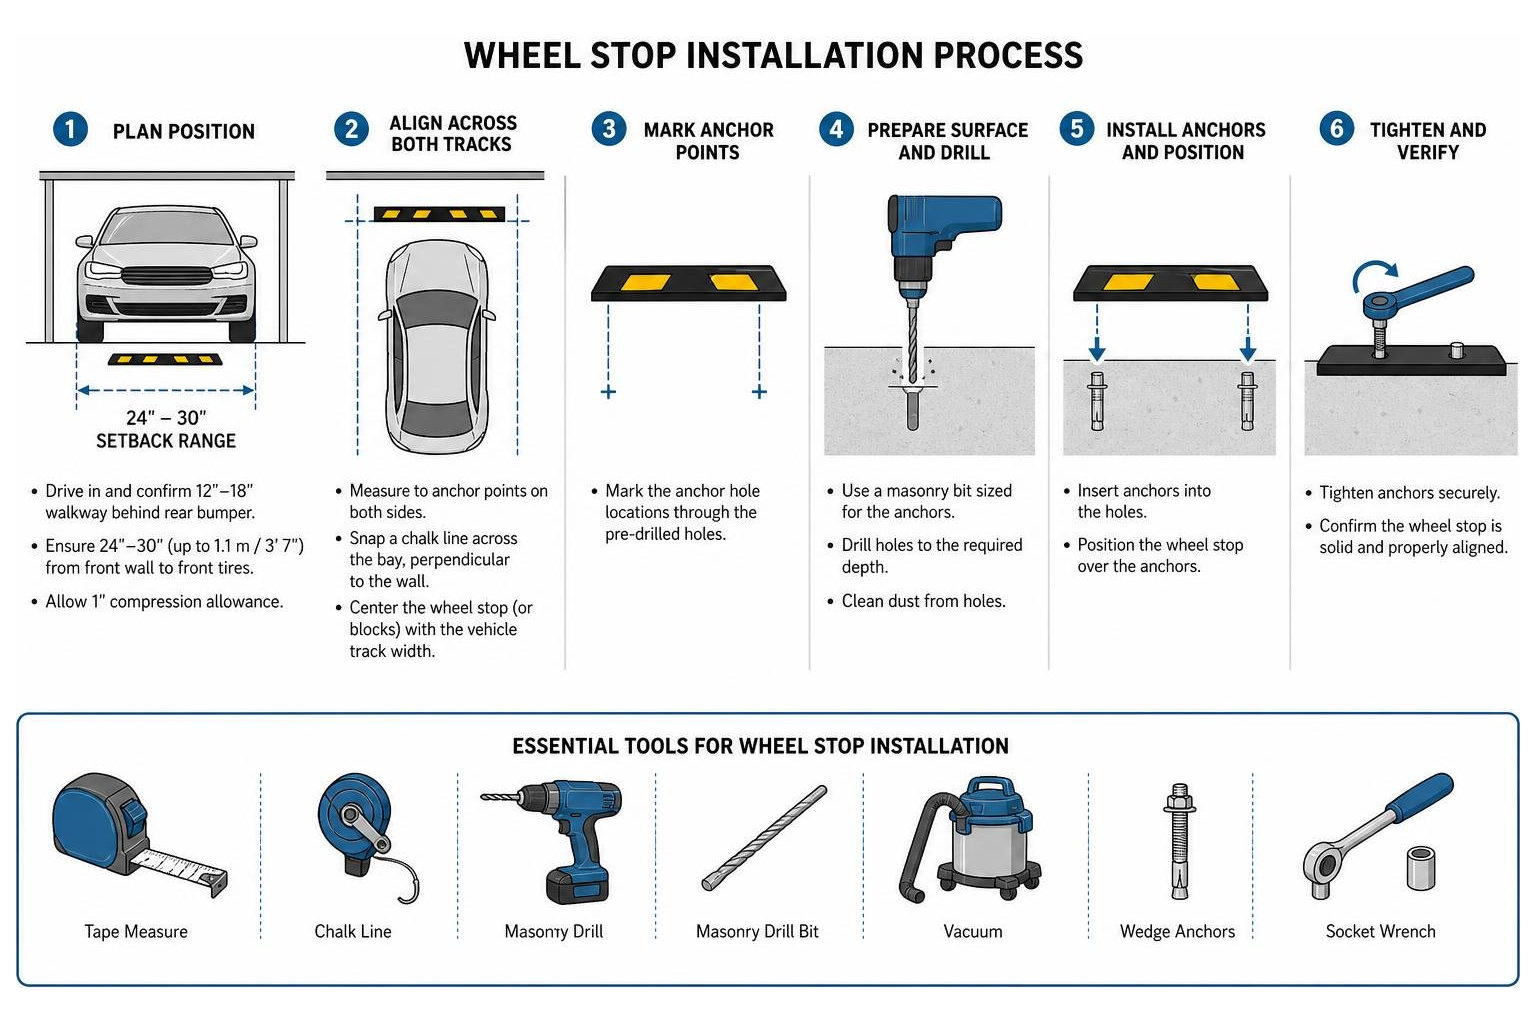
When performing a permanent mechanical install, you must have the appropriate masonry tooling to avoid spalling concrete or shearing anchor bolts.
Essential Tools for Wheel Stop Installation for Garages
Gather your equipment before beginning:

- Rotary Hammer Drill (SDS-Plus): Standard hammer drills struggle in high-PSI slab concrete. An SDS rotary hammer speeds up penetration and prevents bit binding.
- Masonry Drill Bits: A Ø12mm (approx. 1/2-inch) bit for drilling pilot holes and an Ø18mm (approx. 11/16 to 3/4-inch) bit for primary expansion anchor bores.
- Blow-Out Bulb / Shop Vacuum: For removing crushed stone and silica dust from drilled holes.
- Impact Driver or 1/2″ Ratchet Wrench: Equipped with appropriate deep-well sockets.
- Rubber Mallet: To seat mechanical sleeves flush without marring powder-coated surfaces.
- Chalk Reel & Heavy-Duty Tape Measure: For layout verification.
- PPE: Safety goggles, hearing protection, and an N95/P100 respirator mask (for silica dust control).
Step-by-Step Bolting and Drilling Process
Executing a secure mechanical installation on a solid concrete garage slab requires drilling precise anchor holes and setting the hardware properly. For a streamlined breakdown of the basics, check our walkthrough on how to install wheel stops in 5 simple steps.
Step 1: Layout Verification and Hole Marking
Position the wheel stop along your snapped chalk line. Using a center punch or a masonry bit dropped through the unit’s pre-drilled fixing channels, score the concrete floor to clearly mark each drilling location. Slide the wheel stop aside.
Step 2: Drilling the Pilot and Anchor Bores
Fit your rotary hammer with the Ø12mm pilot bit. Set the drill depth gauge to 115–125 mm (approx. 4.5 to 5 inches).
- Drill your pilot holes vertically, keeping the drill body level.
- Switch to the final Ø18mm masonry bit and bore the final anchor holes to depth. Ensure the hole depth exceeds the fixing bolt length by at least 20–25 mm to allow room for residual debris.
Step 3: Evacuating Concrete Dust
Never skip this step! Residual concrete dust prevents anchors from expanding properly against the sidewall of the hole. Insert the nozzle of a shop vacuum or hand blow-bulb directly to the base of the hole and extract all loose concrete powder.
Step 4: Seating the Anchors
Place high-density nylon expansion plugs or steel drop-in anchors into each hole. Tap them gently with a rubber mallet until the top rim sits completely flush with the garage slab surface.
Step 5: Fastening the Wheel Stop
Reposition the wheel stop over the anchor sleeves. Drop heavy-duty galvanized coach screws (or M10/M12 concrete bolts) fitted with broad washers into the mounting holes. Use an impact driver or socket wrench to drive the screws home. Tighten firmly until the washer compresses into the molded recess, securing the stop without over-torquing the material.
Step 6: Finishing with Protective Plugs
Push the supplied UV-resistant rubber or plastic blanking caps into the top of the bolt countersinks. These caps seal the hardware away from standing water, road salt, and dirt, ensuring easy future removal if maintenance is required. For expanded commercial mounting specs, consult the manufacturer Wheel Stop Installation Guidelines.
Adhesive and Non-Drill Wheel Stop Installation for Garages
There are situations where drilling into the garage floor is strictly prohibited—most notably in residential structures with post-tensioned (PT) concrete slabs (drilling into high-tension steel cables inside the slab can cause catastrophic structural failure) or high-end epoxy floors where owners want to avoid penetration holes.
In these cases, heavy-duty chemical bonding is the preferred alternative:
- Surface Degreasing & Abrasion: Clean the contact zone thoroughly with an industrial degreaser to remove tire oil, grime, and sealers. For epoxy or sealed surfaces, lightly score the bonding footprint using 60-grit sandpaper or a diamond cup wheel to create a mechanical anchor profile.
- Adhesive Selection: Use a moisture-curing, heavy-duty polyurethane elastomeric adhesive or a two-part structural epoxy mastic formulated for roadway applications.
- Application Pattern: Apply the adhesive in continuous serpentine beads along the underside base channels of your rubber or composite wheel stop, maintaining a 1/4-inch bead thickness.
- Weighted Setting: Place the stop precisely along your alignment line and press firmly. Place two 50 lb sandbags across the top surface to ensure even, continuous downward pressure.
- Cure Time: Allow a minimum of 24 to 48 hours of cure time at 70°F (longer in cool weather) before allowing vehicle tires to make contact with the unit.
Anchoring on Asphalt, Bitumen, and Specialized Surfaces
Asphalt and bitumen present unique anchoring challenges because asphalt is a flexible bituminous pavement rather than a rigid cementitious slab. Standard expanding concrete anchors will pull loose, crack the asphalt binder, or jack upward under dynamic horizontal tire loads.
When securing wheel stops to asphalt garage aprons, parking decks, or bitumen pads, specialized fixing hardware is essential:
- Galvanized Steel Roadway Spikes: For external asphalt entries, 300mm long by 12mm thick (12″ x 1/2″) galvanized fluted steel spikes are driven through the stop directly into the base course. The flutes grab the compacted base aggregate beneath the asphalt.
- Aerated Asphalt Expansion Anchors: Specialized expanding plugs (such as Hilti HGN-series anchors) feature wide exterior threading that mechanically engages soft bituminous mixtures.
- Chemical Anchor Hybrids: For premium stability, contractors drill a pilot hole, inject structural polyester resin into the asphalt void, and insert a threaded rod. Once chemically cross-linked, the anchor resists extreme shear forces without wallowing out the asphalt.
For a comprehensive review of road base fixings and commercial hardware setups, refer to our complete wheel stops installation manual.
Testing, Vehicle Clearance, and Common Mistakes to Avoid
Once the mechanical anchors are tightened or the adhesive has fully cured, perform a systematic operational test before finalizing your garage setup.
The Vehicle Test Drive
- Low-Speed Approach: Pull your vehicle into the bay at normal parking velocity (approx. 2–3 mph).
- Evaluate Tactile Feedback: As the front tires contact the stop, you should feel a firm, distinct tactile rise without excessive bounce or harsh metal-on-concrete jarring.
- Check Clearances: Put the vehicle in park, turn off the engine, set the emergency brake, and walk around the vehicle:
- Check the front bumper clearance to verify it is not touching the stop, wall, or cabinetry.
- Walk to the rear of the vehicle and lower the motorized overhead garage door. Verify there is at least 6 to 12 inches of clearance between the closed door panel and the rear bumper or trailer hitch.
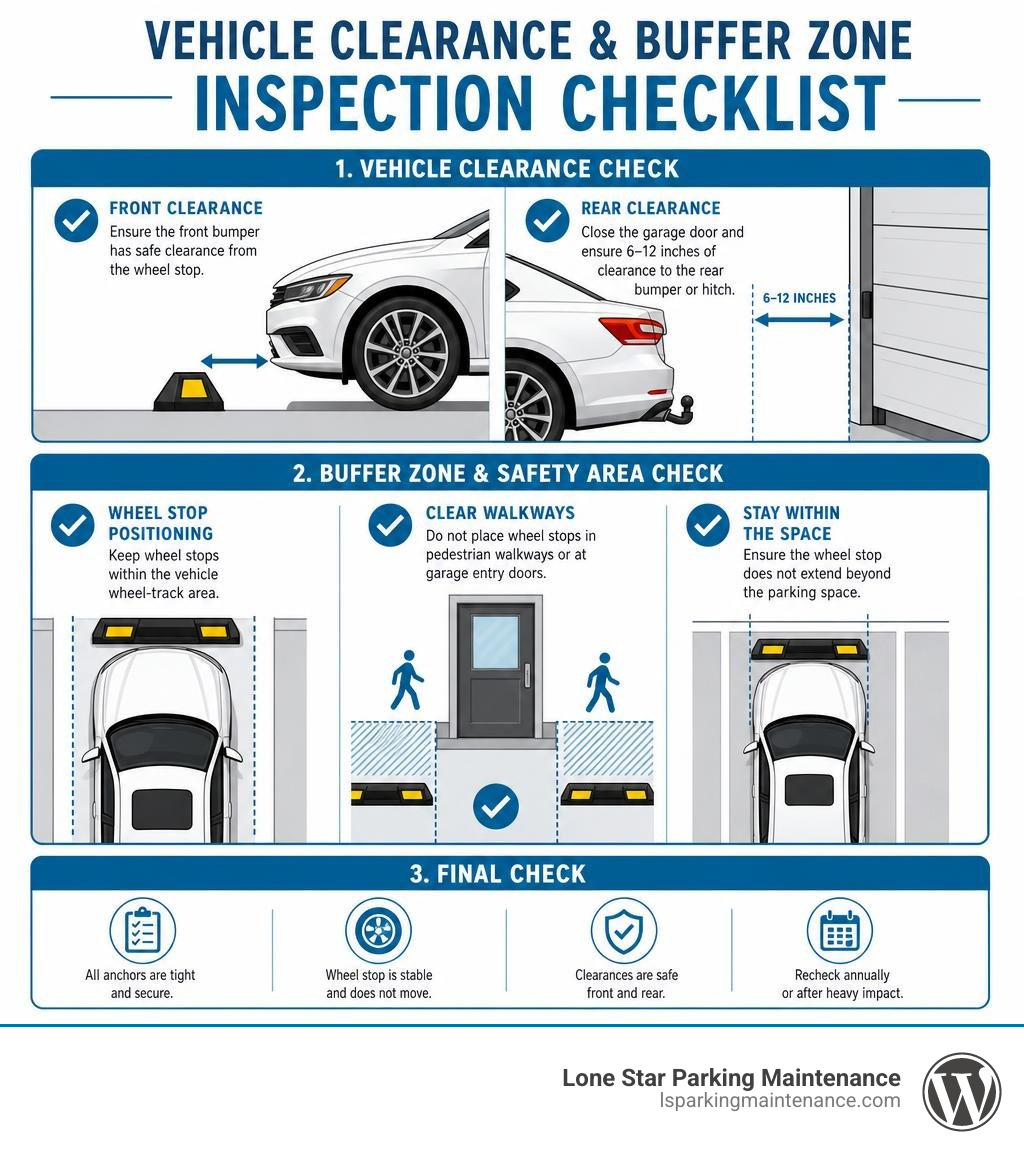
Common Mistakes to Avoid
- Under-Anchoring the Unit: Relying solely on the self-weight of a lightweight 25 lb rubber stop will inevitably cause it to slide, rotate, and fail under repetitive braking force.
- Ignoring Low-Profile Ground Effects: Installing a commercial-grade 150mm (6″) high concrete curb in a garage housing modern sedans or sports cars will tear off front splitters. Keep garage units in the 90–100mm height range.
- Creating Pedestrian Trip Hazards: Avoid placing wheel stops that extend across pedestrian paths to garage entry doors. Wheel stops should remain strictly inside the vehicle wheel-track envelope.
- Neglecting Annual Anchor Checks: Dynamic loads cause bolts to settle. Perform an annual torque inspection to re-tighten any hardware that has backed out due to thermal cycles and vibration.
Understanding the baseline principles in our wheel stoppers overview will keep your facility safe and compliant over the long haul.
Frequently Asked Questions about Garage Wheel Stops
How far from the garage wall should a wheel stop be installed?
For standard passenger vehicles, SUVs, and light trucks, the leading front face of the wheel stop should be placed 24 to 30 inches away from the front wall or storage cabinets. For longer-wheelbase trucks, full-size vans, or vehicles with oversized front overhangs, increase this setback distance up to 1.1 meters (approx. 43 inches), provided your total garage depth accommodates the vehicle’s rear overhang without obstructing the overhead door.
Can you install a wheel stop on epoxy-coated garage floors without drilling?
Yes. If your garage slab has a high-gloss epoxy coating or you have a post-tensioned foundation where drilling is prohibited, use a high-strength polyurethane construction adhesive or roadway epoxy mastic. The epoxy surface must be lightly abraded with coarse sandpaper to remove the gloss finish, thoroughly cleaned of all residual dust, and allowed to cure under static weight for 24 to 48 hours before parking against it.
Do single-car garages need one long stop or two individual blocks?
Both configurations are effective. A single standard unit (typically 1,650 mm / 65 inches long) covers the entire front axle span and eliminates the risk of missing a stop if entering at an angle. However, two individual modular blocks (each positioned beneath the driver and passenger tire tracks) offer two distinct benefits: they make sweeping or hosing out dirt and debris easier through the open center channel, and they leave floor drainage grates unblocked.
Conclusion
Precision parking protects your garage walls, preserves your vehicle’s bodywork, and keeps daily parking stress-free. By selecting the right wheel stop material, establishing accurate wall setbacks, and securing your blocks with the proper mechanical or adhesive fasteners, you ensure a clean, reliable stopping point for years to come.
Whether you are upgrading a residential workshop or managing commercial parking structures across the Dallas-Fort Worth Metroplex, our team at Lone Star Parking Maintenance delivers industry-leading pavement striping, structural floor repair, and professional curb stop installation services. Reach out to our team today to ensure your facility is safe, durable, and built to code.